
Macrame Heart Bracelet - Free Tutorial

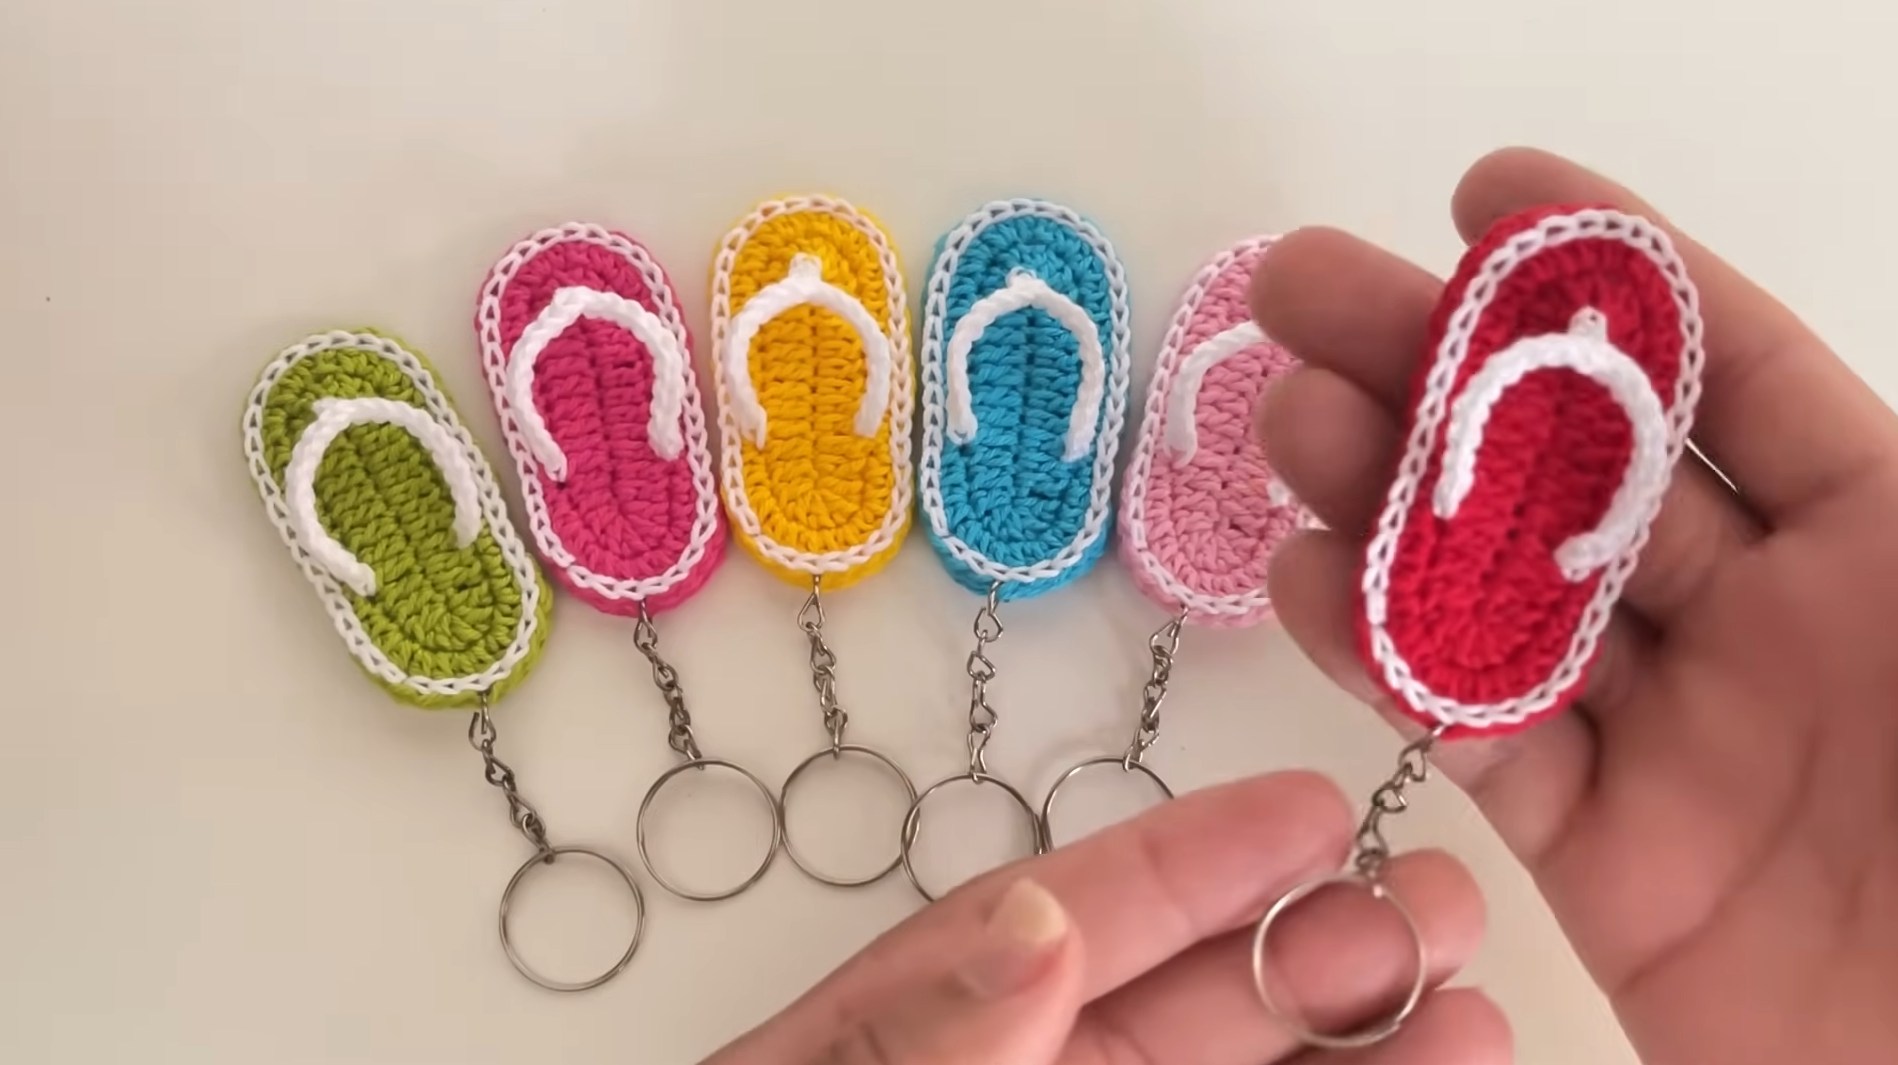
If you are looking for a fun, quick, and practical crochet project, the Crochet Slipper Keychain is a perfect choice. This adorable mini accessory combines functionality with creativity and makes for a wonderful gift, a craft fair bestseller, or a charming personal item.
Whether you are a beginner or an experienced crocheter, this small yet delightful project is both enjoyable and rewarding.
The Crochet Slipper Keychain is not only cute but also highly versatile. You can customize it with different colors, patterns, and embellishments, turning each keychain into a tiny work of art. It’s an excellent way to use up scrap yarn while practicing various crochet techniques.
In this article, you will learn step-by-step how to create your own Crochet Slipper Keychain, from selecting the right materials to assembling and adding finishing touches. We will also explore creative ways to personalize your keychain and answer some of the most common questions about this project.
To begin crafting your Crochet Slipper Keychain, you’ll need a few simple materials that are easy to find and budget-friendly.
First, choose your yarn. A lightweight or medium-weight cotton or acrylic yarn works best for this project. Cotton yarn is particularly good because it holds its shape and offers durability, which is important for keychains that endure frequent use.
A small crochet hook, typically between 2.5mm and 3.5mm, is ideal for making tight stitches that keep the slipper’s shape intact. Check your yarn label for suggestions, but slightly smaller hooks are preferred for amigurumi-style firmness.
You will also need a metal keychain ring or lobster clasp. These are widely available at craft stores and online, and they allow you to easily attach your Crochet Slipper Keychain to keys, bags, or backpacks.
A yarn needle is essential for weaving in ends and assembling the slipper parts neatly. This helps give your finished keychain a polished and professional look.
Small amounts of fiberfill or stuffing can be used to give the slipper a slightly puffy, realistic appearance, though this is optional depending on your design preference.
Lastly, prepare scissors, stitch markers, and optional decorative elements such as buttons, tiny bows, or beads to personalize your Crochet Slipper Keychain.
The foundation of the Crochet Slipper Keychain is the slipper base, which forms the sole and body of the mini shoe. This is where your creativity begins.
Start by crocheting an oval shape for the sole. Begin with a chain of about 6 to 8 stitches, depending on the desired size. Work single crochets along one side, add increases at the ends, and continue along the other side to form a rounded sole.
Repeat rounds with increases at the ends to make the sole slightly wider and longer. Keep the stitch count consistent on the sides to maintain a slipper shape rather than a circle.
Once the sole is complete, begin working in the round without increases to build the sides of the slipper. This creates the walls that give the Crochet Slipper Keychain its realistic shoe-like form.
After a few rounds, start shaping the toe. This usually involves decreasing stitches at the front while maintaining the sides and back. The toe area should look rounded and closed off.
Finish the upper edge with a round of slip stitches or single crochets to give it a neat finish. This edge also provides a strong area where you can later attach the keyring.
Test the slipper shape by folding it slightly. It should look like a miniature house shoe or sandal, and the structure should be firm enough to hold its shape without sagging.
Now that you have the base, it’s time to bring your Crochet Slipper Keychain to life with assembly and decoration. This is the most creative part of the process.
First, weave in all loose ends using a yarn needle to ensure your slipper looks clean and polished. This step is essential for durability, especially since keychains are handled often.
Attach the metal keychain ring by threading a small loop of yarn or using a jump ring. Secure it firmly to the back or side of the slipper, depending on the look you prefer.
If you want a puffy look, lightly stuff the toe or the whole slipper with fiberfill. This adds dimension and makes the Crochet Slipper Keychain feel more substantial in hand.
Add decorations to personalize your slipper. Tiny buttons, embroidered flowers, or even miniature bows look adorable. These small details make each keychain unique.
You can also crochet embellishments such as a tiny strap across the top, a faux buckle, or a small flower to attach to the side. These additions elevate the design from simple to standout.
Once assembled, double-check all attachments for strength. The keychain ring should be secure, and any embellishments should be tightly sewn or glued to withstand daily use.
The Crochet Slipper Keychain is more than just a key holder; it’s a charming gift, a conversation starter, and a versatile craft item. Here are some creative ideas for using it.
Gift them as party favors for baby showers, weddings, or birthday parties. You can customize the slipper colors to match the event theme, making them thoughtful keepsakes.
Sell them at craft fairs or online. The Crochet Slipper Keychain is a popular item because it’s quick to make, uses little yarn, and appeals to a wide audience.
Create matching sets with other mini crochet items like hats, bags, or tiny amigurumi characters. Bundling these items together makes for an irresistible gift package.
Use them as bag charms for backpacks, purses, or luggage. The lightweight yet durable slipper adds a splash of handmade charm wherever it’s displayed.
Make them in various colors to represent different moods, seasons, or holidays. For example, use red and green for Christmas, pastels for spring, or bold colors for summer.
You can also use the same slipper pattern to create larger items like ornaments or decorations. Simply increase the yarn weight and hook size to scale up the pattern.
Is the Crochet Slipper Keychain beginner-friendly?
Yes, it’s a great project for beginners. The stitches used are simple (single crochet, slip stitch, increases, and decreases), and the project is small, making it easy to complete quickly.
What type of yarn is best for a Crochet Slipper Keychain?
Cotton yarn is ideal because it holds its shape well and is durable. However, acrylic yarn also works if you prefer more color variety or softer textures.
Can I wash the Crochet Slipper Keychain?
Yes, but it’s best to hand wash it gently, especially if it has metal parts like a keyring or delicate decorations. Lay flat to dry to preserve the shape.
How long does it take to make one keychain?
On average, it takes about 30 to 60 minutes to complete one Crochet Slipper Keychain, depending on your crochet speed and the complexity of decorations.
Can I sell Crochet Slipper Keychains I make?
Absolutely! Handmade keychains are popular at markets, craft fairs, and online shops. Just make sure to use your own photos and descriptions if listing them for sale.
How do I attach the keyring securely?
The keyring can be attached by crocheting a small loop at the back of the slipper or by sewing a jump ring through the edge stitches. Secure the attachment tightly to prevent it from coming loose.
In this guide, we’ve explored how to create a charming and functional Crochet Slipper Keychain, covering everything from materials and basic steps to assembly and creative applications.
The Crochet Slipper Keychain is not only a delightful project but also a wonderful way to use your crochet skills to make practical, beautiful items for yourself or as gifts. With endless customization possibilities, every keychain you make becomes a unique piece of handmade art.
I hope you’ve enjoyed this tutorial and feel inspired to start your own collection of mini crochet slippers. Please leave your honest opinion in the comments below. Your feedback, suggestions, and ideas are always welcome and help make this community even better for crochet lovers like you!


