
Macrame Heart Bracelet - Free Tutorial

If you’re looking for a cozy and creative project, Crochet Slippers – FREE PATTERN is the perfect choice.
Handmade slippers offer warmth, comfort, and a personal touch that store-bought pairs simply can’t match. Whether you’re crafting for yourself, a loved one, or as a thoughtful gift, crocheting slippers is both practical and rewarding.
The beauty of crochet slippers lies in their versatility. They can be made in various styles, colors, and sizes to suit everyone’s taste.
Additionally, the free pattern provided in this article will guide you step by step, making it easy to create your own unique pair of slippers even if you’re a beginner.
In this tutorial, we’ll walk you through the materials, techniques, and creative options for making crochet slippers. By the end of this guide, you’ll have all the knowledge needed to start your project confidently.
Before starting your Crochet Slippers – FREE PATTERN, gather the right materials to ensure a smooth and enjoyable crafting process. Having the proper tools and yarn makes all the difference in the final product.
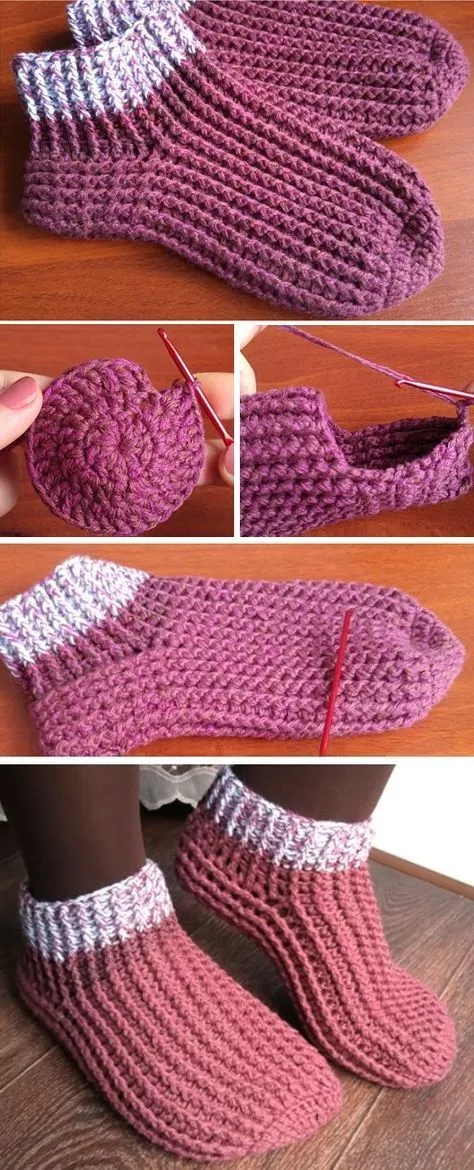
Follow these simple steps to create your own Crochet Slippers – FREE PATTERN. The process is beginner-friendly and can be customized to your liking.
One of the joys of crocheting is the ability to personalize your creations. Here are some ways to make your Crochet Slippers – FREE PATTERN stand out.
Crocheting slippers can be a straightforward process, but these tips will help ensure your project turns out beautifully.
Q: Are crochet slippers beginner-friendly?
A: Yes, most crochet slipper patterns, including the one provided here, are simple enough for beginners to follow.
Q: What is the best yarn for slippers?
A: Acrylic and wool blends are ideal due to their durability, warmth, and affordability.
Q: Can I adjust the slipper size?
A: Absolutely! You can modify the sole length and width to fit any foot size.
Q: How do I make my slippers non-slip?
A: Add non-slip soles, fabric glue dots, or puff paint to the bottoms for extra grip.
Q: How long does it take to crochet a pair of slippers?
A: The time varies depending on your skill level and the pattern, but most pairs can be completed in a day or two.
Q: Can I machine wash crochet slippers?
A: It depends on the yarn used. Acrylic yarn is usually machine washable, while wool requires handwashing. Always check the yarn label for care instructions.
The Crochet Slippers – FREE PATTERN is a delightful project that combines creativity, comfort, and practicality. From selecting the perfect materials to customizing your design, crocheting slippers is an enjoyable experience that results in a truly personalized item.
We hope this guide has inspired you to create your own pair of crochet slippers. Share your thoughts, experiences, and suggestions in the comments below. We’d love to hear about your journey and see your completed projects. Happy crocheting!


