
Macrame Heart Bracelet - Free Tutorial

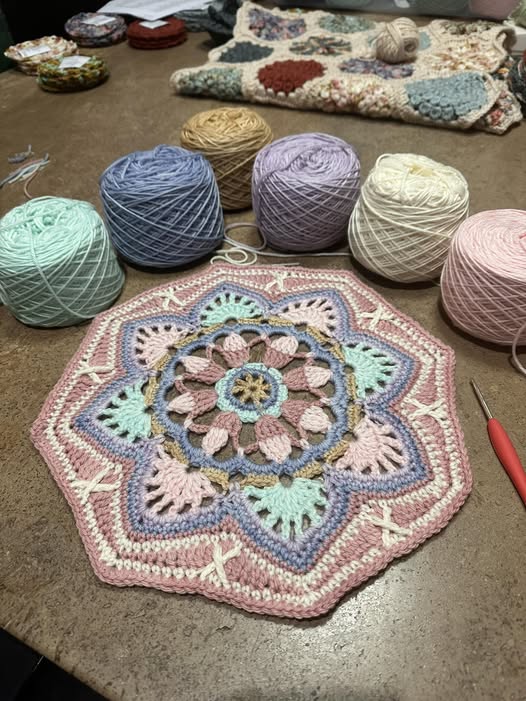
Crochet Sousplat – Step by Step is a wonderful project for both beginners and experienced crocheters who want to add a handmade touch to their dining table. A crochet sousplat is a decorative table accessory that sits under your plates, creating an elegant setting for any meal.
By learning Crochet Sousplat – Step by Step, you not only create a functional piece but also enhance your crochet skills while working on something that will be admired during special occasions and daily meals alike.
Making a crochet sousplat involves choosing the right yarn, selecting the right hook size, and following a pattern that suits your style. This project is perfect for trying new stitches and experimenting with colors.
The beauty of Crochet Sousplat – Step by Step is that you can adapt it to any theme, from rustic designs for cozy dinners to glamorous patterns for holiday celebrations. The process is simple enough to be enjoyable, yet it offers opportunities for creativity and personal touches.
One of the best parts about creating a crochet sousplat is the satisfaction of using something handmade in your home. It adds personality and charm to your table setting, and guests will surely notice the effort and artistry involved.
Plus, by mastering Crochet Sousplat – Step by Step, you can make matching sets, create seasonal themes, or even gift them to friends and family. With just some yarn, a crochet hook, and patience, you can turn simple materials into a beautiful decorative piece.
When starting Crochet Sousplat – Step by Step, selecting the right materials is key to achieving the desired look and durability. Cotton yarn is the most recommended choice because it holds its shape well and is easy to clean, making it perfect for table settings.
The thickness of the yarn matters, too. A medium-weight yarn (like worsted weight) is a popular option, as it provides structure without being too bulky. For more delicate designs, you might choose a lighter weight yarn, but keep in mind that this may take longer to complete.
The crochet hook size should match the yarn weight for best results. For most cotton yarns used in sousplats, a hook between 3.5mm and 4.5mm works well. Always check your yarn label for the suggested hook size and adjust according to your tension.
Color selection plays a big role in the final look. You can choose neutral tones for a classic style, vibrant colors for festive occasions, or mix and match shades to create unique patterns. When following Crochet Sousplat – Step by Step, this is where your creativity can truly shine.
Don’t forget to have scissors and a yarn needle ready. The scissors will help you cut clean ends, and the yarn needle will assist in weaving in loose threads for a neat finish.
Finally, make sure you have enough yarn before starting the project. Running out midway can be frustrating, especially if the yarn color is hard to find later. Planning ahead ensures a smooth Crochet Sousplat – Step by Step experience.
The first step in Crochet Sousplat – Step by Step is usually to create a magic ring or chain loop, which will serve as the center of your round design. This starting point sets the foundation for the entire piece.
Once the center is secure, you will begin working in rounds. Each round builds outward from the center, creating the flat circular shape that makes a sousplat perfect for holding a plate. Consistency in stitch size is crucial for a balanced look.
Common stitches used include chain stitches, single crochet, and double crochet. These basic stitches form the structure, but you can also add decorative stitches for texture. Patterns often combine multiple stitch types to create beautiful effects.
As you work, it’s important to keep your tension even. Uneven tension can cause the sousplat to curl or ripple. This is one of the skills you’ll refine as you practice Crochet Sousplat – Step by Step.
To keep track of rounds, many crocheters use stitch markers. These are especially helpful when working on large projects or intricate patterns where counting stitches is essential.
Before moving on to decorative edges, make sure the base circle is the desired size. A typical crochet sousplat measures about 35 cm in diameter, but you can adjust this depending on your needs.
The edges are where Crochet Sousplat – Step by Step really comes to life. After completing the main body, you can add borders that enhance the overall design and give your piece a professional finish.
One popular edging technique is the scalloped border, which adds a soft, elegant curve around the sousplat. This is created by varying stitch heights in a repeating pattern along the edge.
Another beautiful option is the picot edge, which creates tiny points for a delicate and decorative look. Picots are simple to make and can transform the overall appearance of the piece.
For a more textured look, consider adding puff stitches or shell stitches around the edge. These stitches create volume and visual interest, making your sousplat stand out on the table.
You can also use color changes in the final rows to create a contrasting border. This adds definition and can match other table decor elements for a coordinated setting.
Blocking your finished sousplat helps to shape it perfectly and make the edges lie flat. To do this, dampen the piece slightly, pin it to the desired shape, and let it dry completely.
By taking time to add and perfect these edges, your Crochet Sousplat – Step by Step project will have a refined and stylish look ready to impress.
Once your Crochet Sousplat – Step by Step project is complete, proper care ensures it stays beautiful and functional for years. Cotton yarn is generally easy to wash, but gentle handling preserves its shape and color.
Hand washing in cold water with a mild detergent is the safest method. Avoid using bleach or harsh chemicals, as these can weaken the fibers and fade the colors.
After washing, lay the sousplat flat to dry. Hanging it can cause stretching, which may distort its round shape. Flat drying also helps maintain the neat edges.
If your sousplat becomes wrinkled or loses shape over time, you can lightly steam or re-block it to restore its form. This is especially useful after storage or frequent use.
Storing your crochet sousplats flat, rather than folded, prevents creases. If you must stack them, place tissue paper between each one to protect the stitches and prevent snagging.
By following these care tips, your handmade Crochet Sousplat – Step by Step creations will remain a beautiful part of your dining decor for many meals to come.
Q1: How long does it take to make a crochet sousplat?
It depends on the pattern complexity and your skill level. Beginners may take 6–8 hours, while experienced crocheters can complete one in 3–4 hours.
Q2: Can I use acrylic yarn for a sousplat?
While possible, acrylic may not hold its shape as well as cotton. Cotton is recommended for durability and ease of care.
Q3: What is the best size for a crochet sousplat?
Most sousplats measure around 35 cm in diameter, but you can adjust the size to fit your plates and table.
Q4: Do I need to block my crochet sousplat?
Blocking is not always necessary but highly recommended for a professional finish. It helps the piece lay flat and maintain its shape.
Q5: Can I make a set of sousplats in different colors?
Yes! Mixing colors can create beautiful sets for various occasions and themes.
Q6: How do I stop my sousplat from curling?
Ensure even tension while crocheting and add increases evenly in each round to keep the piece flat.
Q7: Is this project suitable for beginners?
Yes, Crochet Sousplat – Step by Step is beginner-friendly, especially with simple patterns. More advanced stitches can be learned gradually.
In this guide, we explored Crochet Sousplat – Step by Step, from choosing the right materials to adding decorative edges and caring for your finished piece. We covered essential tips for keeping your work neat, creative ideas for customization, and best practices for long-lasting beauty.
Whether you’re making them for your own table or as gifts, crochet sousplats bring charm and elegance to any meal. Now it’s your turn—share your honest opinion about this tutorial and let us know your ideas for future crochet projects. Your feedback helps inspire even more creative patterns.


