
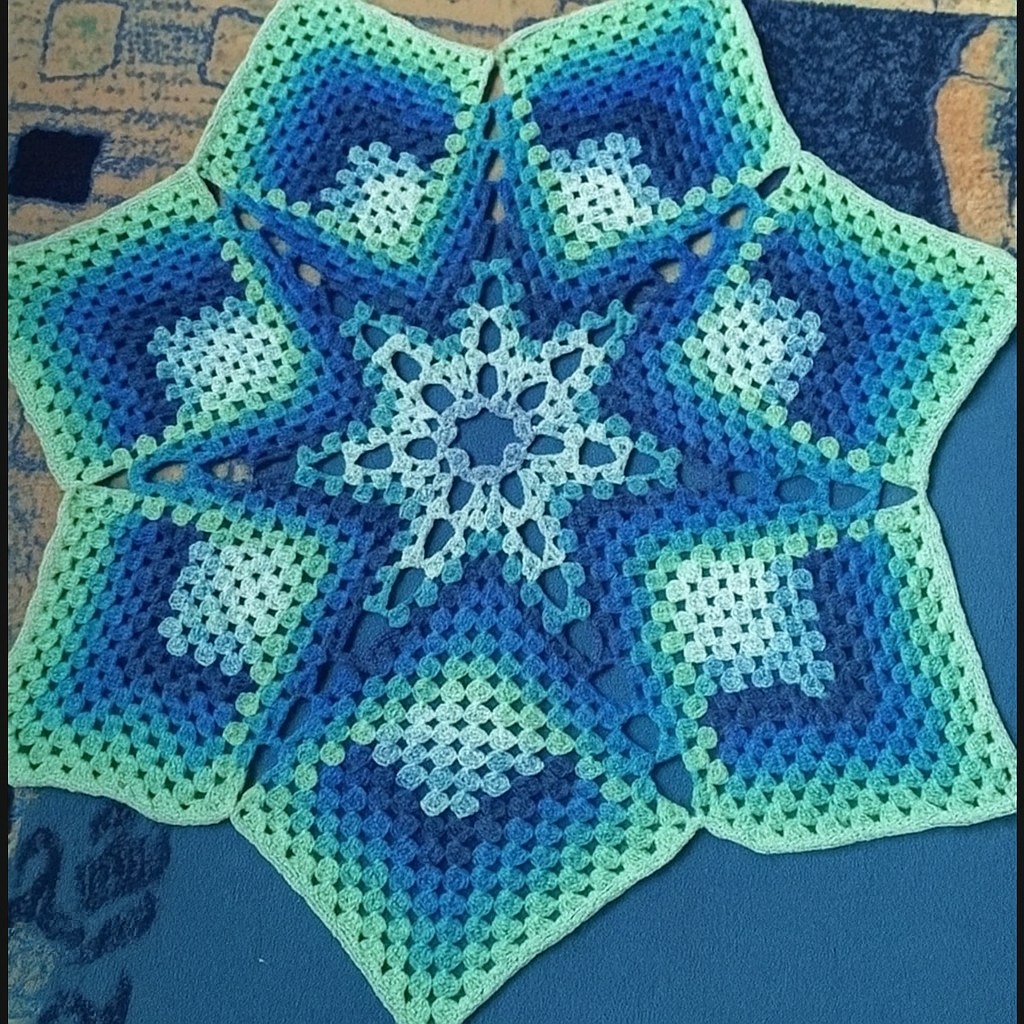
The Crochet Star Rug: Step-by-Step Guide is a wonderful project for those who want to add a handmade, cozy, and stylish touch to their home. This pattern combines practicality and beauty, making it an ideal addition to any room.
When you follow the Crochet Star Rug: Step-by-Step Guide, you will create a unique piece that showcases the elegance of star-shaped designs while offering the comfort of a soft, crocheted rug.
In this article, you’ll find everything you need to complete your Crochet Star Rug: Step-by-Step Guide, including materials, instructions, creative ideas, and helpful tips to make your crochet journey enjoyable and successful.
1. Materials Needed for the Crochet Star Rug: Step-by-Step Guide
Before starting the Crochet Star Rug: Step-by-Step Guide, it’s essential to gather all the right materials to ensure your project is a success.
You will need thick, durable yarn to make the rug both soft and sturdy. Cotton or t-shirt yarn is highly recommended for this project due to its texture and strength.
Choose a large crochet hook, typically between 10 mm and 15 mm, depending on the thickness of your yarn. The larger hook will help you achieve the desired size and structure for the rug.
A stitch marker will be useful to keep track of your rounds, especially when working on a circular or star-shaped design.
Scissors are essential for trimming yarn ends and making clean cuts throughout the project.
You will also need a tapestry needle to weave in the loose ends securely, ensuring that your rug remains neat and durable over time.
Lastly, prepare a flat, clean workspace where you can comfortably crochet your Crochet Star Rug: Step-by-Step Guide and properly shape the star as you go.
2. Step-by-Step Instructions for the Crochet Star Rug: Step-by-Step Guide
The Crochet Star Rug: Step-by-Step Guide is simple to follow when you break it down into manageable steps, making it perfect even for beginner crocheters.
Start by creating a magic ring or chain a small loop to form the center of your star rug. This will be the foundation of your design.
Work the first round with basic double crochet stitches, increasing evenly around to keep the rug flat and well-shaped.
To create the star points, you will need to alternate between increasing and shaping techniques. Carefully follow the stitch count to maintain the star’s symmetry.
As you build each point of the star, continue to increase stitches along the outer edges to give the rug its distinctive, pointed shape.
Use your stitch marker to ensure you are completing each round correctly and maintaining even tension throughout the project.
Continue crocheting until the Crochet Star Rug: Step-by-Step Guide reaches your desired size. Finish by securing the final stitch and neatly weaving in all loose ends.
3. Creative Ideas for Using the Crochet Star Rug
The Crochet Star Rug: Step-by-Step Guide opens up many creative possibilities for decorating your home and personalizing your space.
Place the crochet star rug in a nursery or children’s room to add a whimsical, playful touch that children will love.
Use it as a cozy accent rug in your reading nook or living room, bringing warmth and handmade charm to your favorite space.
The star-shaped rug also makes an excellent gift for baby showers, birthdays, or housewarming parties, showing your care through handmade craftsmanship.
You can create smaller versions of the Crochet Star Rug: Step-by-Step Guide to use as placemats, chair pads, or decorative wall hangings.
For outdoor areas like porches or balconies, the star rug can provide a cheerful, unique detail that sets your space apart.
Consider making multiple rugs in different colors to match seasonal themes or holiday decorations, giving your home a fresh look throughout the year.
4. Helpful Tips to Perfect Your Crochet Star Rug: Step-by-Step Guide
When working on the Crochet Star Rug: Step-by-Step Guide, following some helpful tips will ensure a smooth and enjoyable crochet experience.
Always keep an even tension while crocheting to maintain the rug’s shape and prevent it from curling or becoming misshapen.
Select yarn colors that complement your home’s decor. Bold colors make a strong statement, while pastel shades bring a soft, calming effect.
Be patient when shaping the star points. Taking your time to align stitches will help the star design look clean and well-defined.
If you’re using recycled t-shirt yarn, make sure it is cut evenly to avoid irregular thickness that can affect the rug’s appearance.
Block the finished rug by dampening it and shaping it carefully on a flat surface. This will help define the star shape and smooth out any uneven sections.
Practice the stitch pattern on a small swatch before starting the full rug to build confidence and correct any mistakes early.
FAQ – Crochet Star Rug: Step-by-Step Guide
Is the Crochet Star Rug: Step-by-Step Guide suitable for beginners?
Yes, this guide is beginner-friendly, especially if you are familiar with basic crochet stitches like chain, single crochet, and double crochet.
What is the best yarn for making a crochet star rug?
Thick cotton or t-shirt yarn is ideal for creating a durable, soft rug that holds its shape well.
How long does it take to complete the Crochet Star Rug?
Depending on the size, it can take a few hours to a couple of days to finish the rug, making it a manageable weekend project.
Can I make the rug in different sizes?
Absolutely! You can easily adjust the size by adding more rounds or using thicker yarn to create a larger star rug.
How do I wash the crochet star rug?
Most cotton rugs can be hand-washed with mild detergent and laid flat to dry. Always check your yarn label for specific care instructions.
Can I use other shapes instead of a star?
Yes, while this guide focuses on the star shape, you can apply similar techniques to create circles, hearts, or hexagon rugs.
Conclusion
The Crochet Star Rug: Step-by-Step Guide is a delightful project that combines creativity, practicality, and the joy of handmade crafting. Whether you’re new to crochet or an experienced maker, this rug offers an enjoyable process and a beautiful result.
In this article, we explored the essential materials, step-by-step instructions, creative ideas, and helpful tips to ensure your success with the Crochet Star Rug: Step-by-Step Guide. I’d love to hear your thoughts! Please share your honest opinion, your progress, or any suggestions you may have in the comments. Your feedback is always welcome and truly valued!


