
Crochet Multi-Purpose Blouse, Shawl, Runner Model

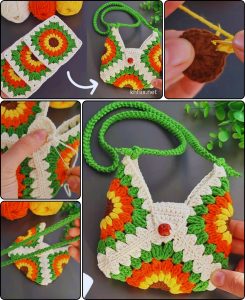
If you’re a crochet enthusiast looking to add a pop of color and texture to your next project, a Crochet Sunburst Granny Square is the perfect design to try! This vibrant and beautiful square is a staple in the world of crochet, known for its unique sunburst pattern that adds a dynamic look to any creation.
Whether you’re working on a blanket, pillow, or even a bag, this crochet square is sure to elevate your project with its bright and cheerful aesthetic. In this Crochet Sunburst Granny Square tutorial, we will walk you through the process step by step so that you can create your own stunning squares.
The sunburst granny square is an iconic pattern that has gained popularity due to its bold colors and intricate design.
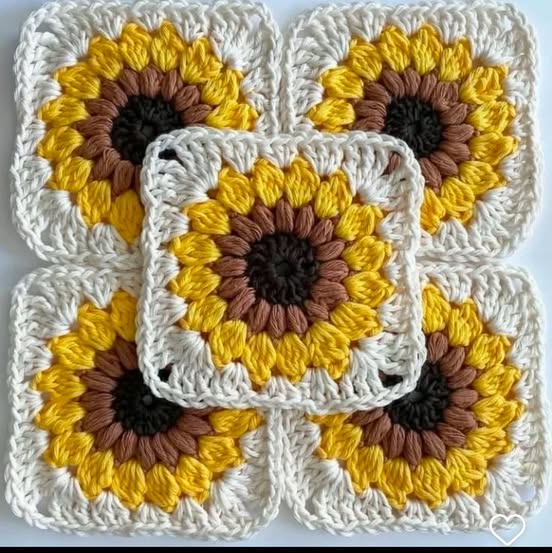
What makes this square so special is the combination of multiple colors in the form of layered petals that form the “sunburst” effect.
This pattern is perfect for anyone looking to experiment with color combinations or for crocheters who enjoy creating detailed yet easy-to-follow designs.
In this tutorial, we’ll cover everything you need to know to crochet the Sunburst Granny Square, including the materials required, step-by-step instructions, tips for mastering the pattern, and how to join your squares together.
Whether you’re a beginner or an advanced crocheter, you’ll find this guide useful as you learn to create one of the most visually striking granny squares out there.
Before you begin your Crochet Sunburst Granny Square project, it’s essential to gather all the necessary materials. Having the right supplies on hand will make your crafting experience smoother and more enjoyable.
The first item you’ll need is yarn. For the Sunburst Granny Square, it’s recommended to use medium-weight yarn, which is also known as worsted-weight yarn (approximately 4-ply). You’ll want to choose several contrasting colors to achieve the sunburst effect. For example, you can select a bright yellow for the center, followed by vibrant oranges, reds, or blues for the petals. Don’t be afraid to experiment with different colors to create your own unique look.
You’ll also need a crochet hook. A 5mm or 6mm hook works well for most worsted-weight yarns, but it’s important to adjust the hook size based on your yarn’s thickness. A slightly larger hook may help you achieve a looser and more flexible square, which is helpful when joining multiple squares together.
Next, you’ll require a scissors for cutting your yarn, as well as a yarn needle for weaving in ends once the square is complete. Having these tools on hand will ensure you can finish the project neatly and without any loose ends.
Lastly, if you’re planning to create a larger project like a blanket, consider getting a measuring tape to ensure that each of your squares is consistent in size. This will help create a uniform look once you start joining your squares together.
The Crochet Sunburst Granny Square incorporates a few fundamental crochet stitches, which will be essential to mastering this pattern. If you are already familiar with basic crochet stitches like slip stitch, chain stitch, and double crochet, you’ll have no trouble tackling this pattern.
First, let’s talk about the magic ring. This technique is often used in granny squares to start the project in the center. The magic ring allows you to crochet tightly in the round and eliminate any gaps in the center. To make the magic ring, simply create a loop with your yarn and insert your hook into the loop. This technique is crucial for starting the sunburst granny square as it provides the perfect foundation for the petals.
Once you have your magic ring, you will crochet double crochet stitches to form the petals. The double crochet stitch is made by yarn over, inserting the hook into the stitch, pulling up a loop, and completing the stitch by yarn over again and pulling through the two loops on the hook. This stitch is the heart of the sunburst petals, creating the height and texture needed to form the beautiful layers of the square.
The next key stitch you’ll use is the chain stitch, which is used to separate each petal of the sunburst design. After completing a round of double crochet stitches, you’ll chain a few stitches to create the space between each petal, allowing the vibrant colors to shine.
Lastly, slip stitches are used to join the rounds and finish off each section of the square. Slip stitches are also helpful when you need to move to a different section of the square or attach new yarn.
Now that you have your materials and are familiar with the basic crochet stitches, it’s time to start making the Crochet Sunburst Granny Square. Follow these simple steps to create your own square:
Step 1: Begin with the Magic Ring
Start by creating a magic ring with your chosen yarn color. This will form the center of your sunburst. Once you’ve created the ring, chain 3 to count as your first double crochet stitch. Then, crochet 11 more double crochet stitches into the ring. You should have a total of 12 double crochet stitches in the ring.
Step 2: Form the First Layer of Petals
To create the first layer of petals, chain 3, then yarn over and make a double crochet stitch into the same stitch from the previous round. This creates the first petal. Repeat this step for each stitch around the ring, creating 12 petals in total. Be sure to chain 3 between each petal to space them evenly.
Step 3: Add the Second Layer of Petals
To create the second layer, choose a new yarn color. Attach the new color into any chain-3 space from the previous round. Chain 3 to begin the petal, then yarn over and make two double crochet stitches into the same space. Repeat this for all 12 spaces, completing the second layer of petals.
Step 4: Continue Adding Layers (Optional)
If you want to create more layers, you can continue adding additional petals using the same technique, changing colors as you go. Each new layer will be slightly larger, forming the beautiful sunburst effect.
Step 5: Finish the Square
Once you’ve added the desired number of petal layers, finish the square by creating a border around the entire square using your preferred stitch (such as single crochet or slip stitches). This border will help stabilize the square and give it a polished look.
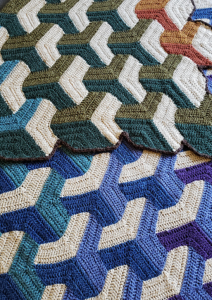
After you’ve crocheted several Sunburst Granny Squares, you’ll want to join them together to create your finished project. There are various methods for joining granny squares, but the most common and easiest method is the whip stitch.
To join your squares, place them side by side with the right sides facing up. Thread your yarn needle with a length of yarn and use the whip stitch to sew through the outer loops of both squares. Make sure to stitch through the edges carefully to avoid puckering. This method creates a seamless join, allowing the vibrant sunburst pattern to flow from square to square.
Alternatively, you can use the join-as-you-go technique, which involves joining the squares as you crochet the final round of each square. This method eliminates the need for a separate joining step and results in a more cohesive look. Choose whichever method works best for your project.
1. How can I change colors in the Sunburst Granny Square?
To change colors, simply complete the last double crochet stitch in the old color, then join the new color at the beginning of the next round. Be sure to secure the ends to avoid them unraveling.
2. Can I make my Sunburst Granny Square larger?
Yes! You can continue adding additional layers of petals to make the square as large as you like. Just be sure to add double crochet stitches and chain spaces evenly to maintain the square’s shape.
3. What are some project ideas using Sunburst Granny Squares?
Sunburst Granny Squares can be used in many different projects, such as blankets, pillows, bags, and shawls. Their vibrant colors make them perfect for home decor or as a thoughtful handmade gift.
4. What is the best yarn for creating Granny Squares?
Worsted-weight yarn is ideal for granny squares, as it is thick enough to create a sturdy square but still soft and easy to work with. Look for yarn that is durable and has a nice drape for the best results.
5. How do I keep my Granny Squares from becoming too tight?
If your granny squares are too tight, try using a slightly larger hook size or loosening your tension. This will help the stitches flow more freely and give your squares a more relaxed feel.
6. Can I crochet a Sunburst Granny Square with a different shape?
Traditionally, granny squares are square-shaped, but you can experiment with creating circular or hexagonal versions of the sunburst pattern. Just adjust your stitch count and shaping accordingly.
In this Crochet Sunburst Granny Square tutorial, you’ve learned everything you need to create vibrant, beautiful granny squares. We’ve covered the materials, basic stitches, step-by-step instructions, and how to join your squares together for a cohesive look.
Whether you’re making a blanket, a bag, or any other project, the sunburst granny square is a great choice for adding color and texture to your creations.
If you’ve enjoyed this tutorial, we’d love to hear your thoughts! Leave a comment with your opinions and suggestions for future projects. Happy crocheting!


