
Crochet Multi-Purpose Blouse, Shawl, Runner Model

Crochet Teddy Bear Applique is a wonderful way to add a cute and personalized touch to your crochet projects.
Whether you’re making blankets, hats, or even clothes, a teddy bear applique can enhance your work with its adorable charm.
In this FREE PATTERN tutorial, we will walk you through each step of creating a lovable teddy bear applique that you can use on any of your projects.
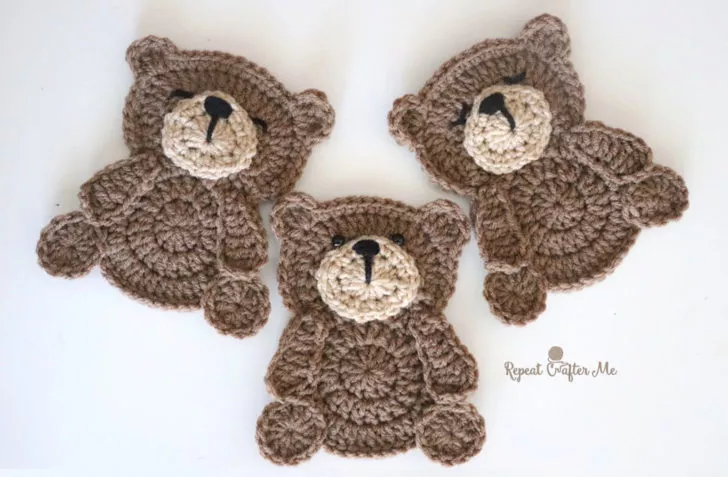
Image from google.
Creating a Crochet Teddy Bear Applique is a fun and rewarding task. Not only does it add personality to your crochet items, but it also allows you to practice your skills with simple techniques.
This applique is perfect for beginners looking to improve their crochet skills or for seasoned crocheters who enjoy adding little details to their projects.
The beauty of the Crochet Teddy Bear Applique is in its versatility. You can use it as a small decoration on baby blankets, attach it to a pillow, or even use it as a cute embellishment on a tote bag.
With the following instructions, you’ll be able to make a teddy bear applique in no time and incorporate it into various crochet projects.
Before we start with the Crochet Teddy Bear Applique – FREE PATTERN, it’s essential to gather all the materials you’ll need. The following supplies will make the process smooth and easy:
For this teddy bear applique, choose yarn in a soft, medium-weight variety like worsted weight. You’ll need brown for the bear’s body and ears, black for the eyes and nose, and a light color such as cream or white for the muzzle. You can also choose other colors to create different variations of the bear, such as a blue bear or even a multi-colored bear for more whimsy.
The size of the crochet hook you use will depend on your yarn choice. For worsted weight yarn, a 4mm (G-6) hook is typically recommended. If you prefer a tighter or looser stitch, feel free to adjust the hook size to suit your crochet tension.
Stitch markers will come in handy to mark the beginning of each round or row, ensuring your work stays neat and evenly stitched. These are optional but can help keep track of your work.
A yarn needle, or tapestry needle, is essential for weaving in ends once you’ve completed your applique. This tool will also help with attaching the applique to your main project.
A pair of sharp scissors is needed to cut the yarn neatly at the end of your project.
If you’d like to add extra charm to your Crochet Teddy Bear Applique, you can consider embellishments like tiny buttons for the bear’s shirt or a ribbon around its neck. These touches will add personality to your bear and make it even more unique.
Now that you have all your materials ready, let’s dive into the Crochet Teddy Bear Applique – FREE PATTERN! Here’s how you can create this cute teddy bear step by step.
To begin, create a magic ring with brown yarn. Work several single crochet stitches into the ring to form a small circle. You will then gradually increase the number of stitches in each round to create the rounded shape of the bear’s head. Remember to use stitch markers to keep track of your rounds.
Once you’ve completed the head, you can make the ears by crocheting two small circles in brown yarn. Attach these to the top of the bear’s head using a yarn needle. Position them slightly toward the outer sides of the head for a cute, classic teddy bear look.
For the muzzle, switch to a light color of yarn (such as cream or white). Crochet a small oval shape and attach it to the center of the bear’s face. This gives the bear a sweet, endearing look and sets the stage for adding facial features.
Now, take the black yarn and use it to stitch the bear’s eyes and nose. The eyes are small dots positioned on either side of the muzzle. For the nose, create a small triangle shape right in the middle of the muzzle. You can also add a little smile beneath the nose for extra charm.
Once you’ve completed your Crochet Teddy Bear Applique, it’s time to attach it to the item you’re working on. Use a yarn needle to sew the applique onto your project. Be sure to stitch securely, especially if the bear will be handled frequently.
After attaching the applique, use your yarn needle to weave in any loose ends. This will help your work look tidy and polished. Once all the ends are woven in, your teddy bear applique is ready to shine!
Now that you know the basic steps for creating the Crochet Teddy Bear Applique – FREE PATTERN, here are some tips to help you customize your bear and make it even more unique:
To make your teddy bear extra cute, consider adding a small bow or scarf. You can crochet a tiny bow and attach it to the bear’s neck or head. A scarf can be made by crocheting a small chain and wrapping it around the bear’s neck for a cozy touch.
While brown is traditional for a teddy bear, feel free to experiment with other colors! You can make a pastel-colored teddy bear or even use multiple colors for a rainbow-inspired bear. The possibilities are endless, so don’t be afraid to get creative.
Give your teddy bear some personality by experimenting with different facial expressions. Change the positioning of the eyes and mouth to create a smiling, surprised, or sleepy bear. You can even embroider eyebrows or add small blush marks for a fun touch.
If you want to add extra texture and detail, consider using felt for the eyes, nose, or even a small heart on the bear’s chest. Felt can be easily cut into shapes and sewn onto your applique to add depth and dimension.
Your Crochet Teddy Bear Applique doesn’t have to be limited to just blankets or hats. You can attach the bear to clothing items, such as t-shirts, baby onesies, or even as a cute decoration on a pillowcase. Use your imagination to create new ways to showcase your bear.
You don’t have to make just one size of teddy bear. Experiment with different hook sizes and yarn weights to create bears in varying sizes. Miniature bears can make adorable embellishments on cards, while larger bears are perfect for blankets or as gifts.
Sometimes, things don’t go as smoothly as planned during your crochet project. Here are some troubleshooting tips to help you overcome common challenges when making your Crochet Teddy Bear Applique.
If the head of your bear doesn’t look the right size, try adjusting the number of increases you make during the rounds. If it’s too small, add a few more stitches, and if it’s too large, decrease a few stitches. You can always adjust as needed.
If your ears don’t stay attached, make sure you sew them on securely. Use a yarn needle to stitch around the base of each ear and make sure the stitches are tight. You can even add a few extra stitches around the edges of the ear to hold them in place.
If your applique is looking a little crooked, check that you are sewing the pieces on evenly. Use a ruler or your fingers to check the symmetry as you work, and make sure to position the ears, eyes, and muzzle before stitching.
To avoid visible yarn ends, take your time weaving in the ends carefully. Use a yarn needle to bury the ends deep within the stitches, and try to match the direction of the stitches so the ends aren’t noticeable.
Q: Can I use this pattern for different sizes of teddy bears?
A: Yes! You can adjust the pattern by changing your hook size or yarn weight to create bears in different sizes. The pattern is versatile and can be customized to suit your needs.
Q: How do I make the teddy bear’s facial features more detailed?
A: You can add more details by experimenting with embroidery, such as adding small lashes to the eyes or creating a textured nose. You can also add extra features like eyebrows or a cute little smile.
Q: Can I use this applique for items other than blankets?
A: Absolutely! This applique works well on a variety of items, including hats, scarves, tote bags, clothing, or even as a patch on backpacks. Let your creativity guide you.
Q: How do I ensure my teddy bear applique doesn’t unravel over time?
A: Make sure to sew the pieces together securely and weave in all the yarn ends. If you’re worried about durability, consider using fabric glue to reinforce the areas that may be subject to frequent handling.
Join our VIP broadcast list and gain access to exclusive patterns, all for free. As a VIP member, you’ll receive the best patterns daily, delivered directly to your device. ✨📱 It’s a unique opportunity to stay up-to-date with the latest trends and designs, curated just for you. Don’t miss out on enhancing your projects and discovering new inspirations with the best patterns every day! 🎨🔝
In this Crochet Teddy Bear Applique – FREE PATTERN, you’ve learned how to create a lovable teddy bear applique that can be added to any of your crochet projects. We covered everything from the materials you’ll need to the step-by-step process of creating the bear’s head, ears, and facial features. Plus, we shared customization tips and troubleshooting advice to ensure you can make the perfect bear every time.
We hope you enjoyed this tutorial! Feel free to leave a comment with any questions or share your thoughts on this project. If you have suggestions for future tutorials, we’d love to hear from you. Happy crocheting!


