
Looking to add a touch of festive fun to your fall wardrobe? A Crochet Turkey Hat – Free Pattern is the perfect project!
This playful accessory is ideal for Thanksgiving celebrations, costume parties, or simply adding some seasonal charm to your everyday look.
Whether you’re crafting one for a child, an adult, or even a pet, this free pattern is versatile and easy to customize.
Crocheting a turkey hat is not only a fun project but also a great way to sharpen your skills. It incorporates a mix of basic and intermediate techniques, allowing both beginners and experienced crocheters to enjoy the process.
Plus, this adorable creation is sure to bring smiles wherever it goes, making it an excellent gift option as well.
In this article, we’ll guide you through everything you need to know to make your own Crochet Turkey Hat.
From selecting materials to adding finishing touches, you’ll find detailed instructions and practical tips to ensure your project is a success. Let’s get started!
1. Why Choose the Crochet Turkey Hat?
The Crochet Turkey Hat is more than just a cute accessory; it’s a versatile project with several benefits:
- Seasonal Appeal: Perfect for Thanksgiving and fall-themed events, this hat adds a festive touch to any outfit.
- Beginner-Friendly: The pattern is easy to follow, making it a great choice for those new to crochet.
- Customizable Sizes: Adjust the pattern to fit babies, kids, adults, or even pets.
- Scrap Yarn Friendly: Use leftover yarn from previous projects to create the turkey’s colorful feathers.
- Creative Expression: Experiment with different colors and embellishments to make the hat uniquely yours.
- Great for Gifting: Handmade hats are thoughtful gifts that recipients will cherish.
With these advantages, the Crochet Turkey Hat – Free Pattern is an irresistible project for any crochet enthusiast.
2. Materials and Tools You’ll Need
To create your Crochet Turkey Hat, you’ll need the following materials:
- Yarn: Choose worsted-weight yarn in brown for the hat, plus red, orange, and yellow for the turkey’s features.
- Crochet Hook: A size H (5.0mm) hook is recommended for this pattern.
- Stitch Markers: These will help you keep track of rounds.
- Scissors: For trimming yarn ends.
- Tapestry Needle: Use this to weave in loose ends and attach embellishments.
- Polyfill or Yarn Scraps: For stuffing the wattle or other 3D features if desired.
Having the right tools and materials is key to a smooth crocheting experience and ensures a professional finish.
3. Step-by-Step Guide to Crochet the Turkey Hat
Follow these instructions to bring your Crochet Turkey Hat to life:
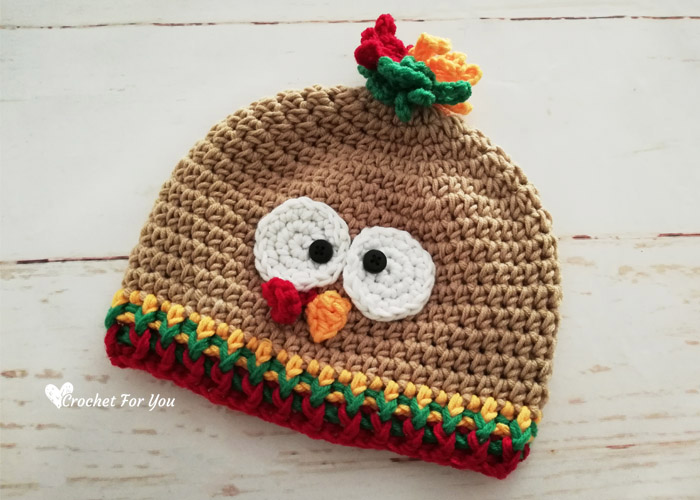
- Start with the Base Hat: Begin by crocheting a simple beanie in brown yarn. Use double crochet stitches and work in the round, increasing gradually to create the desired size.
- Create the Eyes: Crochet two small white circles for the turkey’s eyes. Add black buttons or embroider pupils for a realistic touch.
- Make the Beak: Use orange yarn to crochet a triangular beak. Attach it securely to the front of the hat.
- Add the Wattle: Crochet a small, wavy piece in red yarn to serve as the turkey’s wattle. Attach it just below the beak.
- Design the Feathers: Use bright colors like red, orange, and yellow to crochet individual feathers. Attach these to the back of the hat in a fan shape.
- Finish and Embellish: Weave in all loose ends, adjust the placement of features if needed, and add optional details like a pom-pom on top.
By following these steps, you’ll have a charming turkey hat ready to wear or gift!
4. Tips for Customizing and Perfecting Your Hat
Personalizing your Crochet Turkey Hat adds a unique touch to your project. Here are some tips:
- Experiment with Colors: Try non-traditional colors like blue or green for a whimsical twist.
- Add Textures: Use textured yarns or stitches to give the hat a cozy, dimensional look.
- Adjust for Fit: Measure the recipient’s head and modify the pattern to ensure a comfortable fit.
- Include Fun Embellishments: Add glitter yarn, beads, or embroidered details for extra flair.
- Layer the Feathers: Overlap the feathers slightly to create a fuller, more dynamic look.
- Create Matching Accessories: Crochet a matching scarf or mittens to complete the set.
With these ideas, your turkey hat will stand out as a true work of art!
FAQ
1. Can beginners crochet the Turkey Hat?
Yes! The pattern uses basic stitches, making it accessible to beginners. Tutorials can help with any unfamiliar techniques.
2. How long does it take to crochet a Turkey Hat?
Depending on your skill level, it typically takes 4–6 hours to complete.
3. Can I use different yarn weights?
You can, but be aware that using thicker or thinner yarn will affect the hat’s size and texture. Adjust your hook size accordingly.
4. How do I adjust the pattern for different sizes?
Increase or decrease the number of stitches and rows in the base hat to fit the intended recipient.
5. Can I wash the Turkey Hat?
Yes, but handwashing in cold water is recommended to preserve the yarn’s texture and shape.
6. Is this pattern suitable for pets?
Absolutely! You can modify the size to fit your furry friends for adorable holiday photos.
Join our VIP broadcast list and gain access to exclusive patterns, all for free. As a VIP member, you’ll receive the best patterns daily, delivered directly to your device. ✨📱 It’s a unique opportunity to stay up-to-date with the latest trends and designs, curated just for you. Don’t miss out on enhancing your projects and discovering new inspirations with the best patterns every day! 🎨🔝
Conclusion
The Crochet Turkey Hat – Free Pattern is a delightful and rewarding project that combines creativity, skill, and fun. By following this guide, you’ve learned how to craft a festive hat that’s perfect for Thanksgiving and beyond.
We’d love to hear from you! Share your experiences, suggestions, and photos of your finished turkey hat in the comments. Happy crocheting!


