
The Crochet turtle – Pattern is a delightful project for crafters who love making handmade toys and decorations with a personal touch. This type of amigurumi combines creativity, skill, and charm, resulting in a small turtle that can serve as a toy, collectible, or even a thoughtful handmade gift.
Crochet animals have gained immense popularity due to their unique ability to transform yarn into adorable characters, and turtles are among the most loved for their gentle symbolism and playful design.
Starting a project like the Crochet turtle – Pattern does not require advanced crochet skills, making it a wonderful option for both beginners and experienced makers. The design usually involves basic crochet stitches such as single crochet, increase, and decrease.
With some patience and a little creativity in choosing yarn colors, you can bring to life a miniature turtle that truly reflects your style. These turtles can be customized in endless ways, whether you prefer realistic green shades or bright and whimsical colors.
In addition to being fun and relaxing, working on a Crochet turtle – Pattern can also serve as a meaningful craft experience. Crocheting has long been known to reduce stress, promote mindfulness, and boost creativity.
Making something as charming as a little turtle not only brings joy to the maker but also spreads happiness to anyone who receives it. This project encourages makers to take time for themselves, enjoy each stitch, and appreciate the process of creating something from scratch.
1. Materials and Preparation for Crochet Turtle – Pattern
Before you begin working on your Crochet turtle – Pattern, it is important to gather all the materials you need. Typically, you will need yarn in at least two colors: one for the turtle’s shell and another for the body. Cotton yarn is often recommended for amigurumi projects because it provides durability and a clean stitch definition.
You will also need the right hook size for your chosen yarn. Using a smaller hook than recommended on the yarn label helps keep the stitches tight, preventing stuffing from showing through. This is especially important for projects like the Crochet turtle – Pattern, where neatness and structure matter.
Other essentials include safety eyes, which give your turtle a cute and expressive look. However, if the toy is intended for small children, embroidering the eyes with yarn may be a safer choice. A yarn needle will also be necessary for sewing the different parts of the turtle together.
Don’t forget the stuffing, which gives the turtle its 3D shape and squishy texture. Polyester fiberfill is the most common choice and works well for maintaining shape. Without proper stuffing, your Crochet turtle – Pattern may look flat or uneven.
Taking time to prepare your materials carefully will make the crocheting process smoother and more enjoyable. Having everything ready also prevents interruptions while working. This preparation step ensures that your turtle turns out neat, sturdy, and ready to delight.
Lastly, consider setting up a comfortable workspace with good lighting. Crocheting requires focus, and a cozy environment can make your Crochet turtle – Pattern experience even more rewarding.
2. Step-by-Step Guide to Crochet Turtle – Pattern
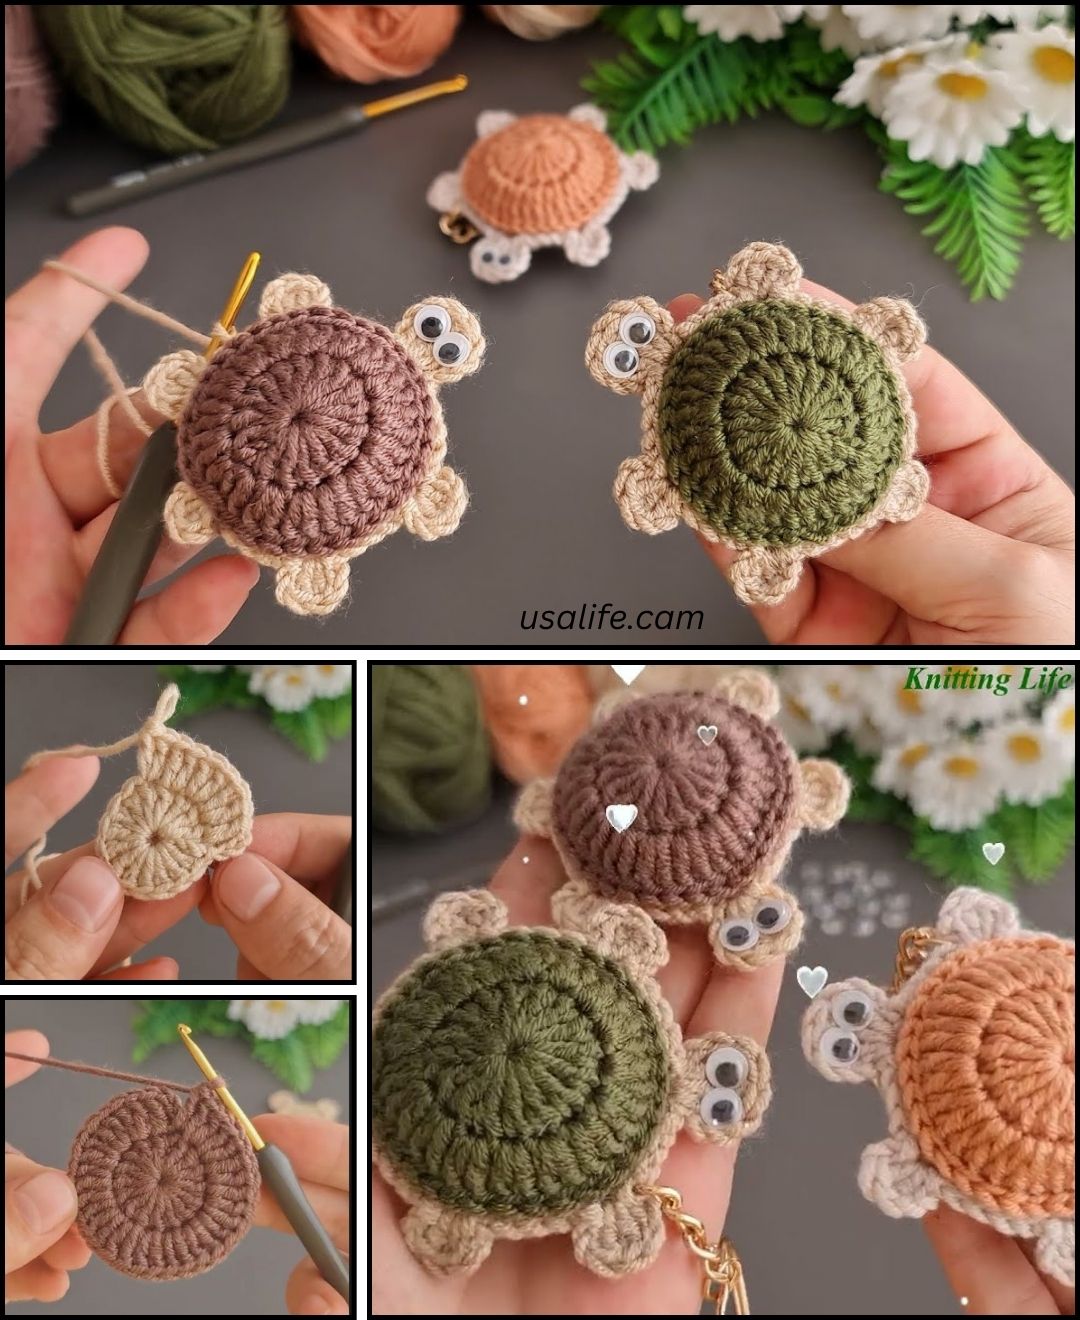
The first step in making the Crochet turtle – Pattern is usually starting with the body or the shell. Most designs use the magic ring technique to create a tight, seamless center. This ensures that the stuffing does not leak out through gaps in the stitches.
As you work in rounds, increases are made to gradually shape the turtle’s body. This repetitive process helps build rhythm and is excellent practice for beginners. With each round, your turtle begins to take form, which is always exciting.
Once the main body is complete, you can move on to crocheting the shell. This part allows for creativity, as you can use a single color or multiple colors for a patchwork effect. The shell is often what makes each Crochet turtle – Pattern unique, so feel free to experiment with different designs.
The legs, head, and tail are usually made separately in small rounds. Although they may seem like minor details, these pieces bring your turtle to life. Attaching them carefully and evenly is key to making your project look polished.
After completing all parts, use a yarn needle to sew everything together. This step requires patience but ensures your turtle is sturdy and well-shaped. Always double-check that each piece is securely attached, especially if the turtle is intended as a child’s toy.
Finally, add the finishing touches. This may include embroidering a smile, adjusting the stuffing, or shaping the turtle’s shell. These small details give personality to your Crochet turtle – Pattern, making it uniquely yours.
3. Creative Ideas for Crochet Turtle – Pattern
One of the joys of working with the Crochet turtle – Pattern is the endless customization options. You can create turtles in natural green shades, or go bold with bright pinks, blues, or even rainbow yarn. Each variation results in a completely new character.
You can also make turtles of different sizes simply by changing the yarn weight and hook size. A thicker yarn with a larger hook creates a bigger turtle, while fine yarn and a smaller hook create a tiny, delicate version.
Adding embellishments is another fun idea. Tiny bows, miniature hats, or even embroidered flowers on the shell can make your turtle stand out. These details are great for gifting, as they add a personal touch.
The Crochet turtle – Pattern can also be adapted for practical uses. For example, making a flat version could result in a coaster, while slightly larger turtles can serve as decorative pillows. Small turtles can even be turned into keychains.
If you enjoy themed projects, you can make a whole family of turtles. Imagine creating a mother turtle with smaller baby turtles. This makes for a heartwarming gift set or display.
Seasonal adaptations are also a fun way to use this pattern. For example, you could create holiday-themed turtles in red and green for Christmas, or pastel turtles for Easter. The versatility of the Crochet turtle – Pattern makes it perfect for year-round crafting.
4. Benefits of Making a Crochet Turtle – Pattern
Creating a Crochet turtle – Pattern offers more than just a finished toy. It is an activity that provides relaxation and mindfulness. Many crafters find crocheting soothing, as the repetitive movements create a meditative rhythm.
Completing a turtle can also boost confidence. Seeing the final product after hours of work gives a sense of accomplishment. This is especially rewarding for beginners who may doubt their abilities at first.
Another benefit is the opportunity to give personalized gifts. Handmade turtles are thoughtful presents that show care and effort. They are suitable for birthdays, baby showers, or as keepsakes.
Crocheting turtles also opens the door to learning new skills. Each project helps improve stitch consistency, tension control, and shaping techniques. Over time, crafters become more skilled and confident.
Additionally, selling handmade turtles can be a small business opportunity. With the popularity of amigurumi, items like the Crochet turtle – Pattern are often sought after in craft fairs and online shops.
Most importantly, this craft fosters creativity. Every turtle you make can be different, allowing endless exploration of colors, textures, and styles. This creative freedom is one of the most rewarding parts of crochet.
FAQ about Crochet Turtle – Pattern
1. Is the Crochet turtle – Pattern suitable for beginners?
Yes, most turtle patterns are beginner-friendly, requiring only basic stitches like single crochet, increases, and decreases.
2. What type of yarn is best for the Crochet turtle – Pattern?
Cotton yarn is highly recommended for amigurumi because it holds its shape well and creates neat stitches.
3. Can I make the Crochet turtle – Pattern in different sizes?
Absolutely! By adjusting the yarn thickness and hook size, you can create turtles of varying dimensions.
4. How long does it take to make a Crochet turtle – Pattern?
On average, it can take a few hours to a day, depending on the size and the crocheter’s experience.
5. Are safety eyes necessary for the Crochet turtle – Pattern?
No, you can also embroider the eyes with yarn or thread, especially if the turtle is meant for small children.
6. Can I sell turtles made from the Crochet turtle – Pattern?
Yes, handmade turtles are popular craft fair items and make wonderful products for small crochet businesses.
7. How can I personalize my Crochet turtle – Pattern?
You can use different colors, add accessories like bows or hats, or even create themed turtles for holidays.
8. What stuffing works best for Crochet turtle – Pattern?
Polyester fiberfill is the most common choice, as it is lightweight, washable, and easy to shape.
9. Can I wash my Crochet turtle – Pattern creation?
Yes, most cotton yarn turtles can be hand-washed gently and air-dried to maintain their shape.
10. What makes the Crochet turtle – Pattern special compared to other amigurumi animals?
The turtle’s shell allows for endless design creativity, making each project truly unique and customizable.
Conclusion
The Crochet turtle – Pattern is more than just a crochet project; it is an opportunity to combine creativity, relaxation, and craftsmanship. From preparing your materials and following simple steps to adding personal touches, every part of the process is rewarding. Whether you make it as a toy, decoration, or gift, each turtle carries the charm of being handmade.
We hope this guide has inspired you to try your own Crochet turtle – Pattern and explore the endless possibilities it offers. Have you ever made one before, or are you planning to start now? Share your honest opinion and suggestions—we would love to hear your thoughts!


