
Crochet Version – Easiest Hood with Collar is a must-try project for anyone who loves cozy handmade accessories that combine style, comfort, and functionality. Whether you’re a beginner or a seasoned crocheter, creating your own hood with a collar is both rewarding and enjoyable.
This Crochet Version – Easiest Hood with Collar tutorial provides step-by-step guidance to help you make a beautiful piece that can be worn during chilly days or gifted to someone special. The simplicity of the design allows you to experiment with colors, textures, and yarn types while maintaining a professional finish.
The best part about the Crochet Version – Easiest Hood with Collar is how versatile it is. It’s perfect for layering over a sweater, pairing with a coat, or wearing indoors for that warm and snug feeling. This pattern offers a modern twist on traditional crochet garments, making it an excellent project to add to your collection.
By following the instructions carefully, you can create a stunning accessory that’s as practical as it is stylish. Plus, once you’ve mastered this pattern, you can easily customize it with buttons, drawstrings, or decorative edging to make it uniquely yours.
Before diving into the tutorial, make sure you have all the necessary materials. For this Crochet Version – Easiest Hood with Collar, you’ll need soft yarn (preferably acrylic or wool blend), a suitable crochet hook, a yarn needle, and scissors.
The project doesn’t require advanced techniques, making it ideal for beginners who want to expand their skills while making something truly useful. The hood and collar combination is designed to fit comfortably around the head and neck, offering both warmth and a touch of elegance that elevates any outfit.
1. Choosing Materials for the Crochet Version – Easiest Hood with Collar
Selecting the right materials is crucial for the success of your Crochet Version – Easiest Hood with Collar. Start by picking a yarn that is warm, lightweight, and comfortable against the skin. Acrylic yarn is often a great choice because it’s affordable, easy to work with, and available in many colors. If you prefer a more luxurious touch, consider using a wool-acrylic blend for added softness and warmth.
Choosing the correct hook size will also influence how your hood turns out. A larger hook will give your hood a looser, more flexible texture, while a smaller hook will create a tighter, denser fabric. Check your yarn label for the recommended hook size and adjust according to your preferred tension.
For the collar, consider using a slightly smaller hook to give it a snug fit around your neck. This detail makes the finished piece more comfortable and ensures it stays in place. The collar adds structure to the hood and frames your face beautifully, giving your project a polished look.
When selecting colors, go for shades that complement your wardrobe or reflect the season. Neutral tones like beige, cream, or gray are timeless, while bold hues such as mustard, burgundy, or teal add a fun pop of color.
Lastly, prepare a yarn needle for weaving in the ends and scissors for cutting. Having your tools organized before you start ensures a smooth and enjoyable crocheting experience. A well-prepared workspace helps maintain focus and makes the process even more relaxing.
2. Step-by-Step Instructions for the Easiest Hood with Collar
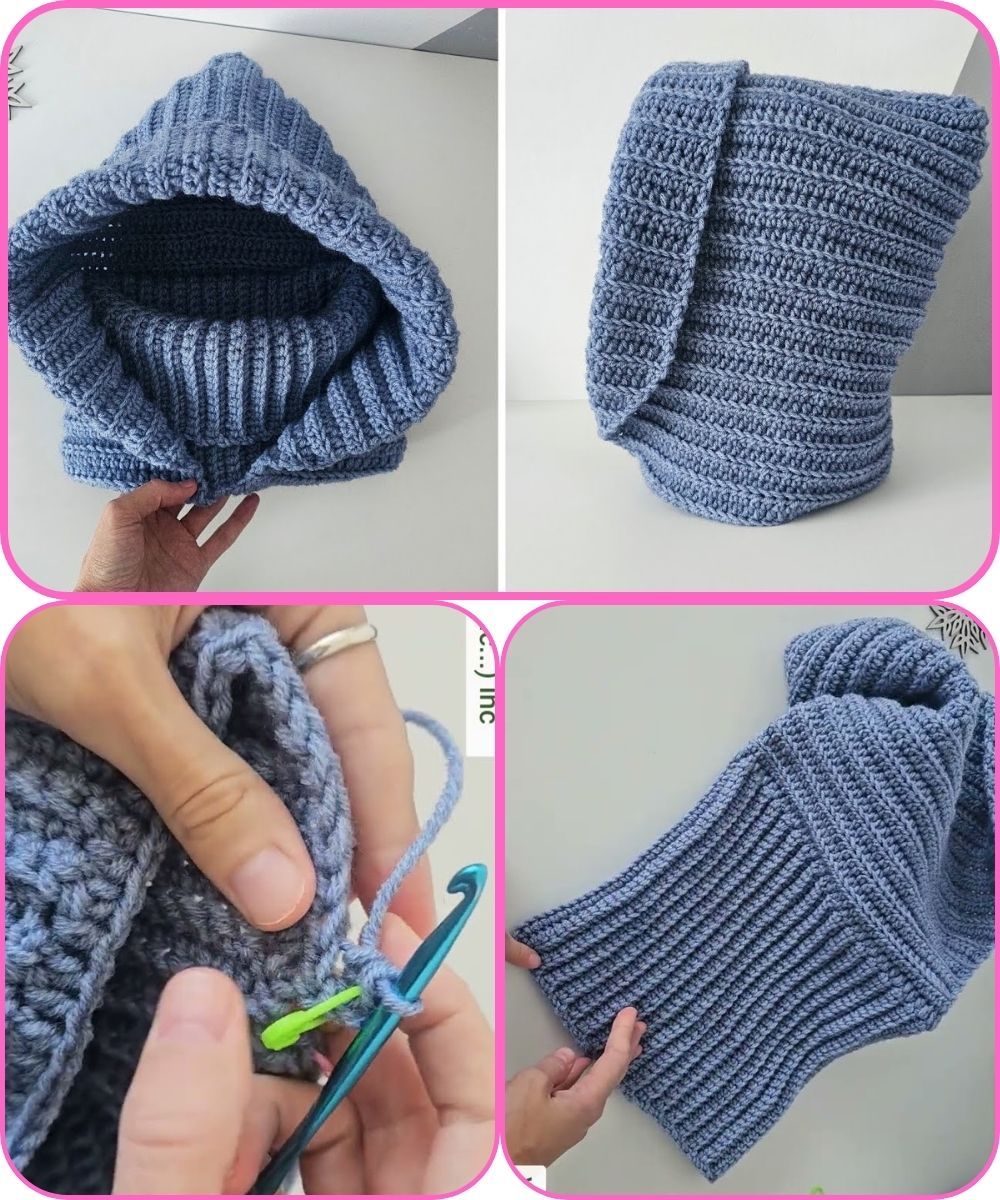
Now that your materials are ready, let’s start crafting your Crochet Version – Easiest Hood with Collar. Begin by crocheting a rectangle that will later be folded and joined to form the hood. This method keeps things simple and beginner-friendly. Measure the length and width according to your head size, but remember to leave enough room for comfort.
Once you’ve completed the main rectangle, fold it in half and sew or crochet along the back edge to shape the hood. This quick and easy step transforms your flat piece into a wearable hood. Be sure to check the fit before fastening off completely.
Next, you’ll crochet the collar directly onto the base of the hood. Work in rows or rounds depending on your preference. The collar should be tall enough to cover your neck comfortably but not too tight to restrict movement. You can add ribbing or texture by alternating between front and back post stitches for an elastic, stylish finish.
If you’d like to customize your Crochet Version – Easiest Hood with Collar, consider adding buttons to one side of the collar. This not only makes it adjustable but also adds a decorative element. Choose buttons that complement your yarn color for a cohesive look.
To make your hood even cozier, you can line it with soft fleece or add a drawstring around the hood’s opening. These small details make your creation stand out and enhance both comfort and warmth.
Finally, weave in all loose ends neatly using your yarn needle. Give your hood a gentle steam or blocking to set the shape and smooth any uneven stitches. This finishing step makes your handmade project look professional and ready to wear.
3. Styling and Wearing Your Crochet Version – Easiest Hood with Collar
One of the best things about the Crochet Version – Easiest Hood with Collar is its versatility. You can wear it with casual outfits, coats, or even indoors as a cozy accessory. It’s ideal for those chilly autumn mornings or breezy winter evenings when you need an extra layer of warmth without the bulk of a full scarf.
Pair your hood with a denim jacket for a trendy, laid-back look. The handmade texture contrasts beautifully with structured fabrics. For a more elegant style, choose neutral colors that blend well with your outerwear, creating a sophisticated ensemble.
If you enjoy outdoor walks or errands, the hood with collar design keeps your head and neck warm while freeing your hands. It’s also perfect for layering under a heavier coat without feeling too thick or restrictive.
Don’t hesitate to make multiple versions in different colors! The Crochet Version – Easiest Hood with Collar makes an excellent handmade gift for family and friends. You can personalize each one to suit their taste and add special touches like embroidery or buttons for a custom feel.
This project is not only fashionable but also functional. It teaches essential crochet skills such as shaping, joining, and finishing while giving you a useful accessory to enjoy all season long.
Lastly, remember that your handmade creations carry your personal touch. Each stitch reflects patience, love, and creativity – the essence of what makes crochet so meaningful.
4. Tips for Success and Variations
To ensure your Crochet Version – Easiest Hood with Collar turns out perfectly, always check your gauge before starting. This helps you maintain consistent tension and ensures your finished piece fits comfortably.
If you’re new to crochet, practice the basic stitches first, such as single crochet, double crochet, and half double crochet. These stitches form the foundation of most patterns and will make the process easier.
Experiment with different yarn types to achieve unique results. Cotton yarn creates a lightweight version ideal for mild weather, while chunky yarns make for an extra-warm winter accessory.
Adding decorative edges like shell stitches or picots can elevate your hood’s appearance. These details make your project more refined and give it a personal touch.
When washing your finished piece, always follow the yarn’s care instructions. Most yarns benefit from gentle hand washing and air drying to maintain their texture and shape.
Finally, enjoy the process! Crocheting should be relaxing and fun. Take breaks, work at your own pace, and celebrate each milestone as your Crochet Version – Easiest Hood with Collar comes to life.
FAQ
What skill level is required for this pattern?
The Crochet Version – Easiest Hood with Collar is suitable for beginners. The stitches are simple and repetitive, making it an ideal project for those new to crochet.
How long does it take to complete this project?
Depending on your speed and experience, it usually takes between 4 to 6 hours to finish. Experienced crocheters may complete it faster.
Can I adjust the size of the hood?
Yes! You can easily modify the size by increasing or decreasing the number of stitches and rows. Always measure as you go to ensure the best fit.
What is the best yarn for this project?
A soft, medium-weight acrylic or wool-blend yarn works best for comfort and warmth. Avoid stiff or scratchy yarns.
Can I add buttons or a drawstring?
Absolutely! Adding buttons or a drawstring gives your hood a stylish, adjustable look while improving functionality.
How do I care for my finished hood?
Hand wash gently in cold water and lay flat to dry. Avoid twisting or wringing the fabric to maintain its shape and softness.
Conclusion
The Crochet Version – Easiest Hood with Collar is a perfect project for anyone looking to make a practical yet stylish crochet accessory. This design is cozy, beginner-friendly, and endlessly customizable, making it an essential addition to your handmade wardrobe. Whether you craft it for yourself or as a heartfelt gift, it’s sure to be appreciated and admired.
Now that you’ve learned how to create this beautiful piece, we’d love to hear from you! Share your honest opinion, tips, or any creative variations you’ve tried. Your feedback inspires others and helps our crochet community grow with every new stitch.


