
Macrame Heart Bracelet - Free Tutorial

The art of knotting has held deep cultural significance for centuries, and with this DIY Chinese Knot – Free Pattern, you’re not just crafting something beautiful—you’re continuing a timeless tradition. From its symbolism of luck and unity to its intricate loops and balanced design, the Chinese knot carries charm and meaning into any space.
Whether you’re a seasoned crafter or just starting out, this pattern is a wonderful opportunity to explore heritage and handmade beauty all in one project.
Learning how to create a DIY Chinese Knot – Free Pattern is both satisfying and deeply calming. The methodical movements, the symmetrical shapes, and the rewarding final result make this a perfect project for those who enjoy meditative, hands-on creativity.
With a few simple materials and some guided practice, you can craft your own knot that’s perfect as a decorative accent, a handmade gift, or even a good luck charm.
One of the best things about following a DIY Chinese Knot – Free Pattern is how accessible it is. You don’t need expensive tools or advanced skills—just some cord, patience, and a touch of curiosity. This project welcomes everyone, and each finished knot is a reminder of your time and attention.
As you go through this article, you’ll discover detailed steps, helpful tips, and inspiring ideas for your own knotting adventure.
The Chinese knot has been used for centuries in decorative and ceremonial contexts. Often seen during the Lunar New Year or gifted at weddings, these knots are believed to bring good fortune. Their symmetrical shape reflects harmony and unity.
Historically, these knots were crafted from silk threads and worn on traditional clothing. They evolved into elaborate designs, combining form and function in everything from jewelry to home décor. Today, modern crafters continue to honor this tradition through handmade pieces.
Creating your own DIY Chinese Knot – Free Pattern lets you become part of this cultural legacy. Even a simple knot carries deep meaning and elegance. You’re not just making an ornament; you’re learning a form of symbolic storytelling.
Different types of knots represent different wishes—longevity, prosperity, peace, and more. With practice, you can combine knots into more complex patterns. Each loop and twist holds significance.
The beauty of this craft lies in its simplicity and symbolism. Even beginners can appreciate its meditative flow and graceful results. And as you gain confidence, your knots can evolve into more intricate works of art.
Understanding the cultural roots of this tradition enhances the experience. It gives depth to your crafting and reminds you of the values woven into every knot.
To get started with your DIY Chinese Knot – Free Pattern, gather a few essential supplies. You’ll need nylon or silk cord, scissors, a lighter (for sealing the ends), and a flat working surface. Thicker cords are easier for beginners to handle.
Choose vibrant colors that carry traditional meanings. Red symbolizes good luck, while gold stands for wealth. You can personalize your color choices to suit your décor or occasion.
Make sure your cord is at least 1 meter long when starting out. It’s better to have extra than not enough, especially when learning. You can trim any excess after you finish your knot.
Using a foam board and pins can help hold your design in place as you work. This is especially helpful for larger or more complex knots that require steady tension.
Before diving in, take a few minutes to practice basic loops and twists. Familiarize yourself with how the cord behaves. It’s a good warm-up that will make the final design smoother.
Lastly, keep patience in mind. Don’t rush. Knotting is a process, and it’s okay to redo steps until you’re satisfied. Each mistake is a chance to learn.
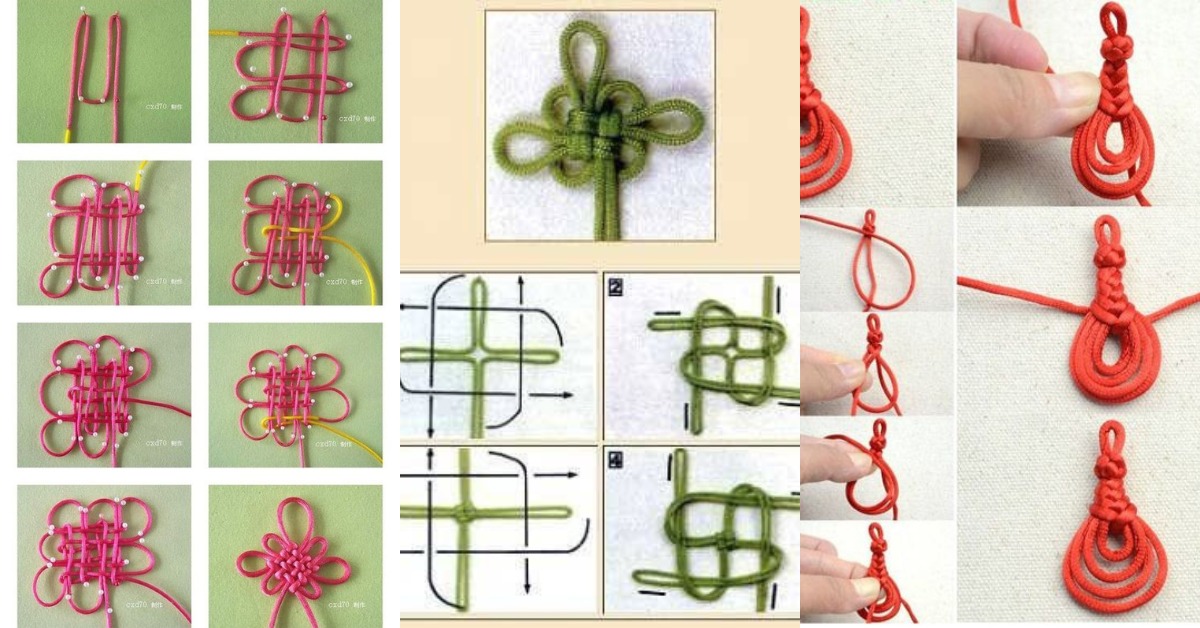
Now let’s walk through a basic DIY Chinese Knot – Free Pattern—the Pan Chang knot. This is a classic knot with a repeating over-under pattern and a square shape.
Start by folding your cord in half and making a loop near the center. This will be your anchor. Use your fingers or pins to hold the shape in place.
Begin weaving the right end of the cord over and under the other sections to form a grid. This can look confusing at first, but stay focused on the pattern. You’re creating interlocking loops.
Once your grid is in place, begin tightening each loop gently, one section at a time. It’s important to maintain even tension, so your knot keeps its shape.
After you’ve tightened the entire knot, inspect it from all angles. Make small adjustments as needed. Trim the cord ends and seal them with a lighter so they don’t fray.
For added decoration, consider adding beads to the ends or attaching a tassel. These finishing touches give your knot an elegant look, perfect for gifts or home accents.
Repeat the process with different lengths and colors to create variations. With practice, the steps will feel natural and you’ll begin to design your own patterns.
A completed DIY Chinese Knot – Free Pattern can be used in many creative ways. Hang it in your entryway to welcome prosperity and happiness. It’s a simple way to add culture and positivity to your home.
Attach the knot to a keychain or handbag for a unique accessory. It’s stylish, meaningful, and always a conversation starter.
Use multiple knots in a garland to decorate for holidays or special events. Their bright colors and symmetrical design bring energy and charm to any space.
Gift your knot to a friend or loved one. Handmade gifts carry emotional weight, and a Chinese knot conveys best wishes in a beautiful form.
Frame your knot as wall art. Choose a coordinating background fabric, mount it carefully, and place it in a shadow box. It becomes a centerpiece of tradition and craftsmanship.
Finally, consider using knots in clothing, jewelry, or bookmarks. Their lightweight and versatile nature means they can go wherever creativity takes you.
FAQ – DIY Chinese Knot – Free Pattern
Q: What type of cord is best for Chinese knots? A: Nylon or silk cord works best. Nylon is easier for beginners due to its flexibility and availability.
Q: How long should the cord be for a beginner project? A: Start with at least 1 meter of cord. It allows room for error and adjustment as you learn the pattern.
Q: Is the Pan Chang knot suitable for beginners? A: Yes, it’s a great starting knot. It looks complex but becomes easy with practice and repetition.
Q: How do I stop the cord ends from fraying? A: Use a lighter to carefully melt and seal the ends. Do this in a well-ventilated area and keep fingers clear.
Q: Can I make my own patterns after learning the basics? A: Absolutely. Once you understand the structure, you can experiment with combining knots and creating your own designs.
Q: Are Chinese knots only for decoration? A: No, they can also be used functionally—in jewelry, fashion, bookmarks, and accessories.
Conclusion
This article guided you through making your very own DIY Chinese Knot – Free Pattern, from its cultural roots to hands-on steps and creative applications. You’ve learned about the materials you need, the significance of each loop, and how to bring meaning into every creation. Whether you’re crafting for yourself or gifting someone special, this knot brings joy and connection.
If you found this tutorial inspiring, please leave a sincere comment with your thoughts or suggestions. Your feedback helps us create even more meaningful and beautiful patterns for everyone to enjoy.


