
If you love upcycling and crochet, the DIY Pull Tabs Crochet Flowers – Free Pattern is a perfect project to try. It combines eco-friendly crafting with colorful creativity, allowing you to turn discarded soda can tabs into beautiful floral designs.
These crocheted flowers are not only unique and eye-catching but also a fun and mindful way to reuse materials you already have at home.
Creating DIY Pull Tabs Crochet Flowers – Free Pattern is both rewarding and accessible to all skill levels. Whether you’re new to crochet or have years of experience, you’ll find that this project offers the right blend of simplicity and charm.
By crocheting around metal pull tabs, you give them a second life, transforming waste into art. These flowers can be used in keychains, brooches, bags, wall art, and even hair accessories.
What makes the DIY Pull Tabs Crochet Flowers – Free Pattern even more special is its adaptability. You can choose any yarn colors, flower sizes, or petal styles to match your vision. It’s an excellent project for small yarn scraps and ideal for community crafts, workshops, or gifts.
In this article, we’ll walk through all the essentials—from materials to customization—and by the end, you’ll feel confident to start your own blooming upcycled garden.
1. Materials You’ll Need to Get Started
To bring your DIY Pull Tabs Crochet Flowers – Free Pattern to life, the first step is gathering all the necessary materials. Fortunately, you won’t need anything too fancy, and you might already have most of these supplies at home.
You’ll need standard aluminum pull tabs, usually found on soda cans or energy drinks. Make sure they are clean, dry, and free of sharp edges. You can gently file down any rough spots with a nail file or sandpaper to make them safe to work with.
Next, choose your yarn. Cotton or acrylic yarns in DK or worsted weight work best. Cotton provides a neat and clean stitch definition, while acrylic offers a softer and puffier look. You can mix colors to create multicolored petals and centers for more flair.
A crochet hook between 3.5 mm and 4.5 mm is generally ideal. The size will depend on the yarn weight and your tension. If you’re a tight crocheter, go one size up to make working around the tabs easier.
You’ll also need scissors and a yarn needle for weaving in the ends. Stitch markers are optional but helpful if you’re making complex flower layers or want perfect petal placement.
For embellishing your finished flower, you might want buttons, beads, or small felt pieces to decorate the center or back. These additions give your DIY Pull Tabs Crochet Flowers – Free Pattern a personalized and polished finish.
2. Step-by-Step Instructions for Crafting the Flowers
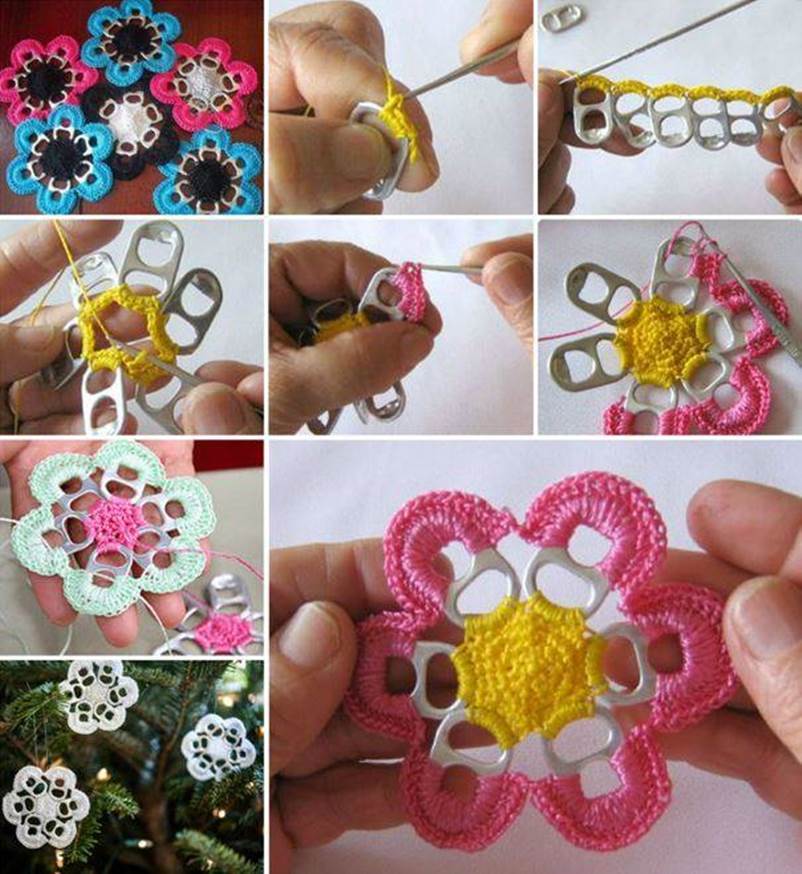
Now that you have your materials, it’s time to dive into the step-by-step process of making your first DIY Pull Tabs Crochet Flowers – Free Pattern. The design begins by wrapping the pull tabs with yarn and forming the petals around them.
Start by inserting your hook into one of the openings of the pull tab and pull up a loop of yarn. Make a series of single crochets around the edge to completely cover the metal tab. This forms the base of your flower petal and keeps the metal hidden.
Repeat the same process with more pull tabs—usually five to six make a complete flower. Crochet around each tab individually before connecting them in a circular shape using slip stitches or single crochets at the base.
Once all petals are connected, you can add a second layer of decorative stitches, such as picots or shells, around the outside edge of the petals. This adds texture and gives your DIY Pull Tabs Crochet Flowers – Free Pattern a more layered and realistic look.
For the flower center, crochet a small circle using a magic ring or start with chain 2 and work several single crochets into the second chain from the hook. Attach this circle to the middle of your joined petals with a whip stitch or glue, depending on your preference.
Secure all loose ends and optionally sew a button or bead in the center to complete the flower. Make sure everything is tightly fastened, especially if the flower will be used in wearable items or handled often.
3. Creative Uses for Your Crochet Pull Tab Flowers
One of the most exciting aspects of the DIY Pull Tabs Crochet Flowers – Free Pattern is its versatility. Once you’ve mastered the basic flower, you can use it in a wide variety of creative projects around your home or as gifts.
Attach your flowers to brooch pins or hair clips for charming accessories. They’re lightweight and durable, making them perfect for daily use or as special event pieces. You can even mix and match flower sizes to create unique designs.
Use them as appliqués on handbags, hats, or denim jackets. A few colorful flowers can completely transform a plain item into something stylish and original. It’s a great way to upcycle old clothes and make them feel new again.
If you’re into home décor, create a garland of flowers by stringing them together with a simple chain or ribbon. Hang the garland on a wall, above a window, or use it as festive decoration for a party or baby shower.
You can also create magnets by attaching a strong adhesive magnet to the back of your flower. These look lovely on refrigerators, lockers, or office boards and make excellent handmade gifts.
Turn your flower into a keychain by sewing it onto a felt backing and adding a keyring. It’s a thoughtful and eco-friendly gift that’s both practical and beautiful. Customize the yarn color based on the recipient’s favorite shades.
For gift wrapping, use these flowers in place of bows on packages. They add a handmade touch and are reusable—much more meaningful than disposable decorations.
4. Tips to Make Your Crochet Flowers Stand Out
While the basic DIY Pull Tabs Crochet Flowers – Free Pattern is beautiful on its own, a few extra touches can elevate your creation and make it even more special. Here are some tips to help your flowers stand out.
Play with color combinations. Using contrasting yarns for petals and centers adds visual interest. Try variegated yarns for a natural, multicolor petal effect without needing to change yarn mid-project.
Vary the number of petals or pull tabs used to change the flower’s look. Some flowers with three petals have a minimalist aesthetic, while others with eight or more look lush and full.
Incorporate textures. Use a mix of yarns—such as velvet or metallic thread—for a more luxurious feel. Just make sure the yarn isn’t too slippery or thin for the pull tabs.
Add sparkle. A few sequins or metallic beads sewn into the center or tips of the petals can add a festive shine, perfect for holiday-themed flowers or special occasion décor.
Reinforce your stitches when using the flowers for wearable items. Double-knot and weave in ends securely. You can even apply a fabric glue on the back to make it more durable and long-lasting.
Try shaping the petals after finishing. Slightly curve or fold them for a 3D effect. A bit of blocking can help the flower keep its shape, especially if you’re using natural fibers like cotton.
FAQ: DIY Pull Tabs Crochet Flowers – Free Pattern
Q: Are pull tab crochet flowers safe for children to handle?
A: Yes, as long as the tabs are smoothed and secured properly with no sharp edges. Always supervise younger children when handling metal parts.
Q: Do I need special tools to clean the pull tabs?
A: No, just soak them in soapy water and scrub lightly. A nail file or sandpaper can be used to smooth out any rough spots.
Q: Can I use any type of yarn for this project?
A: Most yarns work, but cotton and acrylic are recommended for ease of use and durability. Avoid yarns that are too fine or slippery.
Q: How do I keep the petals evenly spaced?
A: Use stitch markers or count your stitches carefully. Joining the tabs with slip stitches at a consistent angle also helps keep the spacing symmetrical.
Q: How many pull tabs do I need per flower?
A: Typically 5 to 6 tabs are used for a full flower. You can experiment with more or fewer depending on your desired design.
Q: Can I wash the finished flowers?
A: Yes, hand-washing is best. Avoid machine washing, as the metal may rust or snag on other items.
Conclusion
The DIY Pull Tabs Crochet Flowers – Free Pattern is a delightful and sustainable craft that brings together creativity, recycling, and crochet. It’s beginner-friendly yet offers endless room for customization, making it a great project for solo crafting or group activities. You’ve learned what materials to use, how to make each part of the flower, ideas for displaying and gifting them, and tips to personalize each one.
We hope this article inspired you to create your own blooming bouquet of recycled beauty. If you enjoyed this guide, please leave your sincere opinion or suggestions in the comments. We love hearing from you and would be thrilled to know how your flowers turned out or what patterns you’d like us to write about next!


