
Macrame Heart Bracelet - Free Tutorial

The Dumpster Raccoon Crochet Pattern is a fun and creative project that brings humor and charm into the world of amigurumi. Whether you are an experienced crocheter or just beginning your crafting journey, this project allows you to make a playful raccoon that captures the mischievous personality of the beloved “trash panda.”
By using yarn, a crochet hook, and a touch of imagination, you can bring to life a cute raccoon that looks like it just crawled out of a dumpster with its little paws and curious eyes. This pattern combines the best of crochet artistry with storytelling through handmade toys.
Crafting with the Dumpster Raccoon Crochet Pattern also gives crafters the opportunity to experiment with textures and colors. Raccoons are known for their striped tails and unique facial markings, which makes them excellent subjects for crochet projects.
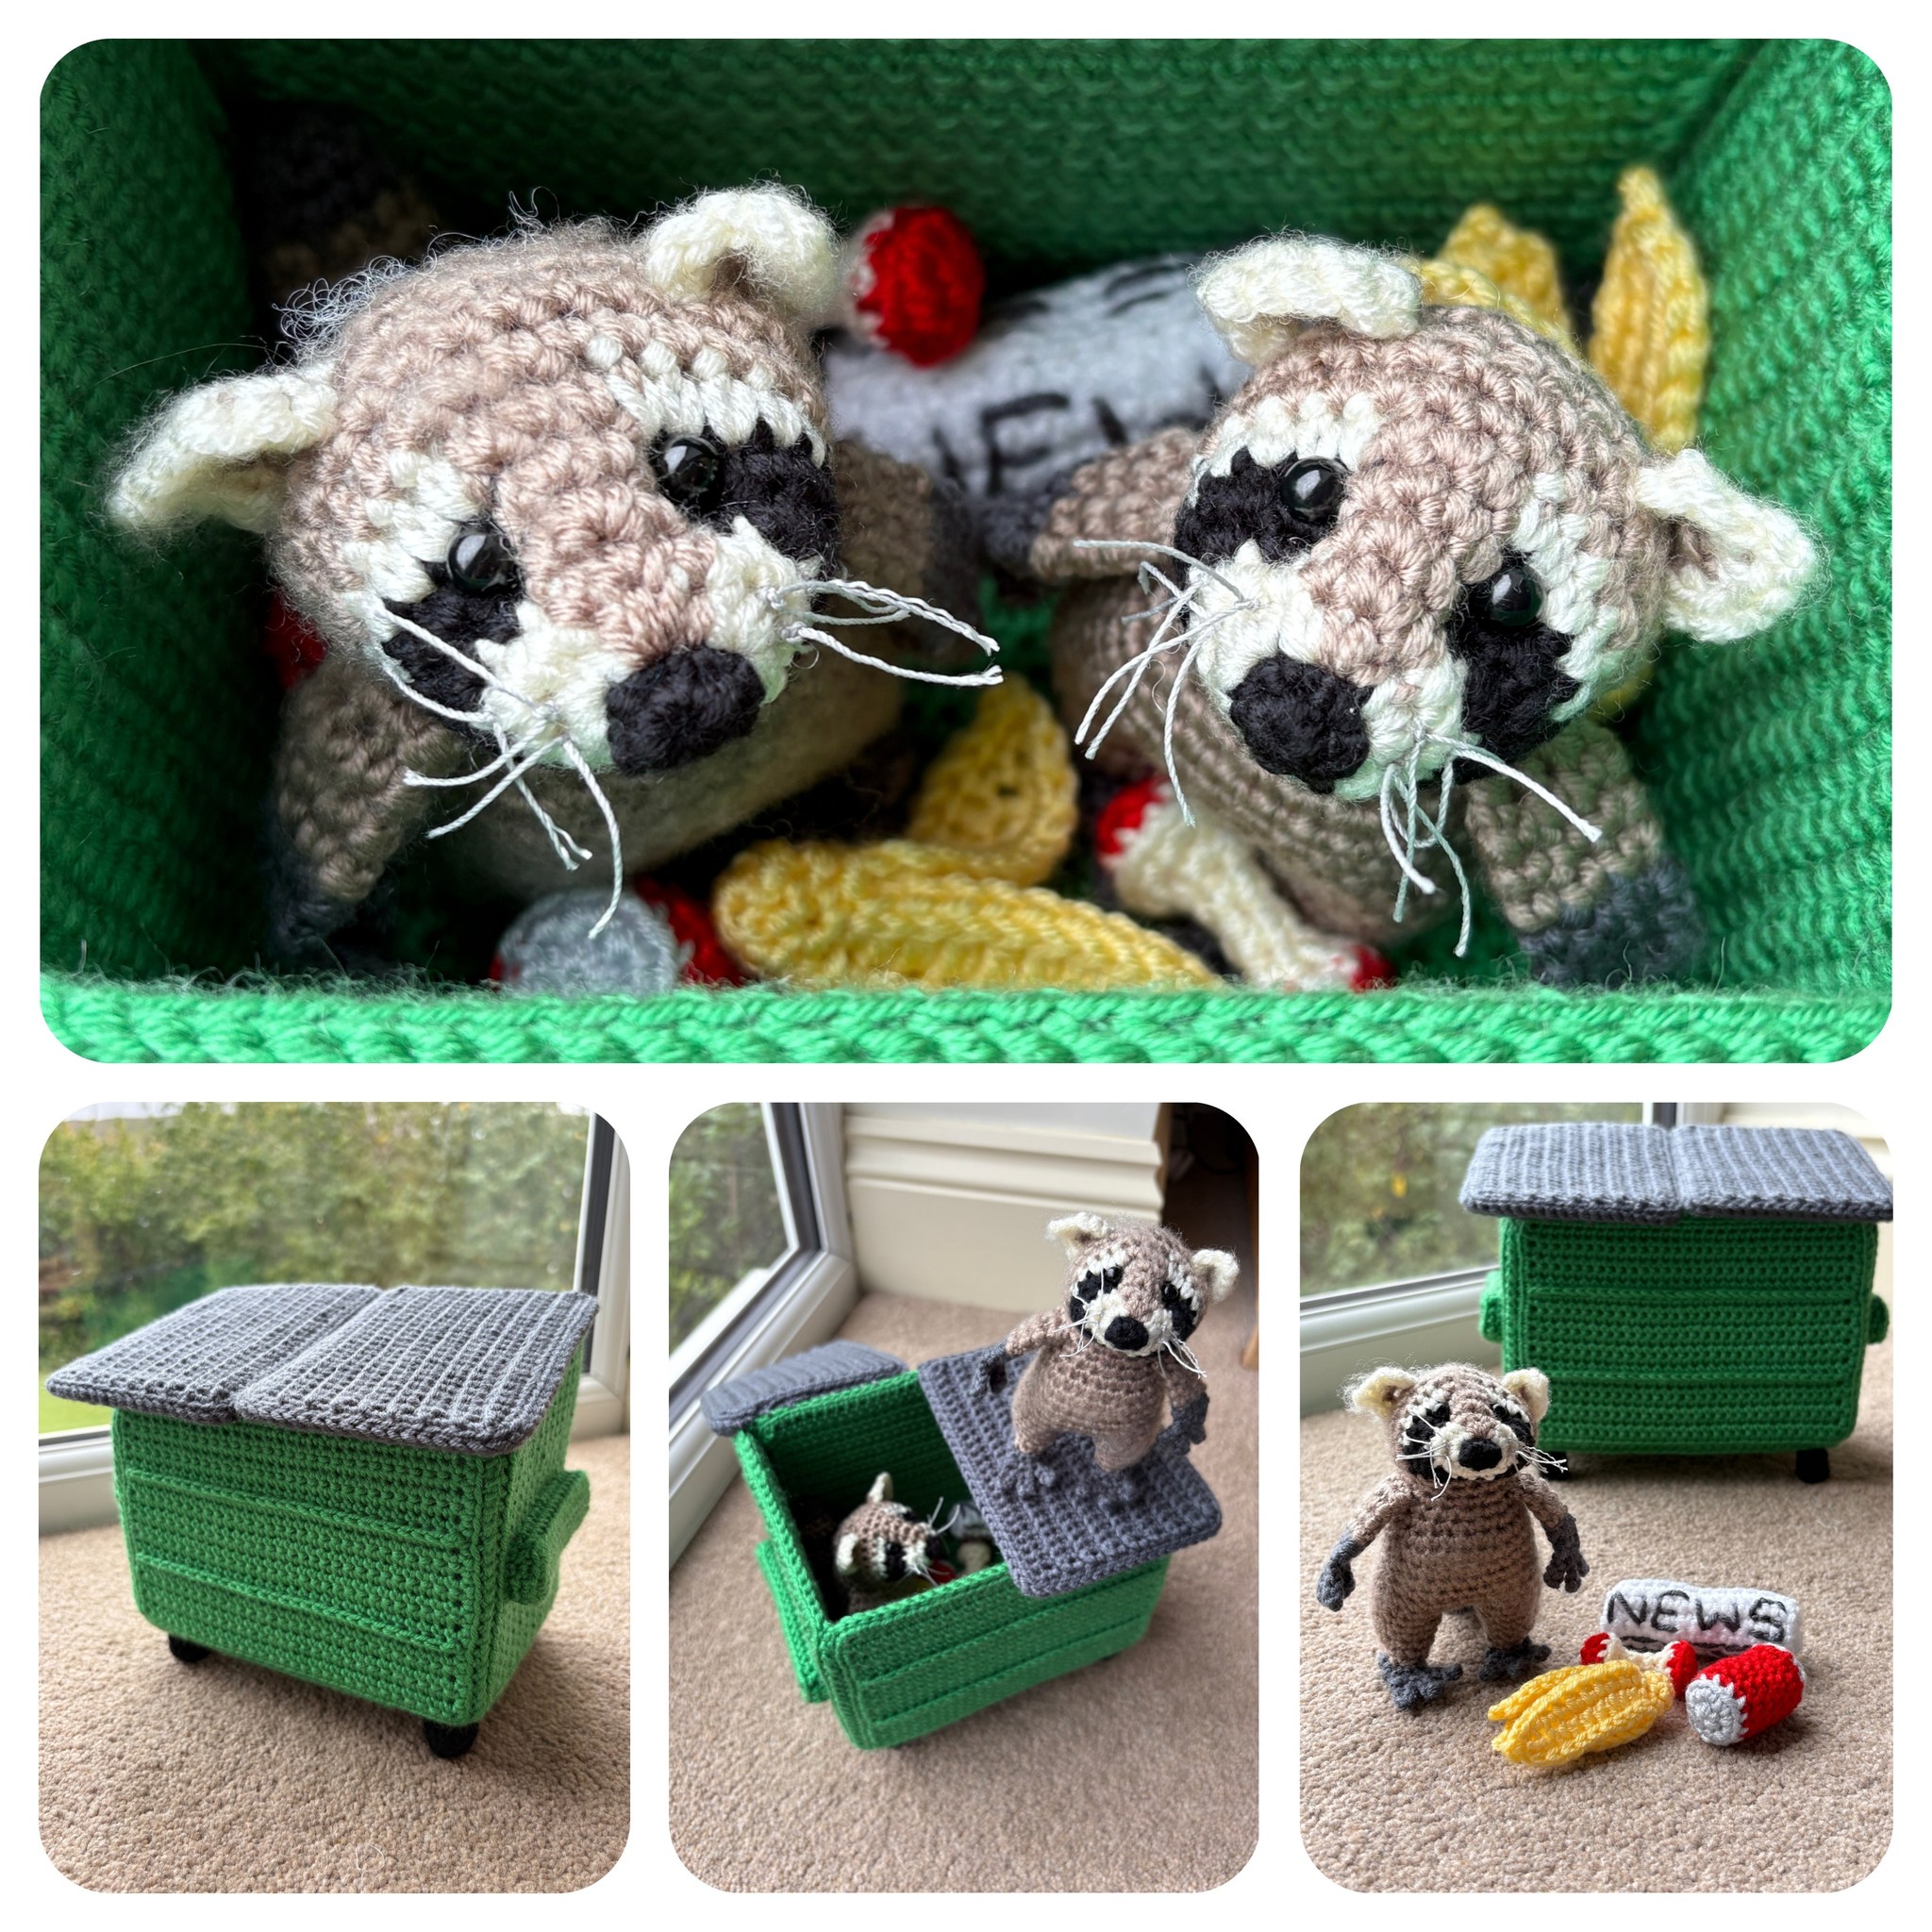
With this design, you can create an amigurumi raccoon that has distinct personality and playful details. Adding accessories like a tiny garbage can or scraps of yarn “trash” can take your finished piece to a whole new level of creativity. Each raccoon can be customized to suit your personal taste, whether you prefer a realistic look or a whimsical one.
For many crocheters, the Dumpster Raccoon Crochet Pattern is more than just a cute project—it is also a way to practice stitches, improve amigurumi shaping techniques, and create something that can be gifted or displayed.
Handmade toys like this raccoon make wonderful presents for children, friends, or anyone who enjoys unique and quirky items. They also work as conversation starters when displayed in your home. By working on this project, you not only enjoy the relaxing process of crochet but also end up with a finished piece that radiates charm and fun.
One of the main reasons crafters love the Dumpster Raccoon Crochet Pattern is the unique personality it brings. Unlike traditional animal amigurumi, this pattern embraces the mischievous and humorous reputation raccoons have, making the project stand out. It’s not just another animal—it’s a character with a story to tell.
Another great advantage is that the pattern is beginner-friendly while still offering some challenges for more advanced crocheters. The shaping of the body, the striped tail, and the distinctive raccoon face help crafters strengthen their skills. For those new to amigurumi, it is an excellent way to learn shaping techniques.
The versatility of this pattern also makes it appealing. You can crochet the raccoon in traditional gray and black, or you can let your creativity run wild with bright, fun colors. Imagine a purple raccoon with glitter yarn, or a pastel raccoon perfect for a nursery. The possibilities are endless.
Additionally, the finished product from the Dumpster Raccoon Crochet Pattern makes a memorable gift. Handmade toys show thoughtfulness and effort, and giving a quirky raccoon will surely bring smiles. It’s ideal for birthdays, holidays, or as a fun surprise.
This pattern also connects crafters with a wider crochet community. Sharing your finished raccoon online or with friends often sparks conversations and inspires others to try it. It’s a project that encourages creativity and connection.
Finally, the satisfaction of making something that is both adorable and funny cannot be overstated. Crafting your very own “trash panda” is rewarding, entertaining, and guaranteed to brighten your day.
To successfully complete the Dumpster Raccoon Crochet Pattern, you’ll need basic crochet materials. The main supplies include yarn in colors like gray, black, and white for a realistic raccoon look. You can also add accent colors for fun details. Soft acrylic yarn is often the best choice for amigurumi since it holds shape well.
A crochet hook suited to your yarn size is essential. Most patterns recommend smaller hooks for amigurumi, which keeps the stitches tight so stuffing does not show through. A 2.5mm or 3.5mm hook is commonly used, but the exact size may vary.
You’ll also need safety eyes or embroidered eyes to give your raccoon character. Safety eyes add realism, while embroidery works well for small children’s toys where choking hazards must be avoided. A small nose can also be embroidered or crafted with felt.
Other tools include a yarn needle for sewing parts together, stitch markers to keep track of rounds, and scissors for cutting yarn. Stuffing is necessary to give your raccoon shape. Polyester fiberfill is commonly used and creates a soft, durable toy.
Optional materials can elevate your raccoon further. Small felt pieces can add facial details, while extra yarn scraps can be used to create tiny “trash” accessories for added humor. Some crocheters even place a small weighted pouch inside the raccoon so it can sit upright.
Having all your materials ready before starting will make the process smoother and more enjoyable. With just these basic supplies, you can bring your dumpster raccoon to life.
The Dumpster Raccoon Crochet Pattern typically starts with the raccoon’s head. Amigurumi projects often begin with a magic ring, then expand in rounds to shape the head. This allows for a smooth, seamless base for the face. Adding facial markings is done either by color changes or by attaching separate crocheted pieces.
Next, the body is created by continuing rounds or by making a separate piece to be attached later. The body should be slightly oval and proportionate to the head. At this stage, you’ll also start stuffing lightly to maintain the shape.
The ears, arms, and legs are usually crocheted separately and then sewn onto the main body. Raccoon ears are small and triangular, while the arms and legs can be short and stubby, adding to the cute effect. Attaching these parts carefully ensures a balanced look.
The tail is one of the most fun parts of the pattern. The Dumpster Raccoon Crochet Pattern often includes a striped tail, achieved by alternating yarn colors every few rounds. This detail is what truly makes your raccoon recognizable and playful.
Once all parts are complete, assembly is the next step. Sewing everything together with a yarn needle requires patience, but it’s also when your raccoon’s personality comes to life. Carefully positioning the eyes, nose, and tail makes a big difference.
Finally, you can add finishing touches like small accessories. A tiny crocheted garbage bin or scraps of yarn pretending to be trash can complete the whimsical theme. This extra detail is what sets your raccoon apart and makes it unforgettable.
One of the best tips for working on the Dumpster Raccoon Crochet Pattern is to use tight stitches. Loose stitches may allow stuffing to peek through, which can affect the overall look of your amigurumi.
It’s also helpful to use stitch markers. Since amigurumi is usually worked in continuous rounds, it can be easy to lose track. A simple marker saves time and keeps your project even.
When choosing yarn, consider mixing textures. A soft fluffy yarn for the tail can give your raccoon extra charm. However, be sure to balance textured yarns with smooth ones for easier stitching.
Stuffing should be done gradually. Overstuffing can stretch stitches, while under-stuffing makes the raccoon floppy. Aim for firmness while still keeping the toy huggable.
Practice patience with assembly. The placement of eyes and ears affects the raccoon’s expression. Trying different positions before sewing permanently can help you get the look you want.
Lastly, don’t be afraid to personalize your raccoon. Add a bow, a scarf, or even a crocheted fish bone for extra fun. Custom details turn your raccoon into something truly unique.
1. Is the Dumpster Raccoon Crochet Pattern beginner-friendly?
Yes, it is suitable for beginners with some basic knowledge of amigurumi. The pattern is straightforward, but it also allows room for more experienced crocheters to add details.
2. How long does it take to complete the raccoon?
On average, it can take 6–10 hours depending on your skill level and the amount of detail you add. Beginners may take longer, while advanced crocheters can finish more quickly.
3. What yarn is best for this project?
Soft acrylic yarn works best for durability and stitch definition. Cotton yarn is also a good choice if you prefer a more structured finish.
4. Can I make the raccoon bigger or smaller?
Yes, by adjusting the yarn weight and hook size, you can scale your raccoon to the desired size. Thicker yarn and larger hooks make a bigger raccoon, while smaller materials make a mini version.
5. Are safety eyes necessary?
No, you can use embroidery if the raccoon is for a child or if you prefer a different look. Safety eyes are popular for realism but embroidery ensures child safety.
6. Can I sell raccoons made from this pattern?
Yes, most designers allow selling finished items, but it’s always good practice to credit the pattern creator if specified.
The Dumpster Raccoon Crochet Pattern is a delightful project that blends humor, skill, and creativity into one handmade toy. From its striped tail to its cheeky face, this raccoon brings personality to amigurumi and joy to crafters. With the right yarn, tools, and patience, you can create a raccoon that reflects your style and makes people smile.
If you love crochet projects that are fun, unique, and full of character, this pattern is an excellent choice. Now that you know how to approach the Dumpster Raccoon Crochet Pattern, it’s time to grab your yarn and hook to get started. Don’t forget to leave your honest opinion and suggestions—I’d love to hear how your raccoon turns out and what creative details you add.


