
If you’re searching for a relaxing and beginner-friendly crochet technique, the Easy Corner to Corner (C2C) Crochet Wattle Stitch is a fantastic option.
Combining the simplicity of the wattle stitch with the dynamic structure of C2C crochet, this technique is ideal for creating cozy blankets, decorative cushions, and wearable accessories that feature texture and style.
The Easy Corner to Corner (C2C) Crochet Wattle Stitch adds a unique diagonal texture that makes projects stand out while still being very easy to learn.
Whether you’re new to crochet or an experienced maker looking for a quick and satisfying project, this method opens the door to creative possibilities.
In this article, you’ll discover what makes this technique so popular, how to work the stitch from start to finish, the best projects for it, and useful tips to get beautiful results every time. Let’s dive into the beauty of the C2C wattle stitch world!
1. Understanding the C2C Crochet Wattle Stitch
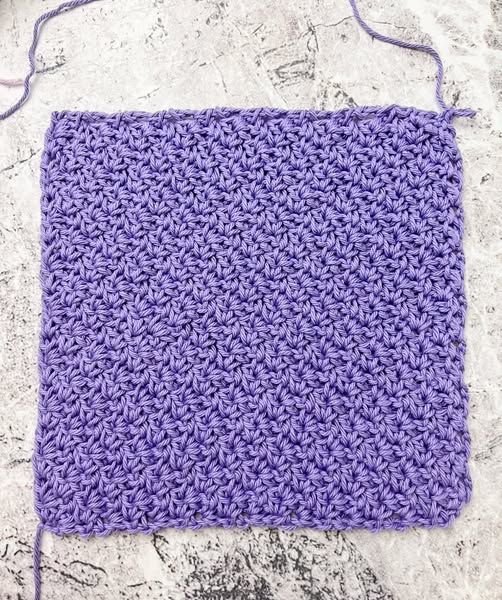
The Easy Corner to Corner (C2C) Crochet Wattle Stitch combines two popular elements: the corner-to-corner construction method and the wattle stitch texture.
The C2C (corner to corner) method is a crochet technique that works from one corner of your project diagonally to the opposite corner. It’s commonly used for pixel-style blankets and graphgans, but it’s also suitable for simple textured projects.
The wattle stitch is a beginner-friendly stitch that consists of a single crochet, chain one, and double crochet all worked into the same stitch or space. This creates a dense but flexible texture with subtle vertical lines.
When combined, the C2C wattle stitch offers a new way to approach texture in diagonal patterns. Unlike traditional C2C made of double crochet blocks, this version builds small textured stitches row by row, increasing and decreasing diagonally across your project.
It’s a great alternative for those who love C2C but want a change in texture or need a tighter stitch for baby blankets or winter scarves.
Best of all, the pattern is easy to memorize, making it ideal for relaxing crochet sessions or taking on the go.
2. Materials and Tools You’ll Need
Before starting your Easy Corner to Corner (C2C) Crochet Wattle Stitch project, make sure you have the following supplies ready:
First, select a medium weight (worsted weight) yarn, especially if this is your first time trying this stitch. Cotton and acrylic yarns both work well depending on the project—cotton for home décor, and acrylic for wearables and blankets.
Next, choose an appropriate crochet hook. For worsted yarn, a 5.0mm (H-8) or 5.5mm (I-9) hook is usually ideal. Always check the yarn label for the recommended size.
You’ll also need a tape measure, yarn needle for weaving in ends, and scissors. Optional tools include stitch markers and row counters, especially if you’re working on a large project like a blanket.
For practicing, start with two colors if you want to see your diagonal increases and decreases more clearly. This is helpful for visual learners.
Lastly, have a notepad or digital note open to track row increases and decreases until you get the hang of the flow.
Gathering the right materials will make your C2C wattle stitch experience smoother and more enjoyable.
3. How to Crochet the Easy C2C Wattle Stitch
Let’s break down how to work the Easy Corner to Corner (C2C) Crochet Wattle Stitch from start to finish.
Step 1: Start with a chain of 4.
Work your first wattle cluster (sc, ch 1, dc) into the 2nd chain from the hook. This forms your first block. Chain 1, turn.
Step 2: Increase rows.
To increase, chain 4 at the beginning of each row. Work a wattle cluster in the 2nd chain from the hook, then continue placing clusters into each ch-1 space from the previous row. Repeat this step to create a triangle.
Step 3: Maintain body size (for square projects).
Once your project reaches the desired width, continue working even without increasing, which maintains the same number of blocks per row.
Step 4: Decrease rows.
To decrease, do not chain 4. Instead, slip stitch across the first cluster to the next ch-1 space, then begin your row with a new wattle cluster. This shifts your starting point inward and decreases the width.
Step 5: Final block.
Your last row will be a single wattle cluster. Fasten off and weave in ends neatly with a yarn needle.
Step 6: Blocking (optional).
For a flat and professional finish, lightly block your project, especially if it’s a square or rectangle.
Once you’ve mastered these steps, you’ll be able to work the Easy C2C Wattle Stitch into a wide variety of beautiful handmade creations.
4. Project Ideas and Customization Tips
The Easy Corner to Corner (C2C) Crochet Wattle Stitch opens the door to endless project possibilities. Here are a few ideas to get you inspired:
Blankets and Baby Afghans
This stitch is ideal for baby blankets, thanks to its dense yet soft texture. Use pastel colors and customize the size with simple increase and decrease rows.
Scarves and Shawls
Make cozy accessories by working C2C rows until you reach the length and width you prefer. The wattle stitch adds drape and warmth perfect for winter wear.
Cushion Covers
Two square panels made using the wattle C2C method can be sewn together for a stylish, textured pillow. Try earthy tones for a modern home vibe.
Table Runners and Mats
The tight stitch pattern makes it suitable for home décor items like placemats or runners. Just be sure to block your final piece.
Mix and Match Textures
Combine C2C wattle stitch panels with other stitch patterns for a patchwork-style throw. This is a great way to show off your skills and make use of leftover yarn.
Color Changes and Striping
Alternate yarn colors every few rows for stripes, or use ombre yarns for a beautiful gradient effect without having to weave in extra ends.
Experimenting with these ideas will help you make the most of the Easy Corner to Corner (C2C) Crochet Wattle Stitch in your own creative way.
FAQ – Easy Corner to Corner (C2C) Crochet Wattle Stitch
Q: Is the C2C wattle stitch suitable for beginners?
Yes! It’s beginner-friendly and easy to memorize. If you’ve learned basic stitches like single crochet, double crochet, and chains, you’ll do great.
Q: How is this different from traditional C2C?
Traditional C2C uses double crochet blocks. The wattle version uses a textured stitch pattern for a denser fabric and more subtle look.
Q: What’s the best yarn to use for this stitch?
Worsted weight yarn is ideal. Cotton works well for décor, while acrylic is perfect for blankets and accessories.
Q: Can I follow a graph pattern using this method?
Yes, although it’s more challenging than with traditional C2C. The clusters can make color changes trickier, but it’s possible with planning.
Q: How do I keep my edges straight?
Be consistent with your turning chains and use stitch markers if needed to track increases and decreases.
Q: Is blocking necessary?
Not always, but it helps your project lie flat and look professional, especially for square items like blankets or pillow covers.
Conclusion
The Easy Corner to Corner (C2C) Crochet Wattle Stitch is a versatile and enjoyable technique that blends structure with beautiful texture. It’s a wonderful choice for beginners who want to explore C2C methods or experienced crocheters looking for a fresh take on diagonal crochet.
From blankets to scarves, pillow covers to home décor, this stitch adapts beautifully to many projects. The best part? It’s fun, relaxing, and offers a polished look without complex patterns.
VIDEO TUTORIAL
We hope this guide has inspired you to try the Easy C2C Wattle Stitch in your next project. Have questions or your own tips to share? Leave a sincere comment below with your thoughts or suggestions—we love hearing from fellow makers like you!


