
The Easy crochet grandma square bag – pattern is a delightful and beginner-friendly project that blends timeless charm with practical style. Perfect for crafters who enjoy mixing nostalgia with functionality, this project utilizes the classic granny square technique in a modern, useful way.
Whether you’re making it for personal use or as a heartfelt gift, this bag pattern is both fun and satisfying to crochet.
This project is ideal for beginners because it introduces simple, repetitive stitch patterns that gradually build into something beautiful. Experienced crocheters will enjoy the meditative process and the ability to customize colors, textures, and sizes.
One of the reasons why the Easy crochet grandma square bag – pattern has gained popularity is its adaptability. You can make it in vibrant rainbow colors for a fun summer bag or choose muted earth tones for a sophisticated everyday accessory.
Another wonderful aspect of this pattern is that it allows for creative reuse of yarn scraps. Granny squares are known for being a great stash-busting project.
You can mix and match yarns in various colors and textures, which makes every grandma square bag unique. From styling your own accessory to upcycling yarn leftovers, this project encourages creativity and sustainability in equal measure.
1. What You Need to Get Started
Before you dive into creating your easy crochet grandma square bag, it’s essential to gather the right tools and materials. The beauty of this project lies in its simplicity; you don’t need fancy equipment or expensive yarns. Just a few basic supplies will do.
You’ll need a 4.0 mm to 5.0 mm crochet hook, depending on your yarn’s thickness. The standard worsted weight (category 4) yarn works well for durability and ease. Cotton yarn is especially recommended if you want a sturdier and washable finish for everyday use.
Don’t forget a pair of scissors, a yarn needle for weaving in ends, and some stitch markers if you like keeping track of your rounds. Optional but useful items include a lining fabric and a zipper or magnetic closure if you prefer a bag with more structure.
Choosing your yarn colors is a fun step in this process. You can stick to a single color for a minimalist look or go bold with multiple contrasting colors for a bohemian effect. The traditional granny square design lends itself beautifully to both styles.
Each granny square is created individually, so you can take your time with one square per session. Once you’ve made enough squares—typically between 8 and 16 for a small to medium bag—you’ll sew or crochet them together. This modular approach makes the project portable and easy to manage.
You can customize the size of your bag simply by adjusting the number of granny squares you use. Add a longer strap to convert it into a crossbody bag or keep it short for a cute handbag style. You’re in full control of the look.
2. Step-by-Step Instructions for Making Granny Squares
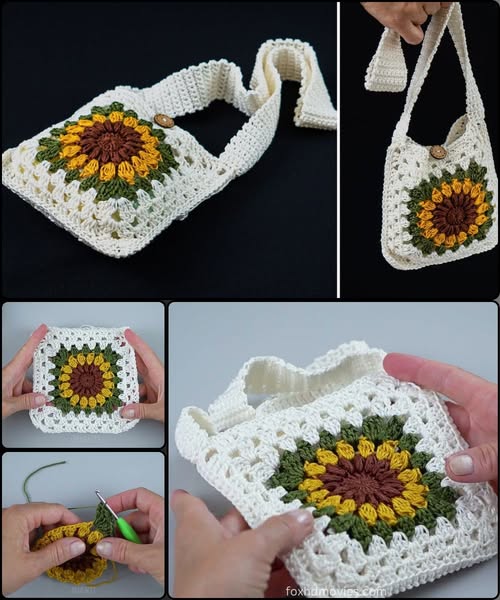
The foundation of the easy crochet grandma square bag – pattern lies in mastering the classic granny square. These motifs are simple to learn and offer endless design possibilities. They are made using clusters of double crochet stitches, typically worked in the round.
Begin with a magic ring or chain 4 and join to form a ring. This will be the center of your square. From here, you’ll work three double crochet stitches into each corner, separated by chain spaces, forming the basic shell pattern.
As you continue to build your rounds, each side of the square increases naturally. Make sure to maintain the shape by adding chain spaces in the corners and working three double crochets in each side space.
You can make each square with a single color or change colors every round for a more dynamic look. Using multiple colors helps define each round, giving your granny square bag a playful and vibrant personality.
If you’re unsure how many rounds to make per square, a good size is 4 to 6 rounds. This results in squares that are easy to handle and sew together while providing enough space to show off the pattern and colors.
Once your squares are complete, block them if needed. This means laying them flat, lightly dampening them, and pinning them to shape. Blocking helps smooth edges and ensures uniformity when joining the pieces.
Repeat the granny square process until you have the desired number. Usually, 13 to 17 squares will make a decently sized bag. Don’t forget to make additional squares if you’d like to add pockets or extend the bag’s shape.
3. Assembling Your Grandma Square Bag
After you’ve completed your granny squares, it’s time to assemble your easy crochet grandma square bag – pattern into a functional tote or handbag. This step is creative and satisfying, as your squares come together into a finished product.
Layout your squares in the desired arrangement. Most bags are formed using two rows of squares for the front and back, plus additional squares for the sides and bottom. Think of the layout like building a cube or box.
Use a slip stitch or whip stitch to join the squares. You can crochet them together using a contrasting yarn for a visible seam or match the color for a seamless appearance. Be consistent in your joining method for a tidy finish.
Once the squares are joined into panels, connect those panels into the shape of a bag. Start by joining the side seams, followed by the bottom. Reinforce the bottom edge with extra stitches if you want added durability.
To give the bag more structure, consider adding a fabric lining. Simply cut and sew a fabric interior that matches the dimensions of your bag. This keeps the shape firm and helps prevent items from poking through the crochet holes.
Add straps using a chain and single crochet method or repurpose an old bag strap. The straps can be attached to the upper edge of your bag using sturdy stitches, and you can even line them for added comfort.
If desired, you can incorporate closures like a button, zipper, or magnetic snap. This adds security and polish to your granny square crochet bag, making it both beautiful and practical for daily use.
4. Customization Ideas and Styling Tips
Now that your easy crochet grandma square bag – pattern is complete, let’s talk about customization. One of the best parts of this project is how flexible and unique each version can be, depending on your personal style.
Add appliqués like flowers, hearts, or stars to some of the squares. This gives your bag a playful and handcrafted touch. You can even embroider on top of the finished bag for extra detailing.
Consider using textured yarns like boucle or metallic threads for one or more squares to add dimension. Even using alternating types of yarn—such as one cotton and one acrylic—creates a striking contrast.
For a festival or boho look, fringe and tassels can be added to the bottom or sides of the bag. These extras elevate the bag from simple handmade to boutique-worthy accessory.
Use your bag seasonally by customizing the colors. Pastels for spring, brights for summer, earth tones for fall, and deep jewel colors for winter. This makes the easy crochet grandma square bag a year-round project.
The size of the bag can be easily changed depending on the occasion. A mini version can hold essentials for a quick trip out, while a larger tote can carry books, groceries, or beach gear.
Finally, if you enjoy crafting for others, this bag makes a thoughtful and functional handmade gift. It’s ideal for birthdays, holidays, or even as a reusable gift bag filled with other surprises.
FAQ – Easy Crochet Grandma Square Bag – Pattern
Q1: Is this pattern suitable for complete beginners?
Yes! The easy crochet grandma square bag – pattern is a great beginner-friendly project. If you know how to double crochet and chain, you can make this bag with ease.
Q2: How many granny squares do I need?
It depends on the size of the bag you want. On average, you’ll need 13 to 17 squares for a medium-sized bag.
Q3: Can I use leftover yarn for this project?
Absolutely. This is a great stash-busting project. Using leftover yarns can add charm and uniqueness to your bag.
Q4: Does the bag need to be lined?
Lining is optional but recommended. It adds structure and helps keep small items secure inside the bag.
Q5: What type of yarn works best for this pattern?
Worsted weight cotton yarn is a good choice because it’s strong, washable, and durable.
Q6: Can I add a zipper or closure?
Yes. You can add zippers, magnetic snaps, or even drawstring closures depending on your preference.
Conclusion
In this article, we explored the Easy crochet grandma square bag – pattern in detail—from selecting materials to assembling the final product and adding personalized touches. This pattern is not only beginner-friendly but also endlessly adaptable, allowing crafters of all skill levels to express creativity.
Whether you want a practical accessory, a stylish statement piece, or a heartfelt handmade gift, this pattern has you covered. With its timeless design and modern appeal, the granny square bag truly never goes out of style.
VIDEO TUTORIAL
If you enjoyed this tutorial, we’d love to hear from you! Leave your honest opinion or suggestions below. What colors did you use? Did you try any fun customizations? Your feedback helps inspire other crafters in the community.


