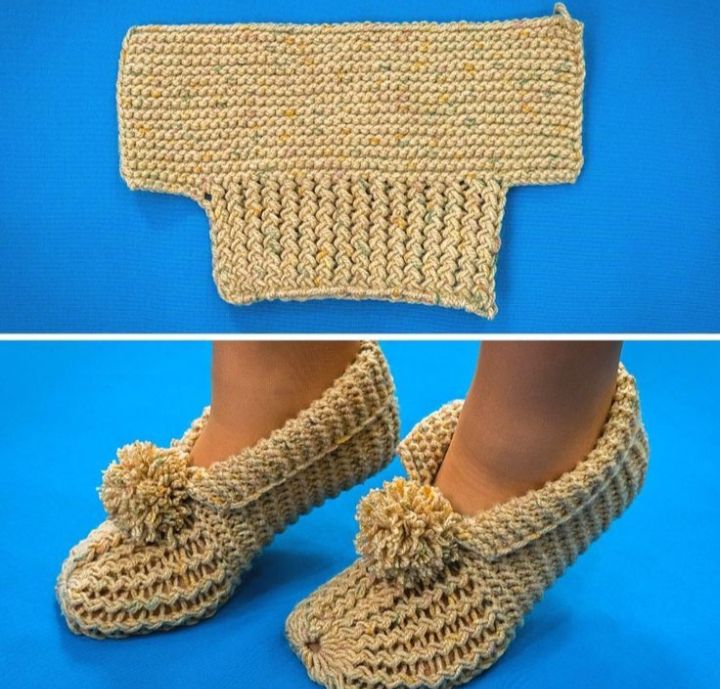
EASY SLIPPER FOR BEGINNERS – FREE PATTERN is one of the most searched crochet projects by those who are just starting out. It combines comfort, simplicity, and style, all in one easy-to-follow project.
Whether you’re looking to create your first wearable crochet item or need a quick handmade gift, this free pattern is ideal for building your confidence.
Making slippers by hand is not only relaxing but also practical. You get to choose the colors, yarn thickness, and size that perfectly match your feet or the person you’re gifting.
Many beginners are surprised at how quickly they can complete a pair of these cozy slippers using basic stitches and a minimal amount of yarn.
In this article, we’ll guide you step-by-step through an EASY SLIPPER FOR BEGINNERS – FREE PATTERN, highlighting the essential tools, stitches, assembly process, and finishing touches.
We’ll also include tips to avoid common mistakes and personalize your slippers. If you’re ready to create something useful and adorable, this tutorial is the perfect start.
Before beginning your EASY SLIPPER FOR BEGINNERS – FREE PATTERN, it’s important to gather all your supplies. Keeping everything ready will help the process run smoothly and make your first project more enjoyable.
You will need a medium weight yarn, also known as worsted weight yarn. Acrylic yarns are perfect for beginners because they are affordable and easy to work with. Choose soft yarns for comfort, especially if you plan to wear your slippers frequently.
For the hook, a 5.0 mm or 5.5 mm crochet hook usually works best with medium weight yarn. Make sure your hook size matches the recommended size on your yarn label. Using the right hook ensures your stitches are even and your slipper fits well.
You’ll also want a yarn needle for sewing up the slipper and weaving in loose ends. Sharp scissors and a stitch marker may also be useful to help you keep track of your rounds or rows.
Choose a light or bright color for your first pair. Light-colored yarn makes it easier to see your stitches, which is a great help when learning. Once you’re more confident, you can play with textures and multi-color patterns.
Optional: Add non-slip fabric or puff paint to the sole to prevent sliding on smooth floors. This step is great if you plan to gift or wear the slippers often around the house.
One of the best things about the EASY SLIPPER FOR BEGINNERS – FREE PATTERN is that it only uses a few simple stitches. If you know how to make a slip knot and chain stitch, you are already on your way!
The foundation chain is the very first step. It’s a simple chain of stitches that forms the base of your slipper. Practice keeping your chains loose and even to help with the next steps.
Next, you’ll use the single crochet (sc) and double crochet (dc) stitches. These are beginner-friendly and form a strong, comfortable fabric that stretches and adapts to your feet.
Increasing and decreasing are important to shape the slipper. Increasing means adding stitches to make the slipper wider in certain areas like the toe. Decreasing removes stitches to taper areas like the heel.
Working in the round is another technique you might use. This involves crocheting in a spiral instead of back and forth, which is especially helpful for shaping the toe section of the slipper.
If your pattern calls for turning chains or working in back loops only, don’t worry. These techniques are simple and just take a little practice. They add structure and flexibility to the design, making the slippers even more comfortable.
To begin the EASY SLIPPER FOR BEGINNERS – FREE PATTERN, start by crocheting the toe area. Most patterns begin with a magic ring or a small number of chain stitches joined into a circle. This will form the front part of the slipper.
Continue crocheting in the round or row-by-row, depending on the pattern. As you increase the number of stitches, you will see the fabric start to curve around like a toe cap. Keep your tension relaxed and even.
Once the toe is complete, you’ll begin working on the foot section. This is typically done in straight rows to form the top and sides of the slipper. Check your work often to ensure it’s the right size.
After the foot section is complete, the heel is the next part to shape. Decrease stitches carefully to give the slipper a snug fit. Some patterns will have you fold the slipper and seam it together at this point.
Use a yarn needle to sew up the back of the slipper securely. Make sure there are no holes or gaps where the stitches meet. This step is essential for comfort and durability.
Finally, you can add an optional edging around the opening. A round of single crochet stitches creates a clean finish and helps keep the slipper in shape. You can also add a contrasting color here for a fun look.
The best part about the EASY SLIPPER FOR BEGINNERS – FREE PATTERN is how easy it is to personalize. Even the simplest design can be made unique with a few creative touches.
Try changing up your yarn colors. Use two-tone yarns, stripes, or even variegated yarns for a more dynamic look. You can switch colors halfway through to create a contrasting sole and top.
Add buttons, bows, or small appliqués to give your slippers a personal touch. These accessories can be sewn on using a yarn needle and small scrap yarn.
Experiment with texture. If you’ve mastered the basic stitches, try incorporating the half double crochet (hdc) or front-post stitches for added dimension. These are still beginner-friendly but provide a more advanced look.
Make a pair for every season. Use cotton yarn for warm weather, and soft wool blends for winter. This way, your handmade slippers will be cozy all year long.
Adjust the pattern for different sizes. By increasing the foundation chain or adding extra rows, you can make slippers for kids, teens, and adults.
Finish with non-slip soles. Use leather patches, puff paint dots, or silicone glue to make your slippers safe on hardwood floors. This adds function without losing any of the charm.
What is the best yarn for beginner slippers?
Medium weight acrylic yarn is ideal for beginner slippers because it is affordable, easy to handle, and widely available.
Can I use only single crochet stitches?
Yes, many EASY SLIPPER FOR BEGINNERS – FREE PATTERN designs are made entirely with single crochet stitches. They are perfect for a sturdy and warm slipper.
How do I make the slipper non-slip?
You can add puff paint, silicone dots, or sew on non-slip fabric to the soles. This helps prevent sliding on tile or wood floors.
What size hook should I use?
A 5.0 mm to 5.5 mm hook is most commonly used for beginner patterns. Be sure to match your hook to your yarn weight for the best results.
How long does it take to make a pair of slippers?
Most beginners can complete a pair in one or two evenings. The more you practice, the faster you’ll become.
Can I wash these slippers?
Yes, especially if you use washable yarn. Always check your yarn label for washing instructions and use gentle cycles.
We’ve walked through every important step in making an EASY SLIPPER FOR BEGINNERS – FREE PATTERN. From choosing the right materials to assembling the slipper and adding personal touches, you now have all the tools to get started with confidence.
This is more than just a crochet project—it’s a rewarding way to express creativity and make something cozy and useful with your own hands. The simplicity of this pattern makes it a perfect entry point into the world of crochet for beginners.
If this was your first pair, congratulations! And if you’re an experienced crocheter looking for a relaxing project, we hope this pattern brought joy to your craft time.
We’d love to hear from you! Leave a comment with your honest opinion, share your experience, or let us know how you personalized your slippers. Your feedback and suggestions help us create more patterns that inspire creativity for everyone.