
If you’re looking for a way to add handmade charm to clothing, linens, or accessories, the perfect solution is to Embellish with Crochet Inserts – Free Pattern.
These delicate touches transform the ordinary into something extraordinary, infusing each piece with a sense of craftsmanship and timeless beauty.
Whether you’re a beginner or an advanced crocheter, this project allows you to explore creativity while keeping things accessible and fun.
The technique of adding crochet inserts—small decorative panels worked separately and then stitched into fabric—is a classic that has stood the test of time.
From vintage handkerchiefs to modern tunics, crochet inserts add texture, softness, and artistic flair. Best of all, you can personalize them endlessly with your choice of yarn, shape, and stitch patterns.
This article will walk you through everything you need to know to Embellish with Crochet Inserts – Free Pattern, including choosing materials, creating the inserts, attaching them to fabric, and offering fun ideas for how to incorporate them into your next project.
Whether you’re enhancing a pillowcase or turning a plain blouse into a statement piece, you’re in for a rewarding journey.
1. Choosing Materials and Preparing for Crochet Inserts
When planning to Embellish with Crochet Inserts – Free Pattern, the first step is choosing the right yarn and materials. Since crochet inserts are typically delicate and detailed, you’ll want a fine or medium-weight cotton yarn that holds its shape and creates clean stitch definition.
Mercerized cotton is often preferred for these types of projects. It’s smooth, has a slight sheen, and is available in a wide range of colors. White, ivory, or soft pastels are timeless choices that work well with most fabrics, but bold colors can make a beautiful modern statement.
Choose a crochet hook that matches your yarn size, typically ranging from 1.5mm to 3mm for insert work. A smaller hook allows for tighter, more intricate designs that won’t distort when attached to fabric.
You’ll also need sharp sewing scissors, a yarn needle for weaving in ends, and fabric that’s either store-bought or handmade. Cotton or linen fabric works best, especially when you want to sew the insert directly into the textile.
Before beginning the crochet portion, pre-wash both your yarn and your fabric to ensure there’s no shrinkage or bleeding later. This step is especially important if the final piece will be washed frequently, like in kitchen towels or baby clothes.
Lastly, select your crochet insert pattern. There are many motifs available—from floral doilies to geometric lace squares. The free pattern we’re sharing here is beginner-friendly but includes tips for customization to fit your style.
2. Step-by-Step Guide: Crochet the Insert Using the Free Pattern
To Embellish with Crochet Inserts – Free Pattern, follow this simple step-by-step method that will give you a clean and attractive result. The pattern provided here uses basic stitches and is ideal for small rectangular or square inserts.
Start with a chain foundation that matches the desired width of your insert. For example, chaining 30 stitches will give you a modest-sized rectangular piece when using a 2.5mm hook and sport-weight cotton yarn.
The first few rows will use single crochet (sc) to build a strong and straight foundation. This ensures the insert edges will lay flat and align well when sewn into fabric.
Next, alternate rows of double crochet (dc) and chain spaces to create a lacy effect. You can experiment with shell stitches, picots, or even filet crochet designs depending on your comfort level.
After reaching the desired length—around 20 to 25 rows for a modest insert—finish with a final row of single crochet. This matches the starting edge and gives the insert a polished frame.
Block the finished piece to shape it and open up the stitch pattern. Use steam blocking or pin it to a blocking mat and mist with water, letting it dry completely before attaching.
Feel free to repeat this insert pattern as many times as needed. You can create a matching set for multiple fabric panels or use them individually as eye-catching accents.
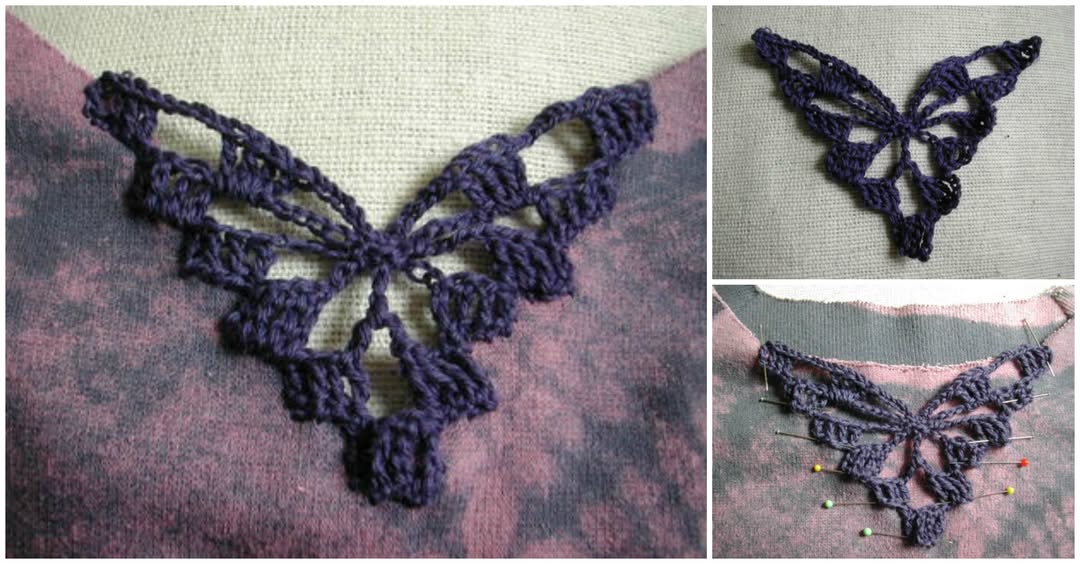
3. Attaching the Crochet Insert to Fabric
Once you’ve created your beautiful insert, it’s time to attach it to your fabric. This step is just as important as the crocheting, and when done carefully, it makes your project look seamless and professional.
Begin by measuring and marking the placement on your fabric. Use a ruler and fabric chalk or disappearing pen to outline where the insert will go.
Cut out the marked section from the fabric, leaving about ¼ inch of seam allowance on all sides. Be sure the fabric edges are straight to avoid uneven tension when sewing.
Pin the insert in place behind or within the cutout. You can place the crochet piece under the fabric (like an appliqué) or inside the space (like a window insert). Both methods create a unique look.
Use a simple whip stitch or a fine zigzag on a sewing machine to attach the crochet insert. Match your thread color to the yarn or fabric for a nearly invisible join.
If you’re adding multiple inserts or working with delicate materials, hand-stitching is usually best. It gives you more control and helps prevent puckering or misalignment.
Once attached, give the piece one final press with a warm iron (use a pressing cloth to protect the yarn) to smooth everything out and set the shape permanently.
4. Project Ideas and Creative Inspiration
There are so many fun and creative ways to Embellish with Crochet Inserts – Free Pattern. These small touches can dramatically enhance the look and feel of everyday items.
One popular option is to use inserts in garments. Add them to the yoke or sleeve of a blouse, or around the hem of a skirt to introduce a soft, romantic feel.
Another idea is to use inserts in household items. Think pillowcases, table runners, curtains, or even towels. A simple insert can instantly elevate a room’s aesthetic.
Crochet inserts also make charming bookmarks or gift tags. When backed with a bit of felt or cardstock, they become unique and functional keepsakes.
If you enjoy upcycling, try adding inserts to old jeans or tote bags. A crochet patch can cover holes or add style to an otherwise plain accessory.
Seasonal decorations are another great way to use these patterns. Create heart-shaped or snowflake inserts for holiday projects and gifts.
Finally, don’t be afraid to experiment with color and yarn weights. A thicker yarn can make a bold, rustic statement, while finer threads give that heirloom lace appearance.
FAQ – Embellish with Crochet Inserts – Free Pattern
What type of yarn is best for crochet inserts?
Cotton yarn is the most popular choice because of its strength, stitch definition, and ease of washing. Mercerized cotton gives a professional finish and resists fraying.
Can beginners try this crochet insert pattern?
Yes! The Embellish with Crochet Inserts – Free Pattern is designed with beginners in mind. If you know basic stitches like chain, single crochet, and double crochet, you’ll do great.
Is it better to sew by hand or machine?
Both work well depending on your experience. Hand-sewing offers more control, especially on delicate fabric, while machine sewing can speed up the process and add durability.
How do I prevent my crochet insert from curling?
Blocking your finished crochet piece helps eliminate curling. Use steam or wet blocking to shape and set the insert before attaching it to fabric.
Can I use different shapes like circles or ovals?
Absolutely! Circular and oval inserts create beautiful focal points. Just make sure to carefully measure and cut your fabric to match the shape for a smooth fit.
What can I do if my insert is too big for the fabric?
You can either reduce your stitch count and start again, or gather the edges slightly to create a ruffled effect. Both can add charm, depending on the look you’re going for.
Join our VIP broadcast list and gain access to exclusive patterns, all for free. As a VIP member, you’ll receive the best patterns daily, delivered directly to your device. ✨📱 It’s a unique opportunity to stay up-to-date with the latest trends and designs, curated just for you. Don’t miss out on enhancing your projects and discovering new inspirations with the best patterns every day! 🎨🔝
Conclusion
Adding a personal touch to your garments or home accessories is easy and enjoyable when you Embellish with Crochet Inserts – Free Pattern. From simple designs to intricate lace, crochet inserts offer endless ways to showcase your creativity and elevate your projects.
In this tutorial, we explored how to choose the right materials, create the crochet inserts, attach them neatly, and even brainstormed ideas to use them creatively. Whether you’re new to crochet or an experienced hand, there’s always room for a little more handmade charm.
We hope you found this guide helpful and inspiring. If you try the Embellish with Crochet Inserts – Free Pattern, let us know how it went! Leave a comment below with your thoughts, suggestions, or even photos of your finished creations. We’d love to hear from you and keep the crochet love going!


