
The Fall For Granny Stitch Pumpkin: Free Crochet Pattern is a delightful project for anyone who loves crochet and the cozy feeling of fall. Pumpkins are a timeless symbol of autumn, and when combined with the nostalgic charm of the granny stitch, they create a piece that is both whimsical and classic.
Whether you are an experienced crocheter or a beginner eager to try something new, this pattern is perfect for creating seasonal decorations that can brighten your home, add charm to your table, or even be given as heartfelt handmade gifts.
One of the wonderful things about the Fall For Granny Stitch Pumpkin: Free Crochet Pattern is how versatile it can be. You can choose traditional fall shades like burnt orange, deep red, mustard, or brown, or you can explore pastel tones for a modern twist.
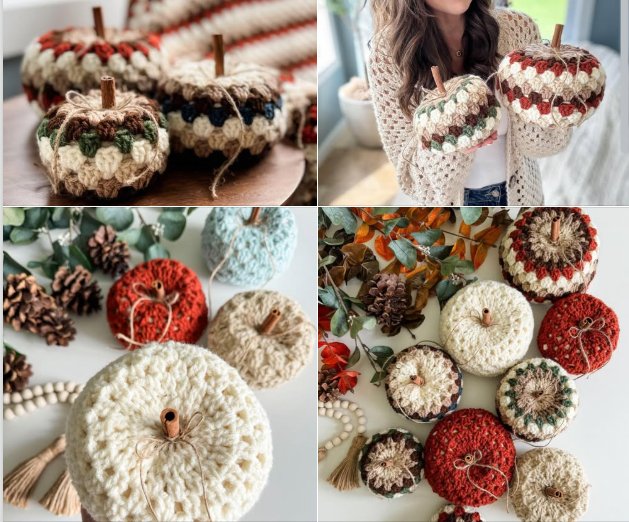
The granny stitch makes the pumpkin soft and textured, which gives it a handmade look that feels comforting and unique. Plus, since this is a round decorative project, you can easily adjust the size depending on your yarn weight and hook size, allowing you to make everything from tiny accent pumpkins to larger statement pieces.
Crocheting pumpkins is also a great way to celebrate the season without much expense. With just some yarn, a crochet hook, and basic supplies, you can create something that looks like it belongs in a boutique craft store. This Fall For Granny Stitch Pumpkin: Free Crochet Pattern combines simplicity with beauty, making it a fantastic option for both beginners and experts who want to enjoy a quick and rewarding project. By the time you finish, you will have a pumpkin that can be cherished for many years to come.
1. Understanding the Granny Stitch in This Pumpkin Project
The granny stitch is one of the most recognizable crochet techniques, famous for its clusters of stitches and nostalgic appeal. In the Fall For Granny Stitch Pumpkin: Free Crochet Pattern, this stitch is used to create the body of the pumpkin, giving it both texture and flexibility. The clusters naturally create a rounded form that works perfectly when stuffed into the pumpkin shape.
Beginners often enjoy learning the granny stitch because it follows a repeatable pattern, making it easy to memorize. Once you grasp the rhythm of the clusters, your hands will move smoothly through the project, giving you confidence as you see the pumpkin take shape. This makes the pumpkin project an ideal stepping stone for those just starting their crochet journey.
The beauty of using the granny stitch in this project is its adaptability. You can make a tight stitch pattern for a firm pumpkin or loosen your tension to create a softer, fluffier design. Each choice gives a slightly different look, allowing you to personalize your pumpkin according to your preference.
Another advantage is the way colors can be incorporated into the granny stitch. You could use one solid shade for a classic look, or alternate rows of different fall-inspired colors for a striped effect. This makes the Fall For Granny Stitch Pumpkin: Free Crochet Pattern both customizable and creative.
Since pumpkins are naturally round, the granny stitch makes it easier to mold the shape compared to other stitch patterns. The clusters allow the fabric to stretch slightly, giving the final piece a natural, plump look once filled with stuffing.
Finally, the granny stitch makes this pumpkin accessible for crafters of all skill levels. While it looks intricate, it is surprisingly simple to execute, allowing you to create something impressive without feeling overwhelmed.
2. Materials Needed for the Fall For Granny Stitch Pumpkin
To begin the Fall For Granny Stitch Pumpkin: Free Crochet Pattern, you’ll need some basic crochet supplies that most crafters already have. The most important element is the yarn, which will determine the size, color, and overall feel of your pumpkin.
For a traditional autumn look, medium-weight acrylic yarn in orange or rust is ideal. However, you can experiment with cotton yarn for a firmer texture or chunky yarn for an oversized pumpkin effect. Choosing high-quality yarn ensures that your project will be durable and maintain its shape over time.
You will also need a suitable crochet hook size for the yarn you choose. Most medium-weight yarns pair well with a 4.5 mm to 5.5 mm hook, but always check the label of your yarn for the recommended size. The hook size can also be adjusted depending on whether you want a tighter or looser stitch finish.
Stuffing is another essential material. Polyester fiberfill is the most commonly used stuffing material, as it is soft, lightweight, and widely available. It allows the pumpkin to hold its round shape while still being squeezable and plush.
For the pumpkin stem, you can use either brown yarn to crochet a simple stem or even a small stick from nature for a rustic touch. This flexibility lets you decide how natural or stylized you want your pumpkin to appear.
Lastly, don’t forget a yarn needle for weaving in ends and assembling your pumpkin. Scissors will also be necessary to trim excess yarn. With just these basic supplies, you’ll be ready to create your pumpkin masterpiece.
3. Step-by-Step Process to Crochet Your Pumpkin
The first step in the Fall For Granny Stitch Pumpkin: Free Crochet Pattern is to create a flat circle using granny stitch clusters. This will eventually form the body of your pumpkin. You begin by making a magic ring or chain loop, then building out rounds of clusters until the circle is large enough to fold into a pumpkin shape.
Once the circle is complete, you’ll fold it inward and seam the edges together, creating a pouch that will be filled with stuffing. The beauty of this method is that it’s simple yet effective, and the granny stitch naturally accommodates the rounded form.
After filling the pouch with fiberfill, you’ll close the top tightly to secure the stuffing inside. At this point, your piece will start resembling a soft ball, which is the foundation of your pumpkin.
To achieve that classic pumpkin look with sections, you can use a piece of yarn or thread to wrap around the body and cinch it in several places. This creates the characteristic ridges and curves seen on real pumpkins. It’s a small detail, but it adds a professional touch to your crochet pumpkin.
The stem is the finishing touch. You can crochet a short tube using brown yarn and attach it to the top, or simply insert a twig or cinnamon stick for a rustic and fragrant detail. This small addition truly completes the project.
At the end of this process, you’ll have a charming pumpkin that is not only decorative but also filled with love and creativity. Each one you make will be slightly different, adding to their handmade appeal.
4. Creative Ideas to Use and Gift Your Crochet Pumpkins
The Fall For Granny Stitch Pumpkin: Free Crochet Pattern is not just about making something pretty; it’s about adding joy to your everyday surroundings. These pumpkins can be used in so many ways, making them one of the most versatile seasonal crafts.
You can place them on your dining table as a centerpiece, combining several pumpkins of different sizes for a layered effect. Adding candles, leaves, or pinecones alongside them creates a cozy autumn display.
They also make excellent shelf or mantle decorations. A few crochet pumpkins placed on a bookshelf instantly transform the space into a seasonal haven. You can even add them to a tiered tray for a farmhouse-style arrangement.
Crochet pumpkins are also wonderful as gifts. They are small, thoughtful, and handmade, which makes them perfect for giving to friends, family, or coworkers. Pairing one with a jar of homemade jam or baked goods makes the gift even more special.
Another creative idea is to use them as place settings during a fall dinner. You could crochet smaller versions and place one on each plate with a little name tag attached. This thoughtful detail makes gatherings feel even more festive.
Finally, these pumpkins can become part of your holiday traditions. Each year, you can create new ones in different sizes and colors, slowly building a collection that tells a story of your crochet journey and seasonal celebrations.
FAQ About Fall For Granny Stitch Pumpkin: Free Crochet Pattern
1. Is the granny stitch pumpkin suitable for beginners?
Yes, the Fall For Granny Stitch Pumpkin: Free Crochet Pattern is beginner-friendly. The granny stitch is repetitive and simple, making it an excellent starting project for new crocheters.
2. How long does it take to make one pumpkin?
Depending on your skill level and the size of the pumpkin, it can take anywhere from one to three hours to complete. Smaller pumpkins can be finished even faster.
3. Can I use leftover yarn for this project?
Absolutely! This project is a great stash buster. Mixing and matching yarn colors can give your pumpkin a unique and playful look.
4. What kind of stuffing works best?
Polyester fiberfill is the most common and works well for keeping the pumpkin lightweight yet plump. However, fabric scraps or cotton stuffing can also be used.
5. How do I clean crochet pumpkins?
Since they are decorative items, spot cleaning with a damp cloth is usually enough. If necessary, hand washing gently and air drying is recommended.
6. Can I sell pumpkins made from this free pattern?
Yes, you can sell your finished pumpkins, but it’s always nice to credit the original pattern inspiration when sharing or selling.
Conclusion
The Fall For Granny Stitch Pumpkin: Free Crochet Pattern is a delightful way to welcome the cozy charm of autumn into your home. With just a few materials and basic stitches, you can create decorations that bring warmth, color, and handmade love to any space. From understanding the granny stitch to assembling your pumpkin and exploring creative uses, this project combines tradition with creativity in the best way.
I hope this tutorial has inspired you to pick up your hook and create your own collection of crochet pumpkins. If you enjoyed this guide, I’d love to hear your thoughts! Please leave your honest opinion and any suggestions for future patterns in the comments—your feedback helps make every new project even better.


