
Creating a Floral Granny Square – Step-by-Step Tutorial is a wonderful way to blend tradition and creativity in your crochet journey.
These floral squares bring a charming, colorful touch to any project, from blankets to bags, and are perfect for adding a bit of springtime joy all year round.
The beauty of a Floral Granny Square – Step-by-Step Tutorial lies in its combination of simple stitches and eye-catching design.
Whether you’re a beginner or an experienced crocheter, this pattern allows you to explore texture, color changes, and layering in a manageable format.
In this guide, we’ll take you through each phase of crafting your floral granny square—from forming the center flower to building the classic square shape around it. By following this Floral Granny Square – Step-by-Step Tutorial, you’ll gain new skills and a versatile pattern to use again and again.
1. Materials and Tools You’ll Need
To begin your Floral Granny Square – Step-by-Step Tutorial, make sure you have all your materials ready. You’ll need yarn in at least three colors: one for the flower center, another for the petals, and a third for the square’s outer frame. Acrylic or cotton yarn in worsted weight is ideal.
A crochet hook that matches your yarn weight is essential. For most worsted yarns, a 5.0mm (H-8) hook is standard. If your tension tends to be tight, you may want to size up slightly.
You’ll also need a yarn needle for weaving in ends, scissors for trimming, and optionally, stitch markers to keep track of rounds. These basic tools ensure a smooth crochet experience from start to finish.
Color selection is one of the most exciting parts of this project. You can go with soft pastels for a vintage look, or bright tones for something more playful and modern. Don’t be afraid to experiment—each combination creates a unique result.
If you’re planning a larger project like a blanket, choose yarns that are consistent in weight and texture. This will help your finished squares align evenly and join together neatly.
Gathering your materials in advance will let you focus fully on the creative process. Now you’re ready to dive into the floral magic of your Floral Granny Square – Step-by-Step Tutorial.
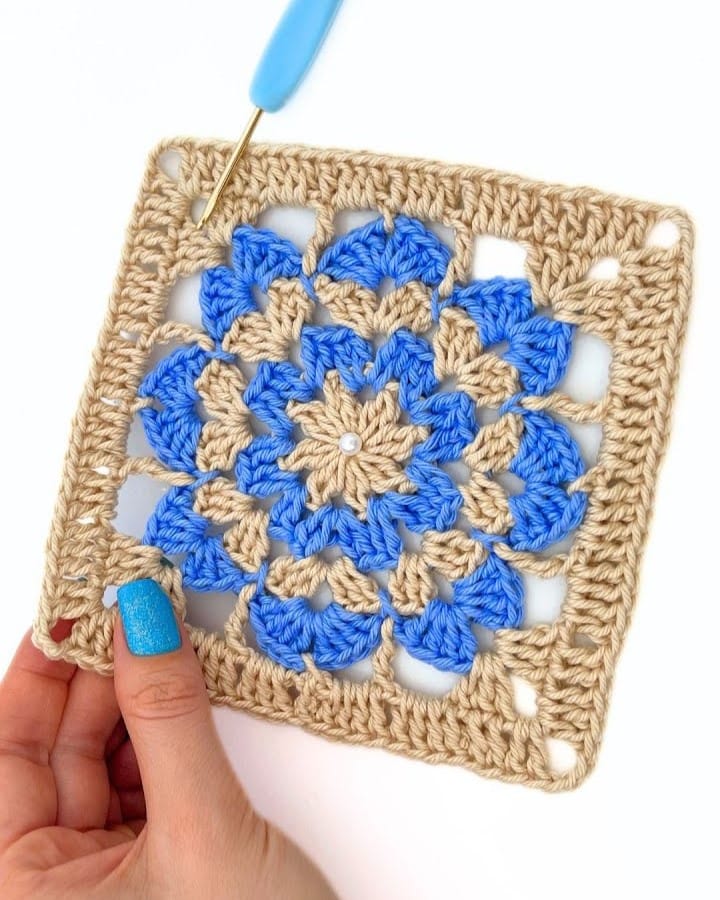
2. Crocheting the Flower Center and Petals
Begin with the magic ring or a simple chain circle to create the center of your flower. Use your first color and crochet a small round using single or half double crochet stitches. This forms the foundation of your flower.
Once your center is complete, switch to your petal color. Petals are usually made by chaining and working multiple double crochets into the same stitch. This gives them fullness and a gentle curl that mimics real petals.
You’ll repeat this petal stitch around the center circle. Most designs use 5 to 8 petals, depending on how dense you want your flower to appear. Always join the final petal with a slip stitch for a neat finish.
Feel free to get creative with the petal design. You can make narrow or wide petals, or even layer two rounds of petals for extra dimension. Some variations add picots or puff stitches at the tips for detail.
After completing the flower, fasten off and weave in your ends. Your flower should now resemble a mini motif that will sit beautifully at the heart of your granny square.
This flower will be the standout element in your Floral Granny Square – Step-by-Step Tutorial, so take your time shaping it carefully before moving on to the square background.
3. Turning the Flower into a Granny Square
Now that your flower is complete, it’s time to transition it into a square. This is where the traditional “granny” structure comes into play, using chain spaces and double crochets to form the familiar square shape.
Attach your background yarn color into a space between two petals. This will be your starting point for building the corners. Most patterns begin with a chain 3 (which counts as your first double crochet), followed by two more double crochets in the same space.
To form a corner, chain 2, and then place three double crochets into the next space. Repeat this around the flower, spacing your groups evenly between petals, and creating chain-2 corners.
If your flower has an odd number of petals, you may need to adjust slightly by skipping stitches or adding an extra chain in some places. The goal is symmetry, so the square lays flat and balanced.
Once your first round of the square is complete, join with a slip stitch and begin the second round. Most granny square patterns build out in similar rows, adding layers until you reach the desired size.
Each new round follows the same format: clusters of three double crochets separated by chain spaces, with corners defined by chain-2 spaces. This classic design gives your piece that cozy, vintage charm.
By the end of this step, your floral centerpiece will now be framed by a beautifully structured granny square—one of the most satisfying moments in any Floral Granny Square – Step-by-Step Tutorial.
4. Finishing Touches and Project Ideas
To complete your Floral Granny Square, fasten off your yarn securely and weave in any loose ends using a yarn needle. A clean finish helps your square look polished and professional.
If your square is slightly uneven, you can gently block it. Pin the square onto a blocking mat or towel and spray it lightly with water. Let it dry completely to maintain the shape.
These floral squares are perfect building blocks for a variety of projects. You can stitch several together to make a floral blanket, baby throw, or even a boho-style pillowcase.
For fashion items, use your squares to create a tote bag, vest, or summer shawl. Just be sure to choose sturdy yarns if your finished item will be handled frequently.
You can also use them as coasters, appliqués, or frame them as decorative wall art. The versatility of a Floral Granny Square – Step-by-Step Tutorial means you can create almost anything.
Remember to mix and match different flower styles and color palettes in your squares. This adds visual interest and gives your projects a handmade, one-of-a-kind feel.
FAQ – Floral Granny Square
Is the floral granny square beginner-friendly?
Yes, with basic crochet knowledge (like chains and double crochets), beginners can follow this tutorial easily.
What yarn is best for floral granny squares?
Worsted weight cotton or acrylic yarns are ideal. They hold shape well and come in a wide range of colors.
Can I make a full blanket with just floral granny squares?
Absolutely! Many crafters join multiple floral squares to create beautiful, vibrant blankets.
How do I join multiple squares together?
You can use slip stitch, whip stitch, or join-as-you-go methods depending on your desired finish.
Can I adjust the size of the square?
Yes, just add more rounds to increase the size or use a larger hook and yarn weight for a bigger square.
What if my square curls at the edges?
Try blocking it, or check your stitch tension. If needed, use a larger hook to loosen up your stitches.
Conclusion
In this Floral Granny Square – Step-by-Step Tutorial, we’ve explored how to create a beautiful flower motif, frame it into a square, and use it for countless creative projects. From crafting the flower center to shaping the square and finishing the piece, each step adds charm and satisfaction.
Whether you’re making a blanket, a bag, or simply experimenting with color and texture, this tutorial gives you all the tools and confidence you need to succeed. The versatility and beauty of floral granny squares make them a timeless favorite.
We’d love to hear how your project turned out! Please leave a sincere comment below with your thoughts, suggestions, or ideas on how you used your Floral Granny Square. Let’s share inspiration and continue growing our crochet community together!


