
Macrame Heart Bracelet - Free Tutorial

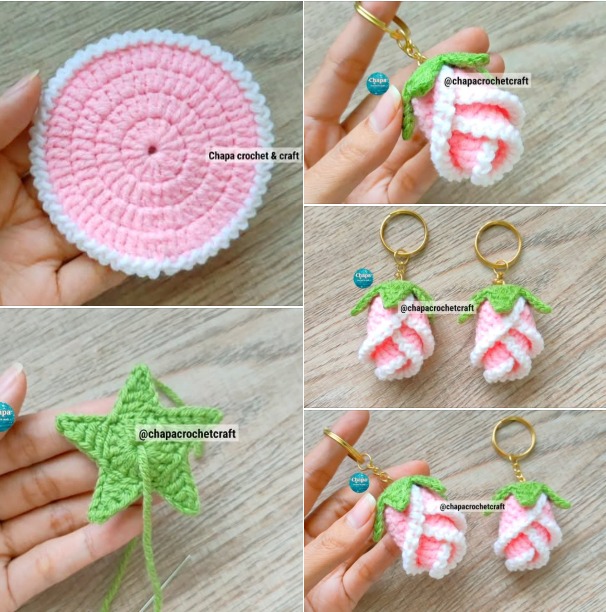
If you’re passionate about adding handmade beauty to your life, working on flower, sepals and assembly – free patterns is an inspiring and rewarding craft. These lovely crochet creations aren’t just visually appealing; they bring a sense of calm and joy as each stitch comes together.
Whether you’re creating a floral accent for your home, decorating a gift, or simply enjoying a peaceful evening project, these patterns open up a world of creativity and purpose. They offer a way to personalize your décor, accessories, or presents with soft and delicate floral motifs.
The combination of flower, sepals and assembly techniques lets you build dimension and realism into your crochet flowers. Each petal, sepal, and final touch contributes to a cohesive and charming design. You can mix and match colors, yarn textures, and sizes to reflect your mood or the season.
These free patterns are also incredibly versatile — from basic daisy shapes to more intricate rose or tulip styles, there’s something here for every skill level. With just a hook and some yarn, you’ll be able to craft a miniature garden of wonders.
One of the greatest aspects of flower, sepals and assembly – free patterns is their flexibility for projects big and small. Want to embellish a sun hat or summer bag? A few crochet blooms will do the trick. Making a baby mobile or a decorative wall hanging? Use clusters of flowers with matching leaves and sepals for that extra charm.
These patterns are ideal for scrap yarn use, which makes them budget-friendly, too. Let’s dive into each stage of this craft — from crocheting the petals, shaping the sepals, and finally assembling it all together with care and creativity.
Crocheting the flower is the heart of this project. It’s where your color choices, stitch variations, and texture decisions come to life. Start by selecting a yarn that suits your desired petal style—cotton yarns are great for structure, while acrylics offer more flexibility. Choosing a slightly smaller hook than the yarn recommends can help your flower hold its shape better.
A basic flower often begins with a magic ring and a series of single or double crochets to form the center. From there, petals can be built outward in loops. You can make them round, pointed, or even ruffled depending on the look you’re going for. Most patterns will guide you through this process, but feel free to experiment once you’re comfortable.
For multi-layered flowers, you’ll typically work in rounds, increasing stitches to build volume and dimension. Each layer should have a slightly different petal count or size to create a natural look. Color changes between layers can make the flower more visually interesting and realistic.
Don’t be afraid to add details like surface stitches or bead centers. These finishing touches give each flower a bit of personality. The more you play with your yarn and stitches, the more confident you’ll become in adapting patterns to your style.
Beginners might prefer starting with simple five-petal flowers, while more advanced crocheters can try intricate designs like roses or peonies. The beauty of flower, sepals and assembly – free patterns is that you can scale your project to your skill level while still achieving lovely results.
Remember to block your finished flowers if needed. This helps the petals lay flat and maintain their form over time. Use a steam iron or gentle shaping techniques depending on your yarn type.
The sepals are often overlooked, but they play a crucial role in giving your crochet flower a finished and natural appearance. These small, leaf-like parts sit just beneath the bloom and can be made in shades of green or any color that complements your design. In botanical terms, they protect the developing flower, and in crochet, they do the same visually.
Most sepals start with a circular base or small chain, followed by individual pointed or rounded leaves radiating outward. You can make them all one piece, or separate components sewn together later. The number of sepals often matches the petal count, but artistic liberty is always welcome.
Using fine yarn or thread for the sepals can add a light and delicate feel. This contrast in texture with the flower petals helps create a more lifelike design. You can also use stitches like picots or shells to add texture and detail to each point of the sepal.
Once finished, these sepals are attached to the underside of the flower. Some patterns include instructions to stitch them as you go, while others suggest sewing them on after blocking. Either method works well—it just depends on your preferred workflow.
Don’t forget to weave in your ends neatly or use them for stitching the flower to another surface. This part is often hidden, but clean finishing is always a sign of quality crochet.
Adding sepals is also a great opportunity to introduce subtle shading. Try combining two shades of green or using a variegated yarn for added visual interest. It’s one more chance to personalize your project.
Now comes the most satisfying part: assembly. Combining the flower, sepals and assembly – free patterns into one cohesive piece brings all your effort to life. Make sure all your parts are complete, blocked, and shaped as desired before you begin putting them together.
To start, place the sepal piece beneath the flower and secure it with a few small stitches. Use a yarn needle and matching thread or yarn for invisibility. Sew through the back loops only if you want to leave the front untouched and fluffy.
Next, you can attach leaves, stems, or backings depending on your intended use. If you’re creating a brooch or pin, a felt backing and safety pin may be appropriate. For wall art or mobiles, simply attach the flower to your base using sturdy yarn or hot glue.
You can also string multiple flowers into garlands, bracelets, or hairbands. The combinations are endless. Just ensure your assembly technique is neat and durable—especially if your project will be handled often or given as a gift.
If you’re assembling multiple flowers, consider layout and balance. Mix different sizes and colors for visual harmony. Group odd numbers for a more natural, organic look—nature rarely grows in even numbers.
Lastly, test the sturdiness of your piece. Tug gently on each part to ensure they’re secure. A beautiful flower that falls apart easily won’t serve you well. This is where the time spent on proper finishing truly pays off.
Now that your flower, sepals and assembly – free patterns have turned into completed pieces, the fun really begins. There are so many creative ways to use your crochet flowers. You can incorporate them into accessories like hats, scarves, or handbags for a handmade accent.
For home décor, these flowers can be used to embellish pillows, curtains, or even table centerpieces. Attach them to twine or ribbon to create garlands, wreaths, or nursery mobiles. The softness of yarn flowers adds charm without the worry of wilting or damage.
If you’re gifting your crochet flowers, consider attaching them to greeting cards, gift wraps, or tags. They add a personal touch that recipients will appreciate and may even keep as a memento.
Crochet flowers are also popular in bridal arrangements, corsages, or boutonnieres. Their durability and customization make them ideal for meaningful occasions. Use whites, creams, or pastel shades for elegant themes.
You can also experiment with turning them into jewelry. Combine smaller flowers into earrings, necklaces, or hair clips. A bit of wire, beads, or chain can add structure and polish.
Finally, don’t forget the therapeutic value. Sometimes the joy of crafting lies in the act itself. Even if you don’t have a plan for your flowers, simply creating them can bring peace and creative fulfillment.
What yarn is best for crochet flowers and sepals?
Cotton yarn is generally preferred due to its structure and stitch definition, but acrylic or blended yarns can also be used based on the desired texture.
Can I make the sepals and flowers in different sizes?
Yes, adjusting hook size or stitch count will help you create a variety of sizes to suit different projects.
Do I need to block my crochet flowers?
Blocking helps shape and flatten your flowers and is recommended for a more finished appearance, especially for layered or ruffled styles.
How can I attach my crochet flowers to other items?
You can sew them on with a yarn needle, use hot glue, or attach them with buttons, pins, or snaps depending on the item.
Are these patterns suitable for beginners?
Absolutely. Start with simple five-petal flowers and basic sepals, then build your skills to try more advanced patterns.
Can I sell items made from these free patterns?
Typically, yes. Just check each pattern’s terms, but most allow handmade sales as long as you credit the design appropriately if required.
Creating flower, sepals and assembly – free patterns offers more than just a fun project—it invites you into a calming, artistic world where color, texture, and creativity meet. From simple blossoms to layered blooms with intricate sepals and thoughtful assembly, these patterns can be adapted for any skill level or purpose.
In this article, we explored how to craft the perfect flower, shape realistic sepals, and bring it all together in a beautiful, polished piece. We also discussed how to use your finished creations in everyday and special items. Whether you’re crocheting for joy, for décor, or for gifts, the possibilities are endless.
We’d love to hear from you! Have you tried any flower, sepals and assembly – free patterns? Leave a comment with your experience, tips, or suggestions. Your feedback helps grow this creative community—and might just inspire the next great project.


