
If you’ve ever dreamed of adding a touch of fun and charm to your home décor, a Frog Crochet Rug is the perfect project for you! This delightful rug brings warmth, color, and personality to any room — especially a nursery, bathroom, or kids’ playroom. In this free pattern tutorial, we’ll explore everything you need to know to make your own adorable frog-shaped rug.
Whether you’re an experienced crocheter or just starting out, this guide will help you create a cozy and unique piece that’s sure to make everyone smile.
The Frog Crochet Rug is not only practical but also incredibly whimsical. It’s a great way to practice essential crochet techniques while crafting something that instantly brightens up your space. From the big, cheerful frog eyes to the rounded green body, each element of this project brings joy and creativity to your crochet journey.
Plus, it’s a wonderful handmade gift idea for children, animal lovers, or anyone who appreciates cute and cozy home décor.
Before we dive into the step-by-step details, let’s talk about why the Frog Crochet Rug has become such a popular trend among crafters. The charm of animal-inspired crochet pieces lies in their versatility and emotional connection.
They make us smile, they feel comforting, and they can easily be customized to match any color scheme or room theme. The frog motif, in particular, symbolizes luck, renewal, and good fortune — making this rug not just a decoration, but a meaningful creation filled with positive energy.
1. Materials You’ll Need to Make Your Frog Crochet Rug
To get started on your Frog Crochet Rug, you’ll need a few basic supplies. The materials for this project are simple and budget-friendly, making it perfect for beginners or anyone looking for a fun weekend project.
First, you’ll need cotton yarn or acrylic yarn in shades of green, white, and black. Cotton yarn is a popular choice for rugs because it’s durable, washable, and provides a soft texture underfoot. Acrylic yarn, on the other hand, offers bright colors and affordability. Choose the one that best fits your preferences and the intended use of your rug.
Next, select the appropriate crochet hook size, typically between 5.0 mm (H) and 6.0 mm (J). The exact size may vary depending on your yarn’s weight. A larger hook will create a looser stitch, resulting in a softer and slightly larger rug, while a smaller hook will produce a tighter, denser texture.
You’ll also need a few additional tools, such as a yarn needle for weaving in ends, a pair of sharp scissors, and a non-slip rug pad to keep your rug safely in place. If you want to make the rug extra plush, you can crochet with two strands of yarn held together — this technique doubles the thickness and gives your Frog Crochet Rug a luxurious feel.
For beginners, using stitch markers can help you keep track of your rounds, especially when working in a circular pattern. This rug features a series of increases and decreases, so markers will ensure your stitches stay even and your frog shape remains symmetrical.
Lastly, don’t forget to have a comfortable workspace with good lighting. Crocheting is much more enjoyable when your environment is cozy and clutter-free. Gather your materials, take a deep breath, and get ready to bring your frog to life — one stitch at a time!
2. Step-by-Step Guide: How to Crochet the Frog Rug
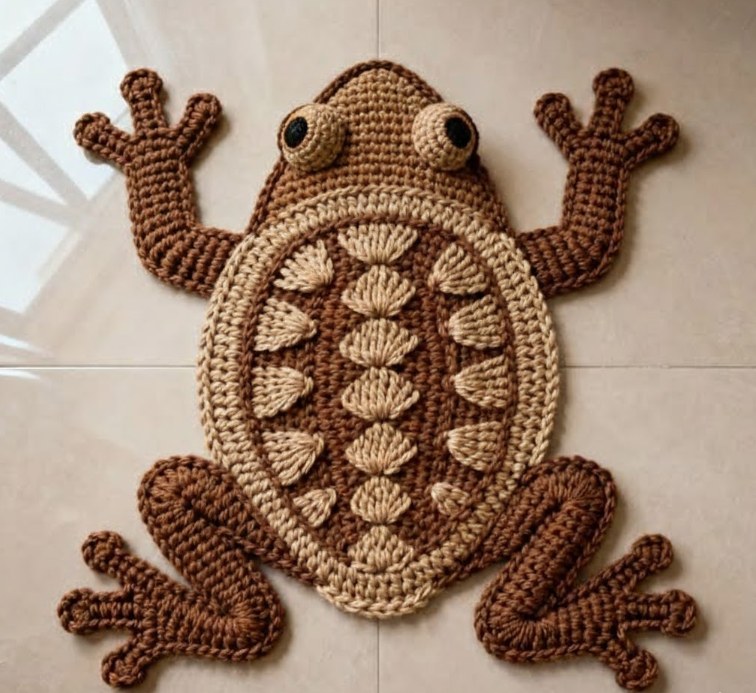
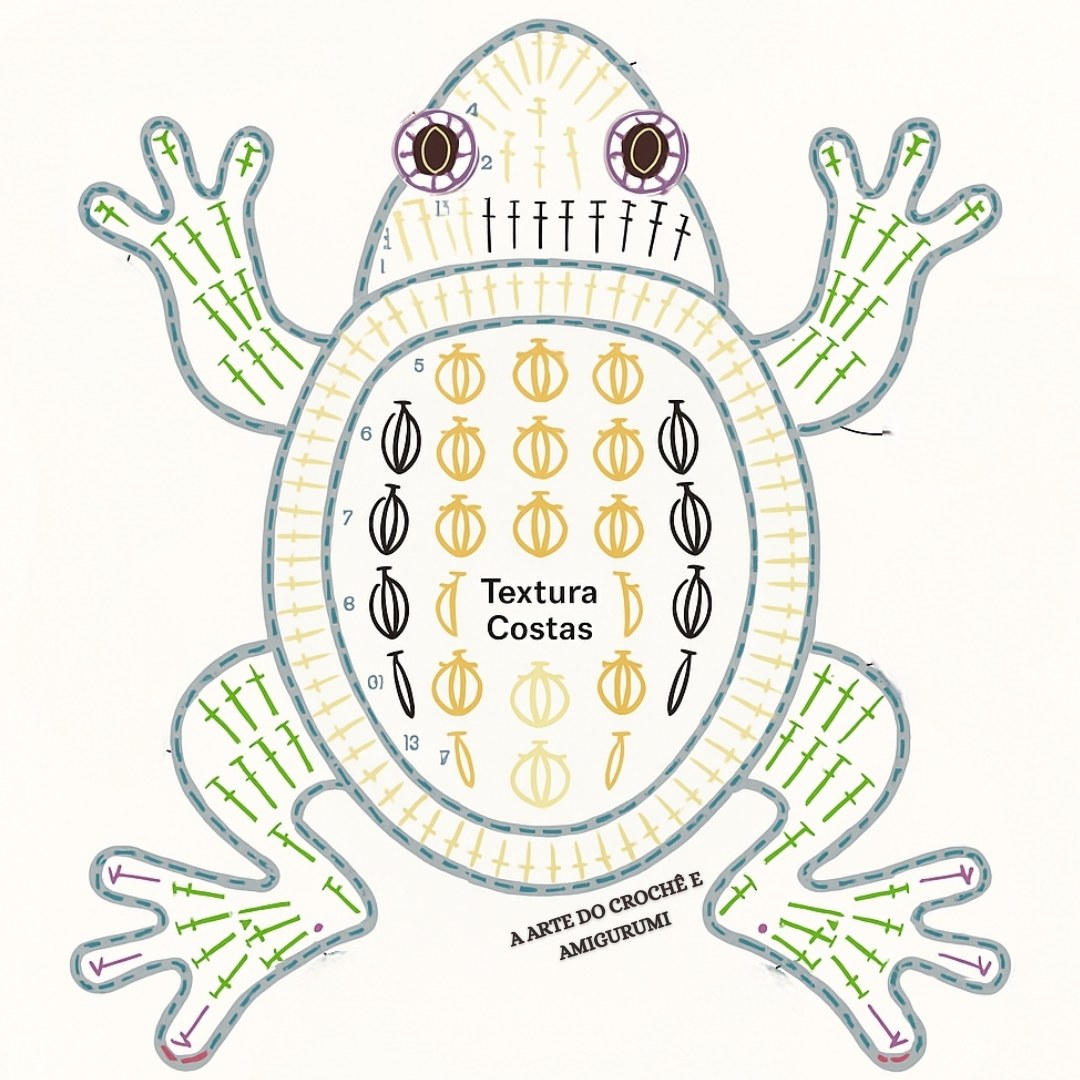
Creating the Frog Crochet Rug begins with forming the frog’s body, which is usually made in a large circular pattern. Start with a magic ring and crochet several double crochets (dc) into the center, gradually increasing in each round to form a flat circle. Continue until your circle reaches the desired size for the body — typically between 24 to 30 inches in diameter.
Once the body is complete, you’ll move on to the frog’s legs and arms. These are smaller oval or teardrop shapes crocheted separately and sewn onto the main body. Use a slightly darker green shade for contrast, or keep everything the same tone for a cohesive look. The legs give the rug its playful frog-like appearance, adding both texture and charm.
The next part of your Frog Crochet Rug involves crafting the eyes, which are perhaps the most recognizable and adorable feature. Crochet two white circles using single crochets (sc), then add smaller black circles for the pupils. Stitch the eyes securely onto the top portion of the body, slightly apart, to create that friendly frog expression.
If you’d like your frog to have extra character, consider adding a smiling mouth using black yarn and simple embroidery stitches. This small detail gives the rug a whimsical personality that kids and adults alike will love.
After all the pieces are attached, weave in any loose ends neatly on the back. It’s important to ensure the back side is smooth so the rug lays flat on the floor. You can also apply fabric glue or rug backing to make it more slip-resistant and durable for daily use.
Take your time during each step — the process is part of the joy! The great thing about the Frog Crochet Rug pattern is its flexibility. You can adjust the size, colors, and facial features to create your own unique version.
3. Tips and Tricks for a Perfect Finish
To make your Frog Crochet Rug look professional, there are a few expert tips to keep in mind. First, always block your crochet pieces before assembling. Blocking helps the stitches relax and the shapes stay even, which is especially important when attaching the eyes and limbs. Simply dampen the pieces and let them dry flat on a towel.
Another important tip is to maintain consistent tension throughout your project. Uneven tension can cause your rug to curl or ripple. If this happens, don’t worry — lightly steam or block the rug again to help it flatten naturally.
When joining parts, use the invisible join technique to keep your seams neat and hidden. It’s a simple way to make your rug appear seamless and polished. Also, ensure that your stitches are secure, especially if your rug will be placed in a high-traffic area.
If you’re new to crocheting rugs, practice on small pieces first. This helps you get comfortable with increasing and decreasing stitches without the pressure of perfection. Over time, your technique will naturally improve, and your Frog Crochet Rug will look flawless.
For an eco-friendly twist, try using recycled yarn or t-shirt yarn. These materials are sturdy, easy to work with, and perfect for rugs. Plus, they help reduce waste while giving your project a unique, textured finish.
Lastly, remember that crochet is meant to be fun and relaxing. Don’t rush through the process. Each stitch you make adds character and love to your handmade creation — and that’s what makes your Frog Crochet Rug truly special.
4. Creative Variations and Styling Ideas
Once your Frog Crochet Rug is complete, there are many creative ways to style and customize it. You can play with colors — try pastel green for a soft, dreamy look, or vibrant lime for a cheerful, playful vibe. Adding small details like rosy cheeks or embroidered eyelashes can make your frog even more expressive.
If you love experimenting with textures, use a combination of yarn types. For instance, mixing cotton and chenille yarn creates a cozy surface that’s perfect for bedrooms or nurseries. You could even crochet the frog’s belly in a lighter shade or add stripes for extra personality.
Your Frog Crochet Rug can also serve different purposes. It’s ideal as a play mat for toddlers, a bathroom rug, or a decorative accent for any animal-themed room. Because it’s handmade, it adds a warm and personal touch that machine-made décor simply can’t replicate.
Consider making multiple rugs in different animal shapes — like a turtle, cat, or bear — to create a collection of fun and functional floor pieces. The frog can be the centerpiece of this adorable animal series.
If you’re giving it as a gift, wrap your rug in eco-friendly paper and include a handwritten tag with care instructions. This thoughtful gesture makes your handmade gift even more meaningful.
Finally, don’t forget to share your creation! Post photos of your Frog Crochet Rug on social media or local crafting groups. It’s a great way to inspire others, exchange ideas, and celebrate the art of crochet together.
FAQ – Frog Crochet Rug
1. How long does it take to make a Frog Crochet Rug?
The time depends on your skill level and the rug’s size. Beginners may take two to three days working a few hours per day, while experienced crocheters can finish it in a single weekend.
2. What type of yarn is best for a Frog Crochet Rug?
Cotton yarn is ideal for its durability and easy washing, but acrylic or t-shirt yarn also work beautifully for this project.
3. Can I wash my Frog Crochet Rug in a machine?
Yes, if you use washable yarn like cotton or acrylic. Always use a gentle cycle and lay flat to dry to preserve the rug’s shape.
4. How can I make my rug non-slip?
Apply a non-slip backing or place a rug pad underneath. Fabric glue dots on the bottom can also help keep it steady.
5. Is the Frog Crochet Rug suitable for beginners?
Absolutely! It uses simple stitches like single and double crochet, making it a great project for those just learning the craft.
6. Can I resize the rug for different spaces?
Yes! Just continue increasing rounds to make it larger, or stop earlier for a smaller version. It’s a very flexible pattern.
Conclusion
Making your own Frog Crochet Rug is a joyful and rewarding experience. From gathering materials to stitching the final smile, every step invites creativity and relaxation. This playful rug not only decorates your home but also showcases your love for handmade art and craftsmanship.
We hope this free pattern has inspired you to pick up your hook and start crocheting today. Whether it’s your first time making a rug or your hundredth crochet project, the frog design will bring happiness and character to your space.
If you enjoyed this tutorial, please leave your honest opinion and suggestions in the comments. We’d love to hear how your Frog Crochet Rug turned out and what creative ideas you used to make it your own!


