
Creating a Gnome Towel Topper Crochet is a fun and functional project that adds charm and personality to your kitchen or bathroom decor.
These adorable towel toppers make fantastic gifts, craft fair items, or simply delightful additions to your home.
Whether you’re a seasoned crocheter or just beginning, this tutorial will guide you through the steps to make your own gnome-themed towel topper.
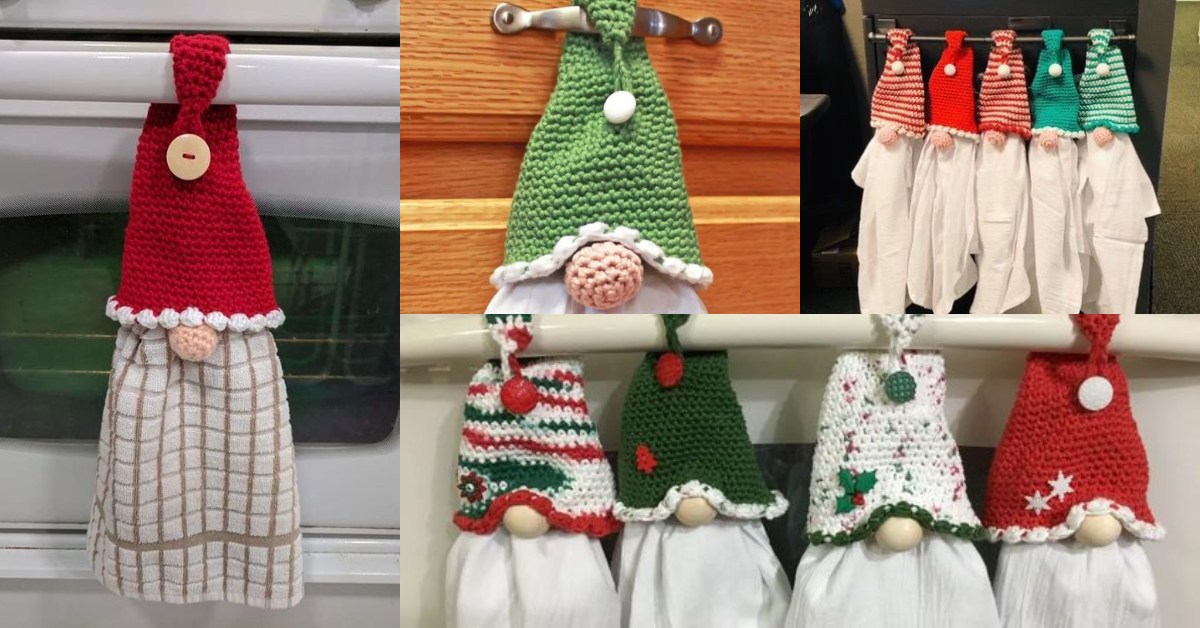
The Gnome Towel Topper Crochet combines creativity and practicality. The whimsical gnome design can be customized with various colors to match your style.
Additionally, this project helps you practice key crochet techniques, such as shaping, attaching pieces, and working in the round. By the end of this tutorial, you’ll have a unique handmade item that is both decorative and useful.
Gather your supplies, clear some crafting time, and get ready to create your own Gnome Towel Topper Crochet masterpiece. Let’s dive into the details and make this project come to life!
1. Materials and Tools Required
Before starting your Gnome Towel Topper Crochet, ensure you have all the necessary materials and tools:
- Yarn: Use worsted-weight yarn in colors for the gnome’s hat, beard, nose, and base. Popular choices include red, white, and beige.
- Crochet Hook: A 4.0mm (G) or 5.0mm (H) hook works well with worsted-weight yarn.
- Towel: Choose a hand or kitchen towel that complements your color scheme.
- Stitch Markers: These help keep track of your rounds and stitches.
- Scissors and Yarn Needle: Essential for cutting and weaving in ends.
- Polyfill Stuffing: Used to give the gnome’s nose a rounded shape.
Having everything ready beforehand will make the crochet process smoother and more enjoyable.
2. Steps to Crochet the Gnome Hat
The hat is a signature feature of the Gnome Towel Topper Crochet, giving it a playful and festive look. Follow these steps to create it:
- Step 1: Start with a Magic Ring: Use your hat-colored yarn to make a magic ring and crochet 6 single crochets (SC) into the ring. Pull tight to close.
- Step 2: Increase Rounds: Work in continuous rounds, gradually increasing the number of stitches by adding two SC into each stitch of the previous round. Use a stitch marker to mark the beginning of each round.
- Step 3: Shape the Hat: After a few rounds, start increasing more sparingly to shape the hat into a cone. For example, increase every third stitch in one round, then every fourth stitch in the next.
- Step 4: Customize the Size: Continue crocheting until the hat reaches your desired height. You can make it tall and pointy or short and rounded.
- Step 5: Finish with a Slip Stitch: Once satisfied with the size, finish the round with a slip stitch and cut the yarn, leaving a long tail for sewing.
- Step 6: Add Embellishments: Consider adding stripes, pom-poms, or other details to the hat for extra flair.
The hat sets the tone for your gnome, so take your time and enjoy the creative process.
3. Crafting the Beard, Nose, and Base
The gnome’s beard, nose, and base are essential components that bring the design together. Here’s how to make each piece:
- Step 1: Crochet the Beard: Use white or gray yarn to create the beard. Chain 10, then work SC stitches down the chain. Add fringe by attaching short strands of yarn to the edge.
- Step 2: Shape the Nose: Use beige yarn to crochet a small ball for the nose. Start with a magic ring, increase for two rounds, then decrease and stuff with polyfill before closing.
- Step 3: Prepare the Base: Use a color that matches your towel. Crochet a circular or rectangular base that will be sewn to the towel.
- Step 4: Attach the Beard: Sew the beard onto the base, positioning it just below where the hat will sit.
- Step 5: Position the Nose: Attach the nose to the center of the beard, ensuring it’s securely fastened.
- Step 6: Assemble the Pieces: Sew the hat onto the base, overlapping it slightly with the beard and nose for a cohesive look.
These steps will give your gnome character and charm, turning it into a delightful decor item.
4. Attaching the Towel and Final Touches
The final steps involve attaching the towel to the crochet topper and adding any finishing touches:
- Step 1: Cut a Hole in the Towel: Fold the towel in half and cut a small slit near the top to accommodate the crochet base.
- Step 2: Secure the Towel: Insert the towel through the base and sew or crochet around the opening to secure it in place.
- Step 3: Reinforce the Edges: Use a blanket stitch or SC around the towel’s edges to prevent fraying and add durability.
- Step 4: Adjust the Fit: Ensure the towel hangs neatly and adjust as needed for a polished look.
- Step 5: Add Decorative Elements: Consider adding buttons, bows, or embroidery to personalize your gnome.
- Step 6: Inspect and Finalize: Check all seams and attachments to ensure everything is secure and well-aligned.
Congratulations! Your Gnome Towel Topper Crochet is now complete and ready to use or gift.
FAQ: Frequently Asked Questions
1. What size towel should I use for the gnome topper? A standard hand towel or kitchen towel works best. You can trim larger towels to fit if needed.
2. Can I use different yarn weights? Yes, but adjust your hook size accordingly. Thicker yarns create larger toppers, while thinner yarns result in smaller ones.
3. How do I clean the finished towel topper? Hand washing is recommended to preserve the crochet work, especially if decorative elements are attached.
4. Can I make this project without a sewing machine? Absolutely! You can hand-sew the towel to the base if you prefer.
5. How can I customize the gnome’s appearance? Experiment with different yarn colors, patterns, and embellishments like beads or embroidery.
6. Is this project suitable for beginners? Yes! The steps are simple and a great way for beginners to practice basic crochet techniques.
Join our VIP broadcast list and gain access to exclusive patterns, all for free. As a VIP member, you’ll receive the best patterns daily, delivered directly to your device. ✨📱 It’s a unique opportunity to stay up-to-date with the latest trends and designs, curated just for you. Don’t miss out on enhancing your projects and discovering new inspirations with the best patterns every day! 🎨🔝
Conclusion
The Gnome Towel Topper Crochet – Tutorial offers a charming and practical way to bring a touch of whimsy to your home. By following the steps in this guide, you can create a unique and festive piece that’s perfect for the holidays or year-round use. From crafting the hat to assembling the base and towel, each stage is an opportunity to showcase your creativity.
We’d love to hear about your experience with this tutorial! Share your feedback, finished projects, or any tips in the comments below. Your input helps us create even better guides and inspire others in the crafting community. Happy crocheting!


