
Macrame Heart Bracelet - Free Tutorial

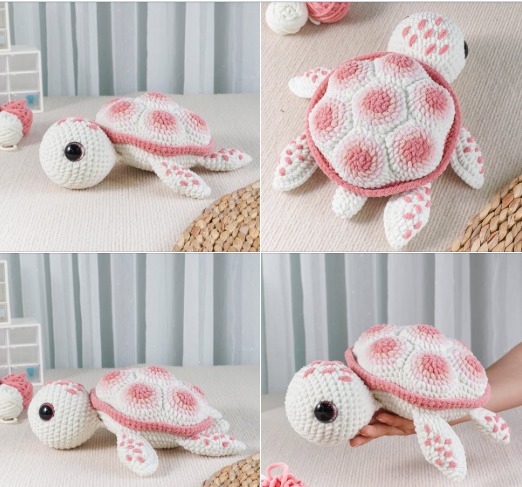
If you are searching for an adorable and meaningful project, the Graceful Turtle Crochet Pattern is the perfect choice. This pattern brings together creativity, relaxation, and a touch of nature’s beauty into one delightful crochet experience.
Crafting this charming turtle allows you to create a thoughtful gift or a lovely decoration that showcases your handmade skills.
The Graceful Turtle Crochet Pattern is suitable for both beginners and experienced crocheters. Whether you’re looking to expand your amigurumi collection or create a cuddly toy for a loved one, this pattern will guide you through every step with ease. Turtles symbolize longevity, wisdom, and peace, making this crochet project even more special.
In this article, we’ll dive deep into the complete process of making the Graceful Turtle Crochet Pattern, including what materials you need, detailed step-by-step instructions, creative tips for success, and even suggestions for how to use your finished turtle. Ready to bring this elegant turtle to life? Let’s get started.
Before starting the Graceful Turtle Crochet Pattern, it’s important to gather all the materials to make your crafting experience smooth and enjoyable.
Start with selecting yarn in your preferred colors. Commonly, crafters choose green or teal for the turtle’s body, beige or brown for the shell, and a touch of white or black for the eyes and small details.
Choosing the right crochet hook is essential. A smaller hook size than recommended for your yarn is ideal to create tight, neat stitches, preventing the stuffing from showing. Typically, a 2.5mm to 3.5mm hook works best.
For the filling, polyester fiberfill is recommended. It provides the turtle with a soft, plush shape that holds well over time without lumping.
Safety eyes are often used to give the turtle a cute, expressive look. However, for projects intended for small children, you may prefer to embroider the eyes for added safety.
A yarn needle is needed to sew the pieces together neatly and securely. You’ll also use it to weave in the ends to give your turtle a clean finish.
Don’t forget a good pair of sharp scissors to cut your yarn accurately and small stitch markers to help track your progress throughout the project.
Creating the Graceful Turtle Crochet Pattern is a rewarding process divided into several sections: the head, body, shell, legs, tail, and facial features.
Start by crocheting the head using your chosen body color. Begin with a magic ring, then work in continuous rounds, gradually increasing to form a smooth spherical shape.
The body is crocheted as a slightly larger oval or round base, providing a firm foundation to attach the turtle’s shell and other parts. Keep the stitches consistent for a uniform look.
Next, move on to the shell. The shell typically features a textured pattern, like simple ridges or hexagonal segments, to mimic the natural look of a turtle’s back.
The legs are made individually, often using simple tubular shapes. You will need to create four legs—two front and two back—to give the turtle stability and charm.
Crochet a tiny tail to add an adorable finishing touch. This piece is often just a few stitches long but contributes greatly to the overall character of your turtle.
Finish by adding facial features. Attach safety eyes or embroider cute sleepy or smiling eyes. You can also embroider a small mouth to give your turtle an extra dose of personality.
When working on the Graceful Turtle Crochet Pattern, a few key tips can help ensure that your project turns out neat, cute, and professional-looking.
Keep your stitches tight. This is crucial in amigurumi to prevent the stuffing from showing through. Adjust your hook size if your stitches feel too loose.
Consistently count your stitches at the end of every round. Missing or adding stitches can alter the shape, so use a stitch marker to keep track easily.
Stuff each part firmly but not overly tight. Overstuffing can stretch stitches, while understuffing can lead to a floppy shape. Add small amounts of stuffing gradually as you work.
Take extra care when sewing parts together. Aligning the legs symmetrically and placing the head at the right angle can make a big difference in how polished the final piece looks.
Consider experimenting with colors. While green and brown are traditional, pastel colors or even rainbow hues can make your turtle stand out as a fun, creative expression.
Add accessories like a tiny flower on the shell, a bow on the head, or even a miniature scarf to personalize your Graceful Turtle Crochet Pattern and give it a whimsical touch.
Once your Graceful Turtle Crochet Pattern is complete, there are many wonderful ways to enjoy or gift your handmade creation.
Use your turtle as a cute home décor item. It looks adorable sitting on a bookshelf, coffee table, or desk, bringing a sense of calm and charm to any space.
Gift it to a friend, family member, or child. Handmade gifts like this are full of love and meaning, perfect for birthdays, baby showers, or just to say “I care.”
Turn it into a keychain or bag charm. Simply adjust the size by using thinner yarn and a smaller hook, then add a keyring to make a portable turtle buddy.
Create a set of turtles in different colors or sizes to display together. A family of turtles makes a delightful and cheerful addition to any room.
Use it as part of educational toys. Teachers and parents can use the turtle to teach children about marine life, environmental awareness, or storytelling.
If you enjoy selling handmade crafts, the Graceful Turtle Crochet Pattern is a popular choice at markets, craft fairs, and online shops. People love adorable, handcrafted animals.
Is the Graceful Turtle Crochet Pattern suitable for beginners?
Yes! This pattern is designed to be beginner-friendly, using basic stitches like single crochet, increases, and decreases. Patience and attention to detail will lead to great results.
How long does it take to complete the turtle?
Depending on your experience and speed, completing the turtle usually takes between 4 to 8 hours. It’s a manageable weekend project.
What type of yarn should I use for this pattern?
Medium-weight cotton or acrylic yarn is ideal. Cotton provides clear stitch definition, while acrylic offers softness and flexibility.
Can I change the size of the turtle?
Yes, you can adjust the size by using a different yarn weight and corresponding hook size. Thinner yarn makes a smaller turtle, and thicker yarn results in a larger one.
Is the finished turtle safe for young children?
It can be! To ensure safety, replace safety eyes with embroidered eyes and double-check that all parts are sewn securely with no loose threads.
Can I sell turtles made from this pattern?
Yes, selling the finished turtles is typically allowed. Handmade turtles are always a hit at craft fairs or as gifts. Just remember to credit the pattern where appropriate.
The Graceful Turtle Crochet Pattern is a delightful and rewarding project for anyone who loves to crochet. Whether you are a beginner looking for a manageable challenge or an experienced crafter wanting to create a meaningful handmade gift, this pattern provides both fun and satisfaction.
In this guide, we covered everything from the necessary materials, detailed steps to create each part of the turtle, helpful tips for a neat finish, and creative ideas for how to use or gift your turtle. You also explored answers to common questions that will help ensure your project turns out perfectly.
I hope you enjoyed this tutorial and feel inspired to try the Graceful Turtle Crochet Pattern. Please leave your honest opinion in the comments, share your creations, and let me know what other patterns or ideas you would love to see next. Your feedback is always appreciated and helps this crafting community grow beautifully!


