
Macrame Heart Bracelet - Free Tutorial

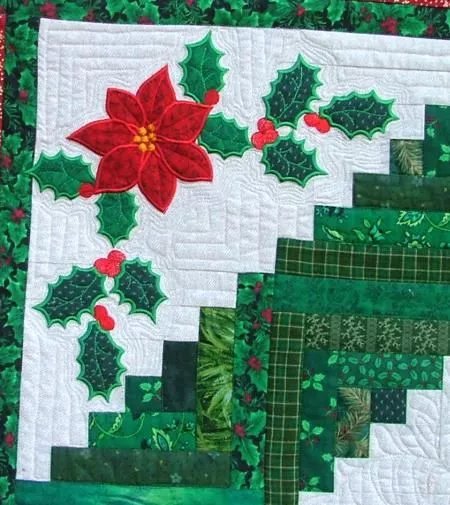
Grandma’s Lattice Quilt – Free Pattern: Transform Your Craft with This Classic Design is an exquisite quilting project that combines tradition and timeless charm.
If you’re seeking a creative endeavor that’s both nostalgic and modern, this pattern is the perfect choice. The lattice design not only showcases intricate details but also allows quilters to experiment with colors and textures to make their quilt truly unique.
Whether you’re a beginner or an experienced quilter, this pattern is versatile and forgiving, making it an ideal project for enhancing your skills.
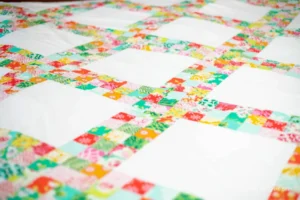
Image from google.
With its grid-like structure, the Grandma’s Lattice Quilt – Free Pattern provides a beautiful framework for various fabric combinations. You can opt for a classic look with muted tones or go bold with vibrant prints.
In this article, we’ll walk you through the process of creating your very own lattice quilt. From gathering materials to sewing your blocks and assembling the quilt, you’ll find everything you need to craft a piece that celebrates tradition while embracing creativity.
Before you begin working on the Grandma’s Lattice Quilt – Free Pattern, it’s essential to prepare and gather the right materials. Proper preparation ensures a smoother quilting process and a stunning final product.
Start by selecting your fabric. The lattice design lends itself beautifully to a mix of solid and patterned fabrics. Choose colors that complement each other and fit the theme of your quilt, whether it’s vintage, modern, or seasonal.
You’ll need a cutting mat, rotary cutter, and quilting ruler for precise cutting. Accuracy is key for achieving the clean lines of the lattice design.
Prepare your sewing machine with a sharp needle and high-quality thread. Matching thread colors to your fabric can create a seamless look, while contrasting thread adds a decorative element.
Download or print the Grandma’s Lattice Quilt – Free Pattern instructions. Having the pattern on hand allows you to reference measurements and layout details as you work.
Pre-wash and press your fabric to avoid shrinkage and wrinkles. This step is particularly important if you’re combining fabrics with different textures.
Set up a comfortable workspace with good lighting. Having all your tools within reach will help you focus on the creative process.
The heart of the Grandma’s Lattice Quilt – Free Pattern lies in its blocks. These blocks are the building units of the quilt, and their precision determines the overall look.
Begin by cutting your fabric pieces according to the pattern dimensions. Use a rotary cutter for clean, straight edges, and double-check measurements to ensure consistency.
Lay out your pieces on a flat surface to visualize the block. Arrange the fabrics in the lattice pattern to confirm that the colors and textures work well together.
Sew the pieces together using a ¼-inch seam allowance. This standard measurement helps maintain uniformity across all blocks and ensures they fit together perfectly.
Press the seams open or to one side after sewing. Ironing seams reduces bulk and creates a polished finish.
Repeat these steps to create multiple blocks. The number of blocks you’ll need depends on the desired size of your quilt. For a small throw, you might need 20 blocks, while a king-size quilt could require 60 or more.
Once all blocks are completed, lay them out to finalize the arrangement. Play with the placement to achieve a balanced look, keeping color distribution in mind.
After creating your blocks, the next step in the Grandma’s Lattice Quilt – Free Pattern process is assembling the quilt top. This is where your quilt starts taking shape.
Begin by sewing blocks together in rows. Align the edges carefully, and use pins or clips to hold them in place while sewing. Take your time to match seams for a polished look.
Press the seams between rows to keep the quilt top smooth and easy to handle. A flat quilt top makes quilting and finishing much simpler.
Decide on sashing and borders. Sashing strips between blocks add definition and emphasize the lattice design. Borders frame the quilt, providing a cohesive and finished appearance.
Sew the rows together to complete the quilt top. Double-check alignment and trim any excess fabric for a neat edge.
Lay out the quilt top on a large surface to ensure everything looks balanced and symmetrical. Make any necessary adjustments before moving to the next step.
Mark your quilting design. Whether you follow the lattice pattern or add your own creative touches, marking ensures even quilting and highlights the design’s structure.
The final stage of the Grandma’s Lattice Quilt – Free Pattern is quilting and binding. This step brings your project to life and ensures it lasts for years to come.
Create a quilt sandwich by layering the quilt top, batting, and backing fabric. Smooth out each layer to avoid wrinkles and secure them with basting pins or spray adhesive.
Quilt the layers together. Straight-line quilting along the lattice design enhances the pattern’s geometry, while free-motion quilting adds a touch of artistry.
Trim the edges of the quilt sandwich to prepare for binding. Use a rotary cutter for clean, even edges.
Attach the binding to the quilt’s edges. Binding not only finishes the quilt but also provides durability and a polished look.
Add a quilt label with your name, date, and any special notes. This detail personalizes your quilt and preserves its story for future generations.
Wash and dry your quilt to soften it and remove any markings or residue. Your Grandma’s Lattice Quilt – Free Pattern is now complete and ready to be displayed or gifted.
1. What makes the Grandma’s Lattice Quilt special?
This quilt combines timeless elegance with versatility. Its lattice design works with a variety of fabrics and themes, making it a classic choice for quilters of all levels.
2. Can beginners attempt this pattern?
Yes! The Grandma’s Lattice Quilt – Free Pattern includes clear instructions and straightforward steps, making it beginner-friendly while still engaging for experienced quilters.
3. What size should I make?
The quilt size depends on your preference. The pattern can be adapted for anything from a small baby quilt to a large bedspread.
4. How do I choose colors for the lattice design?
Select a color palette that suits your style. Neutral tones create a subtle look, while bright or contrasting colors make the lattice stand out.
5. Can I quilt this by hand?
Absolutely! Hand quilting adds a personal touch and works beautifully with the lattice design.
6. How do I care for my finished quilt?
Wash your quilt in cold water on a gentle cycle. Air drying or using a low heat setting in the dryer helps preserve its quality.
Join our VIP broadcast list and gain access to exclusive patterns, all for free. As a VIP member, you’ll receive the best patterns daily, delivered directly to your device. ✨📱 It’s a unique opportunity to stay up-to-date with the latest trends and designs, curated just for you. Don’t miss out on enhancing your projects and discovering new inspirations with the best patterns every day! 🎨🔝
The Grandma’s Lattice Quilt – Free Pattern: Transform Your Craft with This Classic Design is a delightful project that merges tradition with creativity. Whether you’re making it as a gift or for personal use, this quilt is sure to impress with its timeless appeal and intricate design.
We hope this guide inspires you to try this beautiful pattern. Share your thoughts, suggestions, and photos of your finished quilts in the comments below. Happy quilting!


