
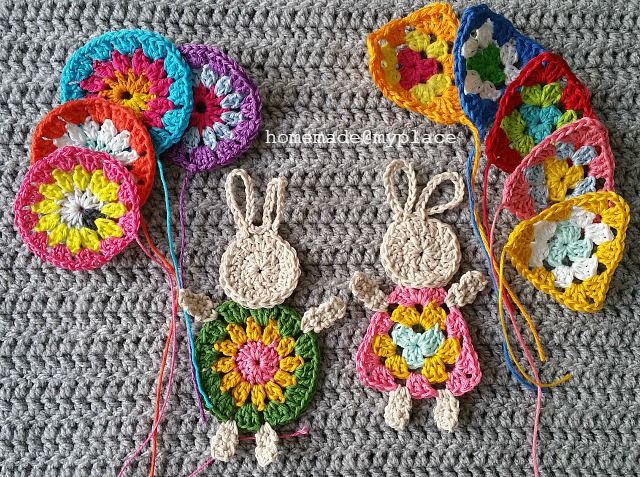
If you’re a fan of crochet and are looking for a cute and fun project, the Granny Bunny Free Crochet Pattern is the perfect choice for you. This adorable bunny design features the traditional granny square technique and combines it with the charm of a cute, cuddly bunny.
Whether you’re a beginner or an experienced crocheter, this free pattern offers a wonderful opportunity to practice your skills and create something special for Easter, spring, or simply to decorate your home with some handmade cuteness.
The Granny Bunny Free Crochet Pattern is simple enough to follow while allowing you to explore the creative possibilities of using granny squares for amigurumi.
You’ll enjoy watching your bunny come together as you work through the pattern, and the result is a fun, soft, and huggable stuffed animal that adds a unique touch to any space.
The great thing about this pattern is that it’s highly customizable—you can choose your favorite yarn colors to make the bunny truly your own.
In this article, we will walk you through the steps to make your own Granny Bunny. We’ll cover the materials you’ll need, provide detailed instructions for the crochet process, and even offer some helpful tips to make the project easier.
Whether you’re making one for yourself, as a gift, or as a fun addition to your crochet collection, this free pattern will provide hours of enjoyable crafting. So, let’s get started with the steps to create your very own bunny!
Materials Needed for the Granny Bunny
Before you begin working on your Granny Bunny Free Crochet Pattern, it’s important to gather all the necessary materials. Having everything ready will help you avoid interruptions and ensure that the project goes smoothly from start to finish. Here’s what you’ll need to get started:
- Yarn: For the body and head of the bunny, use a soft yarn in a neutral color like white, cream, or light grey. You’ll also need additional yarn in pastel colors for the ears, tail, and any other accents you want to add to personalize your bunny.
- Crochet Hook: A size G-6 (4mm) crochet hook is recommended for this pattern, but you can adjust the size of the hook based on the yarn you choose.
- Tapestry Needle: You’ll need a tapestry needle to sew the pieces together and weave in the ends.
- Safety Eyes: Safety eyes are optional but can be a great way to give your bunny a realistic look. Choose the size that best fits your bunny’s face.
- Fiberfill Stuffing: To give your bunny a soft, cuddly feel, you’ll need fiberfill stuffing to fill the head, body, and limbs.
- Scissors: You’ll need a pair of scissors to cut your yarn as you go.
Once you have all your materials ready, you can jump right into creating this charming crochet bunny.
Starting the Granny Square for the Bunny’s Body
The first step in making the Granny Bunny Free Crochet Pattern is to create the granny square that will serve as the body of the bunny. To start, make a slip knot with your yarn and create a foundation chain to form a ring. You’ll work in rounds, adding double crochet stitches and chain spaces to build the square’s shape.
Each round will add to the size of your granny square. Start by making four double crochet stitches into the ring, and then join them with a slip stitch. Afterward, continue adding rounds, alternating between double crochet and chain stitches to form the classic granny square pattern. As you work, make sure to keep your tension consistent so that the square remains even.
The size of your granny square will depend on the size of the bunny you want to create. For a small bunny, keep the square relatively small, but for a larger bunny, continue adding rounds to increase the size of the body. Once the square reaches the desired size, fasten off and cut the yarn, leaving a long tail to sew the pieces together later.
Creating the Head, Ears, and Tail
Now that you have the body of your Granny Bunny ready, it’s time to move on to creating the head, ears, and tail. These pieces are also made using the granny square technique, but they will require fewer rounds than the body.
Start with the same technique used for the body, but keep the head smaller and more compact. The head should be proportional to the body, so make a granny square that’s slightly smaller in size. As with the body, you can adjust the size of the square depending on how large or small you want the bunny’s head to be.
For the bunny’s ears, you can create two smaller granny squares or work in rows to form long ear shapes. When making the ears, remember to leave one end of the square open so that you can fold it into a natural ear shape. You can add contrasting colors or stripes to the ears to give them a fun and unique look.
The tail is created by making a small circle with your yarn, using a few rounds of double crochet stitches to form a small, puffy ball. This will be sewn onto the back of the bunny’s body once all the pieces are complete.
Assembling the Granny Bunny
Once you’ve finished creating all the pieces of your Granny Bunny, the next step is to assemble them into the cute bunny you’ve been working towards. Start by attaching the head to the body using your tapestry needle. Use the long yarn tails from the body and head to sew them securely together, making sure the stitches are tight and the pieces stay in place.
Next, attach the ears to the top of the head, positioning them in a way that looks natural and balanced. Use a few stitches to sew the ears securely, ensuring they are symmetrical and not too floppy. Once the ears are in place, sew on the tail to the back of the bunny, making sure it sits comfortably and adds to the bunny’s cuteness.
Finally, if you’re using safety eyes, place them on the face of the bunny, ensuring they are evenly spaced and positioned properly. If you’re not using safety eyes, you can embroider eyes using black yarn or felt. Once the eyes are in place, add any additional details like a small nose or mouth to complete the facial features.
Final Touches and Customizations
The Granny Bunny Free Crochet Pattern is incredibly customizable, so feel free to get creative with your bunny! You can add a small scarf, a bow, or even a little vest to give your bunny extra personality. You can also experiment with different yarn colors for each piece to create a one-of-a-kind bunny that suits your style.
To add some extra flair, consider crocheting small flowers or leaves and attaching them to the bunny’s ears or body. This can be especially cute if you’re making the bunny as a gift for someone special or for a holiday like Easter.
The beauty of this pattern is its versatility. You can make a simple bunny or go all out with accessories and embellishments. Don’t be afraid to make your bunny as unique and whimsical as you like!
FAQ – Frequently Asked Questions
1. What size crochet hook should I use for the Granny Bunny?
For the Granny Bunny Free Crochet Pattern, a size G-6 (4mm) crochet hook is recommended. However, you can adjust the size of the hook based on the yarn you are using.
2. Can I use any type of yarn for the bunny?
Yes, you can use any type of yarn for this project. However, it’s best to use soft, medium-weight yarn like worsted weight (4) to ensure the bunny is both soft and sturdy.
3. How do I make the bunny’s ears stand up?
To make the ears stand up, make sure they are securely sewn to the head and consider using a bit of extra stuffing inside the ears to give them more structure.
4. Can I make a larger Granny Bunny?
Yes! To make a larger bunny, simply increase the size of the granny squares you use for the body, head, ears, and tail.
5. Can I make this bunny without using safety eyes?
Yes, you can embroider the eyes or use small buttons if you prefer not to use safety eyes. Just make sure they are securely attached for safety.
6. How long does it take to make the Granny Bunny?
The time it takes to make the Granny Bunny Free Crochet Pattern depends on your experience level, but it typically takes a few hours to complete.
Join our VIP broadcast list and gain access to exclusive patterns, all for free. As a VIP member, you’ll receive the best patterns daily, delivered directly to your device. ✨📱 It’s a unique opportunity to stay up-to-date with the latest trends and designs, curated just for you. Don’t miss out on enhancing your projects and discovering new inspirations with the best patterns every day! 🎨🔝
Conclusion
In this Granny Bunny Free Crochet Pattern tutorial, we’ve walked you through the steps to create a cute and customizable crochet bunny. From gathering materials to assembling the bunny, this project is a fun and creative way to practice your crochet skills while making something adorable.
We hope this pattern has inspired you to start your own project and experiment with different colors and accessories. We’d love to hear your thoughts and see your finished bunnies—please leave your feedback and suggestions in the comments below! Happy crocheting!


