
The charm of the classic granny square has stood the test of time—and what better way to use it than in a stylish, handmade accessory?
With this GRANNY SQUARE BAG – FREE CROCHET PATTERN, you can turn colorful squares into a functional and fashionable item. Whether you’re heading to the market, the beach, or a casual lunch, this bag will add a touch of retro flair to your outfit.
This project is ideal for crocheters of all skill levels. Beginners will love practicing their stitches with a repeatable pattern, while experienced crafters can explore color combinations and creative layouts.
The bag comes together by joining squares and adding a sturdy handle, creating something both useful and beautiful.
One of the best things about a granny square bag is its versatility. You can make it bold or neutral, small or oversized, lined or unlined. It’s a great stash-buster and a rewarding project you’ll want to make again and again.
1. Why You’ll Love This GRANNY SQUARE BAG – FREE CROCHET PATTERN
The GRANNY SQUARE BAG – FREE CROCHET PATTERN is more than just a pretty project. It’s practical, customizable, and full of handmade personality. Here’s why it’s worth adding to your to-make list:
First, it’s a perfect beginner project. Granny squares use basic stitches—chain, double crochet, and slip stitch—making them accessible and easy to learn. Once you master the square, you can create dozens for your bag.
Second, this bag is highly customizable. Want it in pastel shades? Go for it. Prefer rainbow or vintage hues? You’re in control. You can even make each square different, adding a patchwork vibe that’s totally unique.
Third, it’s quick and satisfying. You can crochet a single square in under 30 minutes. Over a few evenings, you’ll have enough to piece together a full-sized bag. It’s one of those projects where progress is instantly visible.
Finally, a granny square bag is functional. Use it as a reusable shopping tote, a book bag, or even a beach carry-all. It’s sturdy, washable, and folds flat when not in use—ideal for daily life.
2. Materials You Need for Your Crochet Granny Square Bag
To begin your GRANNY SQUARE BAG – FREE CROCHET PATTERN, you’ll need just a few basic supplies. Most can be found in your existing yarn stash:
1. Yarn
Worsted weight (medium/4) cotton or acrylic yarn is best. Cotton gives a sturdy finish, while acrylic offers flexibility and vibrant colors. Choose at least two colors for contrast or more for a lively mix.
2. Crochet Hook
A 4.0 mm (G) or 5.0 mm (H) hook typically works well with worsted yarn. Use the size recommended on your yarn label for best results.
3. Yarn Needle
For weaving in ends and joining the squares. A blunt-tipped tapestry needle works perfectly.
4. Scissors
Sharp scissors help you keep your work neat and ends trimmed.
5. Optional: Lining Fabric and Sewing Needle
For extra durability and a clean interior finish, consider adding a fabric lining.
You may also want to add buttons, magnetic snaps, or leather straps for a professional touch, but these are completely optional.
3. How to Crochet the Granny Squares and Assemble the Bag
The core of this GRANNY SQUARE BAG – FREE CROCHET PATTERN lies in making and assembling the squares. Here’s how the process goes:
Step 1: Make Your Squares
The traditional granny square starts with a magic circle or a chain ring and uses clusters of double crochet stitches. A common layout has four rounds per square, changing colors each round if desired.
Make 13 to 17 squares for a medium-sized bag, depending on the dimensions you want. Most bags are made from a 3×3 or 4×4 square layout.
Step 2: Block the Squares
After crocheting, block each square to ensure they’re the same size. This helps in joining and gives your bag a polished look.
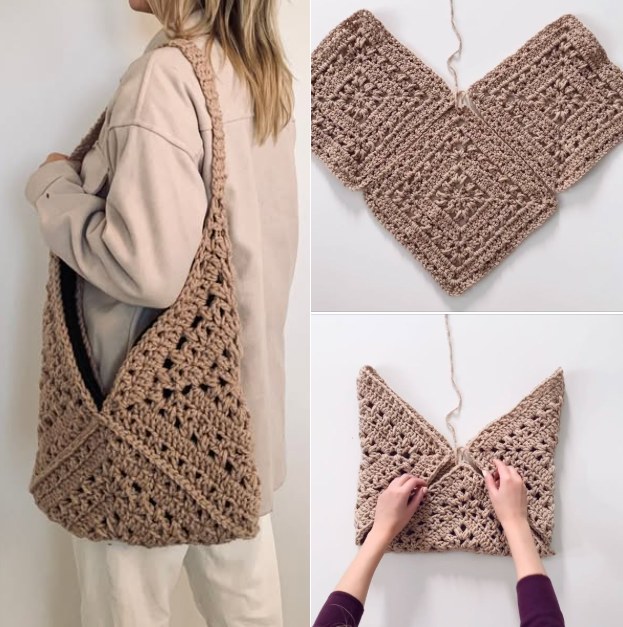
Step 3: Join the Squares
You can use slip stitch, single crochet, or the invisible whip stitch method to join your squares. Lay out your pattern before joining to make sure the colors flow nicely.
Join the squares into panels, then stitch the panels into a rectangular or square bag shape. Don’t forget to leave an opening at the top!
Step 4: Add Straps
You can crochet simple straps using rows of single crochet or double crochet, or use ready-made straps for a more structured feel. Attach them securely to the top corners of the bag.
Step 5: Optional – Add Lining
Cut a fabric piece the same size as your assembled bag. Fold and sew the edges, then hand-stitch or machine-sew the lining into the inside for a clean finish.
Now your granny square bag is ready to show off!
4. Fun Variations for Your Granny Square Bag
The beauty of this GRANNY SQUARE BAG – FREE CROCHET PATTERN is how many ways you can personalize it. Here are a few ideas to inspire you:
1. Color Themes
Create a rainbow bag, a minimalist neutral tone palette, or stick with traditional vintage colors. A monochromatic theme also adds sophistication.
2. Embellished Squares
Add appliqués, buttons, or embroidery to the center of each square for a detailed and artistic touch.
3. Shapes and Sizes
Try different square sizes or experiment with rectangles and hexagons for a twist on the classic design. You can even make a circular bag from round motifs.
4. Handles and Closures
Use macramé cords, leather straps, wooden handles, or crocheted i-cords. Add a button or zipper closure if you’d like more security.
5. Reversible Bag
Line the bag with a pretty fabric and sew it in a way that allows the bag to be flipped inside out, offering two looks in one.
Your bag, your rules! There’s no wrong way to make it your own.
FAQ – GRANNY SQUARE BAG – FREE CROCHET PATTERN
How many granny squares do I need for a bag?
Most bags use between 13 and 17 granny squares, depending on the size of each square and the desired bag size.
Can beginners make this bag?
Yes! This is a great beginner project that uses basic stitches and simple joining techniques.
Do I need to line the bag?
No, it’s optional. But lining helps protect your items and adds structure. If you’re carrying small items, lining is a great idea.
What yarn is best for granny square bags?
Cotton yarn is ideal for structure and durability. Acrylic is great for colorful, soft bags. Use what you’re most comfortable with.
Can I wash the finished bag?
Yes! Hand wash or use a delicate machine cycle. Be sure to check your yarn label and let the bag air dry flat.
Conclusion
The GRANNY SQUARE BAG – FREE CROCHET PATTERN is a timeless project that combines creativity, functionality, and charm. Whether you’re making it for yourself or as a heartfelt gift, this pattern allows endless variations and colorful expression. Each square holds the warmth of your hands and the spirit of your style.
VIDEO TUTORIAL
Have you made a granny square bag before? Or are you planning to try one soon? Leave a comment below and tell us your favorite color combos or creative twists—we’d love to hear your ideas and celebrate your handmade journey!


