
Granny Square Crochet Bag – Pattern is a timeless and delightful project that blends creativity, functionality, and a touch of vintage charm.
Whether you are a beginner or a seasoned crocheter, creating a granny square bag offers a rewarding experience and the opportunity to personalize your work with endless color combinations and designs.
With just a few basic stitches and some yarn, you can create a beautiful accessory that stands out for both its style and handmade appeal.
One of the most enjoyable aspects of the Granny Square Crochet Bag – Pattern is its versatility. You can use leftover yarn scraps to build colorful squares, or follow a more uniform design for a modern, minimalistic look.
These bags are perfect for everyday use, beach outings, shopping trips, or even as gift bags. With just a few hours of work, you can craft something both practical and stylish that shows off your crochet skills.
In this detailed guide, you’ll learn everything you need to know about creating your own Granny Square Crochet Bag – Pattern, including choosing yarn and tools, designing and assembling your squares, and adding finishing touches like straps and linings.
We’ll also cover customization options and provide tips to ensure your bag is durable, eye-catching, and uniquely yours.
1. Selecting Materials for Your Granny Square Crochet Bag
The first step in making a beautiful Granny Square Crochet Bag – Pattern is selecting the right materials. Yarn choice can significantly impact both the appearance and functionality of your finished bag.
Cotton yarn is often the best option for bags because it provides strength, structure, and durability. It holds its shape well and doesn’t stretch much, which is ideal for a bag that will carry weight. If you prefer a softer look or a more flexible texture, consider acrylic blends or a sturdy wool.
When it comes to hooks, the size typically recommended for granny squares is between 4.0 mm to 5.5 mm, depending on your yarn. Check your yarn label for the suggested hook size and make sure to create a test square to check your tension before starting.
Color selection is where your creativity shines. You can go bold and colorful with every square a different hue, or keep it simple with a monochromatic palette. The design possibilities are endless with the Granny Square Crochet Bag – Pattern.
Besides yarn and a crochet hook, you’ll need a yarn needle for sewing the squares together and weaving in ends. Stitch markers can be helpful for keeping track of corners or rounds, especially if you’re working on a more complex variation of the granny square.
If you plan to line your bag, have some fabric and a sewing needle or machine ready. A lining can add extra stability and prevent smaller items from slipping through the gaps in your crochet.
2. Crafting and Assembling the Squares
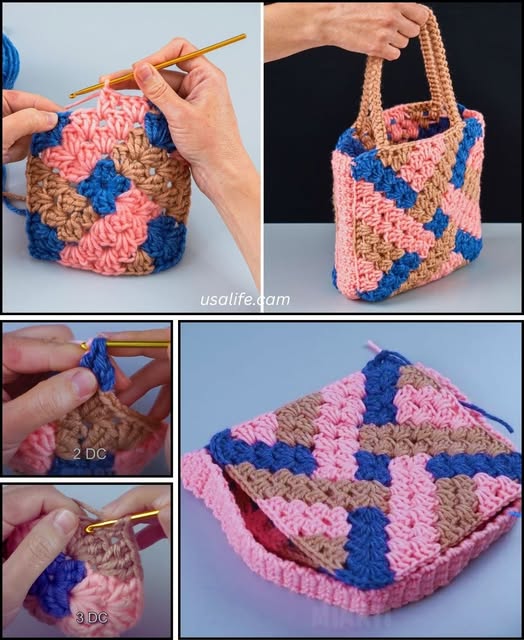
Once your materials are ready, it’s time to start crocheting your squares. The classic granny square begins with a chain loop and builds outward with clusters of double crochet stitches. This simple structure allows for easy memorization and fast stitching.
Start by making a magic ring or chaining four and joining to form a loop. From there, work your double crochet clusters in rounds, typically forming three clusters per side with chain spaces at the corners. This basic design forms the foundation of your Granny Square Crochet Bag – Pattern.
As you make each square, be mindful of consistency in size. Even tension and the same number of rounds will help your squares align neatly when sewn together. Blocking your squares before assembly can help with uniformity.
You can decide on the number of squares based on how big you want your bag to be. A standard size might use nine squares per side, while a smaller purse might use four or six. Create extra squares if you’d like to add pockets or decorative panels.
Once all squares are complete and blocked, lay them out in your desired pattern. Play with arrangements and color placement until you’re happy with the layout. This step can be especially fun if you’ve used different colors or designs.
Sew the squares together using a whip stitch or slip stitch join. A seamless or invisible join can give your Granny Square Crochet Bag – Pattern a clean and polished finish. Work slowly to keep edges aligned and corners matching.
3. Shaping and Structuring the Bag
With your main body panels assembled, it’s time to shape the bag. This can be as simple or complex as you like, depending on the style you’re aiming for. The most common style is the tote shape—two panels sewn together along three sides with an open top.
Begin by attaching the sides using the same stitch technique used for joining the squares. Reinforce the bottom seam to ensure it can support weight. You may want to crochet an extra panel as a base insert to provide more structure to the bottom of the bag.
To give your Granny Square Crochet Bag – Pattern depth and volume, add side panels between the front and back. This boxy shape increases carrying space and gives the bag a sturdier form. The width of the side panel will determine how deep your bag will be.
Consider adding a flap closure or button if you want your bag to stay shut. A crocheted drawstring is also a great option and adds a handmade, boho flair. If you want a zippered closure, you’ll need a zipper and some basic sewing skills.
Lining the bag is optional but highly recommended. A fabric lining can protect the inside of your crochet, add support, and keep small items secure. Choose a fabric that complements your colors and attach it with a simple hand stitch or sewing machine.
Before finalizing, turn the bag inside out to check seams and alignment. Make any adjustments needed so the bag looks clean and professional when finished.
4. Finishing Touches and Customization
Now that your bag is assembled, it’s time to add the finishing touches that bring the Granny Square Crochet Bag – Pattern to life. Handles, embellishments, and personalized details can transform your project into a truly unique piece.
You can create straps using long crochet chains reinforced with rows of single crochet or half-double crochet for thickness. Alternatively, use leather straps for a more polished, professional look. Ensure that the straps are securely attached and even.
Add a crochet flower or button detail to one of the squares for a charming accent. You could also add tassels, beads, or fringe to the sides or bottom of the bag for a fun and trendy style.
If you love practical bags, consider adding a small inner pocket to the lining for items like keys or cards. You can even make a matching coin purse using one or two additional squares.
Want your bag to close? Add a drawstring, magnetic snap, or button flap. These are easy additions and help keep your belongings safe inside your Granny Square Crochet Bag – Pattern.
For added durability, consider reinforcing the handles with interfacing or stitching a layer of fabric underneath the crocheted strap. This helps prevent stretching over time.
Personalization is key to any handmade item. Whether it’s through color choice, layout, or decorative elements, your final piece should reflect your style and personality.
FAQ – Granny Square Crochet Bag – Pattern
Is this project suitable for beginners?
Yes, the Granny Square Crochet Bag – Pattern is perfect for beginners. If you can make a basic granny square, you can complete this bag with ease.
What kind of yarn is best for a crochet bag?
Cotton yarn is the best option because it is strong and holds its shape well. Acrylic yarn is also acceptable, but may stretch more over time.
Do I need to line my bag?
Lining your bag is optional but highly recommended for durability and functionality. It helps support the structure and keeps items from falling through stitches.
How many granny squares do I need for a bag?
It depends on the desired size. A small tote may require 10–12 squares, while a larger one could need 16 or more. Plan your layout before starting.
Can I wash the finished bag?
Yes, but wash with care. If you use cotton yarn, hand washing and air drying are safest. Always test a swatch for colorfastness.
Can I sell bags made with this pattern?
Yes, most patterns allow you to sell the final item. However, it’s good practice to credit the pattern inspiration if required by the designer.
Conclusion
Creating a Granny Square Crochet Bag – Pattern is not only a fun and satisfying project, but also a chance to make a functional accessory that reflects your creativity. From choosing materials to stitching the final seam, every step brings you closer to a unique, handmade piece you’ll be proud to use or give as a gift. Whether you’re new to crochet or looking for a joyful weekend project, this pattern delivers beauty, versatility, and a touch of nostalgia.
Have you tried making your own granny square bag? Share your thoughts, tips, or suggestions in the comments! We’d love to hear how you customized your Granny Square Crochet Bag – Pattern and what you learned along the way.


