
The Granny Square With 3D Rose Tutorial is a creative and unique project that blends traditional crochet techniques with a modern twist. Granny squares have long been a staple in the world of crochet, known for their versatility and timeless appeal.
By incorporating a 3D rose into the square, you can take your crocheting skills to the next level while adding a beautiful floral touch to your projects.
If you’re familiar with granny squares but are looking to add an extra layer of texture and design, this Granny Square With 3D Rose Tutorial will guide you through the steps.
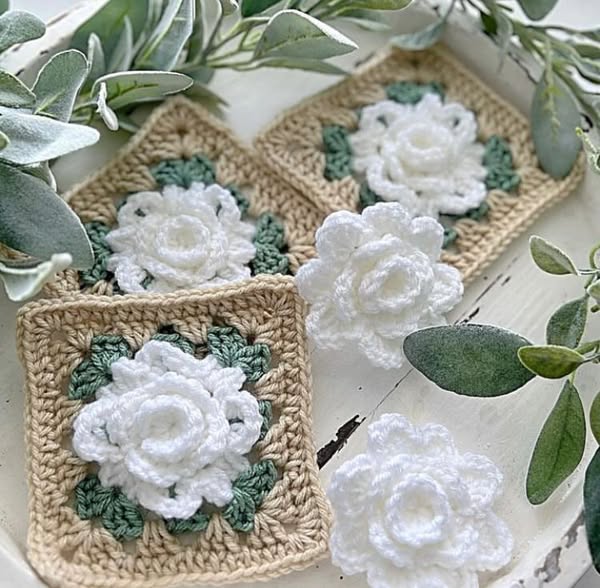
Whether you’re creating a blanket, cushion cover, or bag, the 3D rose adds a pop of dimension that will make your project stand out. This tutorial is perfect for intermediate crocheters, but beginners will also be able to follow along with the detailed instructions and helpful tips.
The technique of adding a 3D element to crochet can seem daunting at first, but once you understand the basics, it becomes easy and fun to master.
In this article, we will explore the materials you’ll need, the steps to create the granny square, and how to crochet the 3D rose. By the end of this tutorial, you’ll have the skills to create stunning pieces that are sure to impress.
1. Materials You Will Need for the Granny Square with 3D Rose
Before starting the Granny Square With 3D Rose Tutorial, it’s important to gather all the necessary materials. Here’s what you’ll need for this project:
Yarn: For the granny square, choose a yarn that works well for the size of your project. You can use any yarn weight, but medium-weight yarn (such as worsted weight) is commonly used for granny squares. For the 3D rose, choose a yarn in a contrasting color to create the effect of a bold flower.
Crochet Hook: Select a crochet hook that corresponds with your yarn weight. For medium-weight yarn, a size H-8 (5.0 mm) hook is a good choice. If you are using a different weight yarn, adjust the hook size accordingly.
Scissors: A sharp pair of scissors will be needed to cut your yarn at the end of each section of the project.
Yarn Needle: This tool is used to weave in the ends of your yarn after completing the granny square and the 3D rose.
Stitch Markers: If you’re a beginner or need extra help keeping track of your stitches, stitch markers will be useful to mark your starting chain or the corners of your granny square.
Measuring Tape: This is optional but can help you ensure that your granny square is the desired size.
With these materials in hand, you’re ready to begin your Granny Square With 3D Rose Tutorial and create something beautiful.
2. How to Crochet a Basic Granny Square
Creating the granny square itself is the first step in this project. The Granny Square With 3D Rose Tutorial starts with mastering the classic granny square, which is the foundation for adding the 3D rose later. Follow these simple steps to crochet your granny square:
1. Create a Slip Knot: Begin by making a slip knot with your yarn, then chain 4 and join with a slip stitch to form a ring.
2. Round 1 – Crochet the First Round: Chain 3 to start your first cluster of double crochets. Then, make 2 double crochets into the ring, chain 2, and repeat this 3 more times. You should have 4 groups of double crochet with 2 chain stitches in between each group.
3. Round 2 – Adding Corners: For the second round, start by chaining 3 again, and then crochet 2 double crochets into the same space. Chain 2 and crochet 3 more double crochets into the same space. This creates the first corner. Continue working around, making 3 double crochets in each space between the clusters from the previous round, and finish by joining with a slip stitch.
4. Round 3 – Finishing the Square: For the final round, repeat the process of chaining 3 and adding 2 double crochets, chain 2, and 3 double crochets in each corner space. In the spaces between corners, make 3 double crochets. When you reach the beginning, join with a slip stitch to close the round.
5. Fasten Off: Cut the yarn and weave in the ends using a yarn needle. You should now have a perfect granny square ready to add the 3D rose!
Once your granny square is complete, it’s time to move on to the fun part – adding the 3D rose.
3. How to Crochet the 3D Rose for Your Granny Square
The 3D rose adds a beautiful, tactile element to your granny square. This step-by-step guide will show you how to crochet the rose and attach it to your square.
1. Create a Magic Ring: Start by creating a magic ring with your yarn. This will form the center of the rose.
2. Round 1 – Crochet the Petals: Chain 3 to begin the first petal of the rose. Then, make 2 double crochets into the ring, followed by a chain 2 and 3 more double crochets into the ring. Repeat this process 5 times to create 5 petals in total. Tighten the magic ring to secure the petals.
3. Round 2 – Forming the Petals: In the second round, crochet into the spaces between the petals from the first round. Make 3 double crochets, chain 2, and 3 double crochets in each space to create larger petals. This round adds volume and makes the petals stand out.
4. Round 3 – Finishing the Rose: To complete the rose, crochet 2 double crochets in each of the spaces between the petals, chain 2, and repeat for all 5 petals. This will give your rose a fuller, more dimensional look.
5. Attach the Rose to the Granny Square: Position the 3D rose on the center of your granny square and use a yarn needle to sew it into place. Make sure the petals are securely attached, and the rose is centered on the square.
6. Weave in Ends: After securing the rose to the granny square, weave in any remaining ends to give your project a neat finish.
Now that your Granny Square With 3D Rose is complete, you can create as many as you like to make a stunning blanket, cushion cover, or even a bag!
4. Creative Ways to Use the Granny Square With 3D Rose
Once you’ve mastered the Granny Square With 3D Rose Tutorial, you may be wondering how to incorporate your beautiful squares into different projects. Here are a few ideas to get you started:
1. Throw Blanket: Use your granny squares with 3D roses to create a colorful and textured throw blanket. Combine different colors of yarn for a fun, eclectic look.
2. Cushion Cover: Create a chic cushion cover by crocheting several granny squares with 3D roses and joining them together. This project adds a lovely decorative touch to your living room or bedroom.
3. Bag: Sew several granny squares together to make a unique bag. Add a lining and handle to complete your creation.
4. Wall Hanging: For a more decorative project, use your granny squares with 3D roses to make a beautiful wall hanging. You can arrange the squares in any pattern you like to create a stunning piece of art for your home.
5. Coasters: If you’re looking for a smaller project, crochet granny squares with 3D roses to create custom coasters. These make great gifts or additions to your own home.
6. Scarf or Shawl: Use your granny squares to make a scarf or shawl. The 3D rose will add a lovely floral accent to the design.
The possibilities are endless once you’ve perfected this technique!
Frequently Asked Questions
Q1: How do I choose the right yarn for my Granny Square With 3D Rose?
A: For the granny square, choose a medium-weight yarn that complements the 3D rose. Opt for soft, durable yarn for comfort and longevity.
Q2: Can I use a smaller crochet hook for more delicate fabric?
A: Yes, if you’re using thinner yarn, feel free to use a smaller crochet hook to achieve a finer texture for the granny square.
Q3: How do I attach the rose to the square if it’s not lining up?
A: If the rose isn’t aligning perfectly, you can adjust it slightly and use a yarn needle to carefully stitch the rose into place, making sure the edges are even.
Q4: Can I use this technique for other crochet projects?
A: Yes! You can use the 3D rose technique in other projects, such as hair accessories, jewelry, or appliqué for clothing.
Q5: What if my 3D rose isn’t turning out right?
A: If your rose isn’t turning out correctly, check the stitch count and make sure you’re following the pattern closely. Practice may also help refine your technique.
Q6: Can I mix and match yarn colors for the granny square and rose?
A: Absolutely! You can experiment with different color combinations for the granny square and the 3D rose to create a customized and unique look.
Conclusion
The Granny Square With 3D Rose Tutorial is a wonderful way to add a touch of elegance and texture to your crochet projects.
By following the steps in this tutorial, you can create beautiful, dimensional squares that can be used in a variety of applications. Whether you’re making a blanket, bag, or cushion cover, the 3D rose will elevate your creations.
VIDEO TUTORIAL
We hope this tutorial inspires you to explore new crochet techniques and experiment with colors and patterns. Feel free to leave a comment below with your thoughts or any suggestions for future projects. We’d love to hear your feedback and see what you create! Happy crocheting!


