If you’re looking for a fun and functional project, How to Crochet a Cute Mini Tote Bag with Two Colors – Step by Step Tutorial is the perfect guide to get you started. This beginner-friendly pattern uses simple techniques, eye-catching color contrasts, and basic materials to help you create a lovely mini tote bag.
Whether you’re crafting for yourself or as a handmade gift, this project combines creativity, practicality, and joy.
The beauty of this cute mini tote bag lies in its versatility. You can use it for your essentials like keys, phone, or small crochet tools, or gift it to a loved one. With just two complementary yarn colors and a few hours of your time, you’ll have a stylish tote that adds charm to any outfit. Plus, it’s a great way to use leftover yarn and explore color matching.
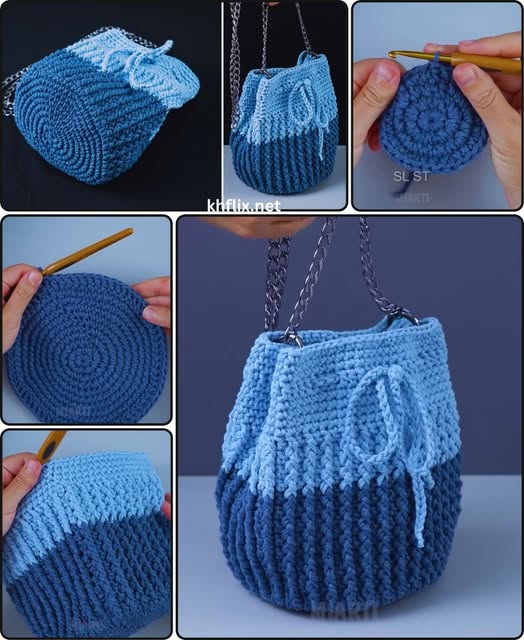
In this step by step tutorial, you’ll learn how to build the base of the bag, switch colors seamlessly, shape the handles, and finish the piece with neatness and structure. Everything is designed to be easy to follow while keeping your experience rewarding.
Let’s dive into this How to Crochet a Cute Mini Tote Bag with Two Colors – Step by Step Tutorial and enjoy the magic of handmade!
Before starting your project, gather all the supplies you’ll need for this How to Crochet a Cute Mini Tote Bag with Two Colors – Step by Step Tutorial. Having the right materials on hand will make your experience smooth and enjoyable.
Choose two yarn colors that complement each other. A popular choice is one neutral tone like beige, cream, or gray paired with a brighter shade such as coral, mint, or navy blue. Cotton yarn is ideal because it provides structure and durability for bags.
You’ll also need a 4 mm or 4.5 mm crochet hook. This size works well for medium-weight yarn and helps create tight stitches that form a solid, long-lasting fabric. If you’re new to crochet, this hook size is also easier to handle.
Other essential tools include scissors, a yarn needle for weaving in ends, and stitch markers to help you keep track of rows or color changes. Optional but useful is a measuring tape to ensure both sides of your tote are symmetrical.
Decide which color will be the main body and which will be the accent. Typically, the base and handles are made in the darker color to hide wear, while the body can feature the lighter or brighter tone.
Now that your materials are ready, let’s move into the fun part: crocheting your cute mini tote bag with two colors step by step!
To begin your How to Crochet a Cute Mini Tote Bag with Two Colors – Step by Step Tutorial, start with the darker color to create the bag’s sturdy foundation. This will form the base where everything is built.
Create a foundation chain of around 25 to 30 stitches, depending on how wide you want your mini tote. Turn and work single crochet stitches into each chain across, creating the first row. Continue for several rows to form a rectangular base.
Once your base is complete, you’ll start working in the round to build the sides. Crochet around all four edges of the rectangle, increasing at the corners to prevent curling. This forms the bottom edge of your tote bag.
Switch to your second color by pulling the new yarn through the last stitch of the previous round. This ensures a clean, seamless color change. Now begin working single crochet stitches in continuous rounds.
After several rounds, your mini tote will begin to grow in height. Use stitch markers to help count your rounds and maintain symmetry on both sides.
When the desired height is reached—usually around 15 to 20 rounds—it’s time to prepare for the top edge and handle shaping in your How to Crochet a Cute Mini Tote Bag with Two Colors – Step by Step Tutorial.
Now that you have the main body complete, it’s time to shape the handles of your cute mini tote bag. This part gives your bag its function and final polish.
Continue with the same color used for the last few rounds. Begin by working a row of single crochet around the top edge of the bag, ensuring it’s even and clean for the handle attachments.
To make the handles, crochet a specific number of chains (typically 20–30, depending on desired length) and skip an equal number of stitches on the body, then join the chain back into the round. This forms the first handle.
Repeat the same steps on the opposite side of the bag to create the second handle. Be sure both handles are aligned evenly across from one another for balance.
On the next round, single crochet into each stitch, including the chains, to reinforce the handle structure. You may want to repeat this round once or twice to make the handles sturdier.
After finishing the handles, fasten off your yarn and weave in all loose ends with a yarn needle. Your How to Crochet a Cute Mini Tote Bag with Two Colors – Step by Step Tutorial is almost complete—now it’s time for the final touches!
Now comes the most creative part of your How to Crochet a Cute Mini Tote Bag with Two Colors – Step by Step Tutorial—adding your own custom flair! This helps turn your simple tote into something unique and stylish.
Add decorative elements like crochet flowers, buttons, or embroidery. These details can be attached to the front or sides of the tote for a personal touch. Choose matching or contrasting colors to highlight your style.
Consider lining the inside of the tote with fabric. Cut and sew a small rectangle to fit inside the bag and attach it with a few stitches. This adds durability and a polished look, especially for carrying delicate items.
If you’d like extra strength in the handles, you can braid yarn strips and attach them or crochet around thin rope for support. This technique also makes your tote more fashionable and durable.
You can also play with textures. Try alternating rows of single crochet with half-double crochet for a different feel. Textured stitches like the moss stitch or granite stitch work well for bags.
Personalize your bag by adding a charm or keyring to one handle. It’s a small touch that makes your mini tote bag with two colors feel extra special, especially if you’re gifting it.
Lastly, give your tote a gentle block by dampening it and shaping it with your hands. Let it dry flat so it maintains its shape. Now your handmade tote is ready to use or share with someone you love!
Q: Is this mini tote bag pattern suitable for beginners?
A: Absolutely! The How to Crochet a Cute Mini Tote Bag with Two Colors – Step by Step Tutorial is designed with simplicity in mind. If you know basic stitches like single crochet and chaining, you’ll be able to follow along easily.
Q: How much yarn do I need for this project?
A: You’ll need approximately 100g of each color, depending on the size of your tote. Medium-weight (worsted) cotton yarn works best.
Q: Can I adjust the size of the bag?
A: Yes! Simply adjust the number of foundation chains to make the base wider or narrower. The height can also be changed by adding or reducing rounds.
Q: How do I make the handles stronger?
A: To strengthen the handles, you can crochet multiple rounds over them or insert rope or interfacing for added support.
Q: Can I use more than two colors?
A: Definitely! You can experiment with stripes, color blocking, or variegated yarns to create unique effects.
Q: What is the best way to keep the bag clean?
A: If you use cotton yarn, the tote is usually machine washable on a gentle cycle. Always check the yarn label and consider handwashing for longevity.
In this tutorial, we’ve covered How to Crochet a Cute Mini Tote Bag with Two Colors – Step by Step Tutorial, from choosing your materials to adding those personal finishing touches. You learned how to build a sturdy base, create smooth color changes, shape handles, and even customize your tote for extra charm.
This is more than just a pattern—it’s an opportunity to enjoy the process of crafting something beautiful with your hands. Whether you’re making a gift, practicing new crochet skills, or simply indulging in a relaxing project, this mini tote is the perfect choice.
Now we’d love to hear from you! Did you enjoy this How to Crochet a Cute Mini Tote Bag with Two Colors – Step by Step Tutorial? Share your thoughts, suggestions, or even your finished creations in the comments. Your feedback helps inspire others and keeps the creative energy flowing in our crafting community!