
Macrame Heart Bracelet - Free Tutorial

Learning How to crochet a cute Small Bag – Free Pattern is an exciting journey for both beginners and seasoned crocheters. This pattern is not only practical but also stylish, making it perfect for daily use, gifting, or adding to your handmade collection.
With the right guidance, anyone can create a charming small bag that’s both functional and visually appealing.
Crochet allows endless creativity, and making a small bag is an excellent way to experiment with stitches, textures, and colors. The beauty of this project is that it combines artistry with utility, providing a handmade item that can be used for personal belongings or shared with friends and family.
How to crochet a cute Small Bag – Free Pattern emphasizes easy-to-follow instructions, making it accessible for crafters at various skill levels.
A handmade crochet bag is more than just an accessory; it represents creativity, effort, and dedication. By following this guide, you can create a small bag that reflects your style while also honing your crochet skills.
Whether it’s a gift or a personal treat, completing this project brings a sense of accomplishment and pride in your craftsmanship.
Selecting the right yarn is the first crucial step in creating a How to crochet a cute Small Bag – Free Pattern. Lightweight yarns like cotton or acrylic blends are ideal because they provide durability while keeping the bag structured. Choosing the right color is also important—solid tones create a classic look, while variegated yarn adds playful textures.
The crochet hook should match the recommended yarn weight to achieve the perfect stitch tension. Too large a hook can make the bag floppy, while a smaller hook can make it stiff. Experimenting with a few swatches before starting ensures your bag has the right balance between flexibility and durability.
Materials like stitch markers, measuring tape, and yarn needles are essential for a smooth workflow. These tools help keep track of rows, shape the bag accurately, and finish off details professionally. Don’t forget embellishments such as buttons, beads, or appliqués to enhance the bag’s personality.
A lining can add structure and longevity to your crochet bag. Simple fabric linings protect the crochet stitches and prevent items from snagging or falling out. This step is optional but highly recommended for a polished and durable final product.
Handles or straps are another consideration. You can crochet them directly into the bag, attach pre-made straps, or even create adjustable shoulder straps. This customization allows your small bag to fit your personal style and intended use.
Remember, the materials you choose will influence both the appearance and functionality of the bag. The combination of yarn, hook, and accessories determines whether your bag is lightweight, sturdy, or decorative, giving you full control over the final design.
Understanding basic crochet stitches is essential when learning How to crochet a cute Small Bag – Free Pattern. Techniques like chain stitch, single crochet, double crochet, and slip stitch form the foundation of this project. These simple stitches can be combined creatively to create textures and patterns that enhance the bag’s aesthetic.
The magic ring is a popular starting technique for many crochet bags, as it allows you to begin projects from the center with minimal gaps. This technique is especially useful for creating circular bases for your small bag, providing a neat and professional look.
Increasing and decreasing stitches shape the bag and help achieve desired dimensions. Proper counting and consistency are key; mistakes in stitch counts can affect the symmetry and size of the finished bag. Practice swatches can help you gain confidence before starting the main project.
Color changes can be added mid-pattern to create stripes or decorative sections. This technique adds a playful or elegant touch depending on the color palette. For beginners, it’s helpful to plan color changes before starting to avoid complications later.
Adding texture through stitches like popcorn, puff, or shell stitches can make your small bag stand out. These stitches create raised patterns and intricate designs that add a unique flair, making the bag a conversation piece.
Finally, finishing techniques such as weaving in ends, blocking, and edge trimming ensure a polished appearance. Attention to detail in these finishing touches makes a handmade bag look professionally crafted and durable for everyday use.
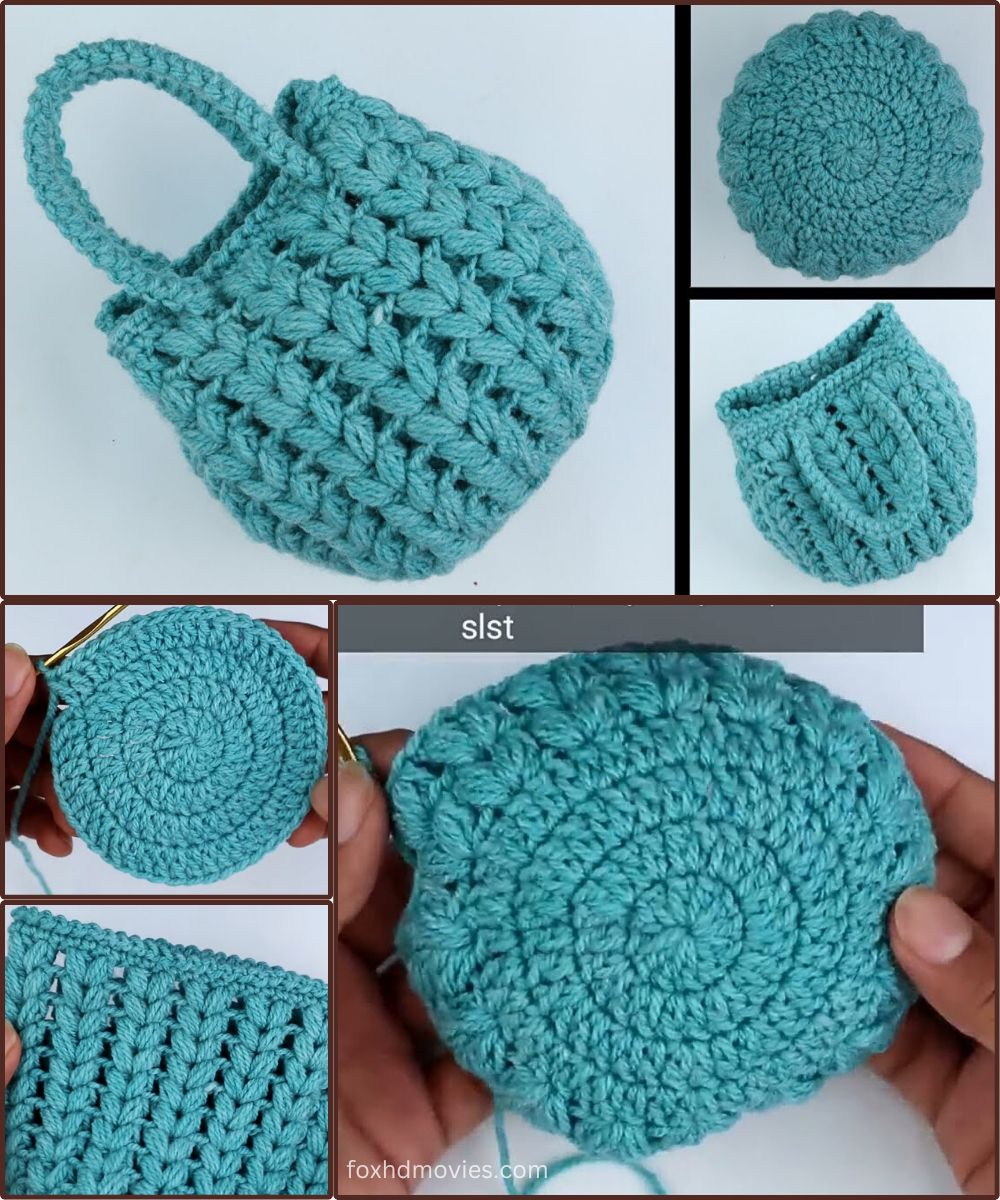
The construction of a How to crochet a cute Small Bag – Free Pattern starts with the base. Many patterns suggest a round or rectangular base using simple stitches to form a sturdy foundation. This base determines the bag’s overall shape and size, so precise counting and consistent tension are essential.
After completing the base, the sides are built by working in rounds or rows. This step requires patience, especially for beginners, but following the instructions carefully ensures uniformity. Stitch markers can help keep track of rounds and prevent accidental increases or decreases.
Handles or straps are then added according to the chosen design. They can be integrated into the bag’s structure or sewn on separately. Adjustable straps or braided handles offer versatility and added style.
Embellishments are the final creative step. Buttons, tassels, appliqués, or beads can be attached to enhance the bag’s charm. These small decorative elements elevate a simple crochet bag into a unique and eye-catching accessory.
For added functionality, lining the bag provides structure and protects the stitches. Lining can be sewn with a simple fabric that complements the yarn, giving the bag durability and a professional finish.
Double-checking the bag for consistency in stitch patterns, tension, and overall shape ensures that your How to crochet a cute Small Bag – Free Pattern is not only beautiful but also practical and long-lasting.
One of the best aspects of a How to crochet a cute Small Bag – Free Pattern is the ability to personalize it. You can experiment with yarn colors, textures, and stitch patterns to match your style. Creative freedom is what makes crochet projects so rewarding.
Consistency in stitch tension is crucial to maintain the shape of the bag. Uneven tension can cause warping, uneven edges, or a misshapen final product. Practicing consistent stitching throughout ensures a polished result.
Blocking the finished bag helps smooth out stitches and enhance the shape. Although not all bags require blocking, it’s particularly helpful for small bags with intricate patterns.
Embellishments and accents can add personality to your bag. Try adding buttons, crocheted flowers, or tassels for a playful touch, or use minimalist designs for a classic look. These additions make the bag uniquely yours.
Experiment with strap lengths and attachment methods. Short handles make the bag suitable for hand-carry, while long straps allow it to be worn as a crossbody. This flexibility increases the bag’s usability for different occasions.
Finally, enjoy the process. Crocheting a small bag is not just about the end product—it’s about creativity, learning, and crafting something with your own hands. Every stitch you make adds value and charm to your handmade bag.
1. Can beginners make this small bag?
Yes! While it requires patience and attention to detail, the pattern is beginner-friendly with simple stitches and clear instructions.
2. How much yarn is needed for the small bag?
Depending on size and stitch choice, 150–250 yards of medium-weight yarn is usually sufficient.
3. Can I customize the size of the bag?
Absolutely! Adjust the number of stitches and rows to create a bag that fits your needs.
4. Should I add a lining?
Adding a lining is optional but recommended for durability and to protect the crochet stitches.
5. How do I maintain the bag?
Hand washing in cold water and laying flat to dry preserves the bag’s shape and extends its lifespan.
6. Can I change the color mid-pattern?
Yes, color changes can create stripes, patterns, or decorative sections for a unique look.
Creating a How to crochet a cute Small Bag – Free Pattern is a fun, rewarding project that combines practicality with creativity. From selecting yarn and tools to learning stitches, shaping the bag, and adding embellishments, every step offers opportunities to develop skills and express personal style. With patience and attention to detail, you can craft a beautiful handmade bag that is both functional and charming.
Now that you’ve explored the full process, it’s your turn! Try making your small bag, experiment with colors and textures, and share your honest thoughts or suggestions. Your feedback and creativity will inspire even more wonderful crochet projects.


