
Macrame Heart Bracelet - Free Tutorial

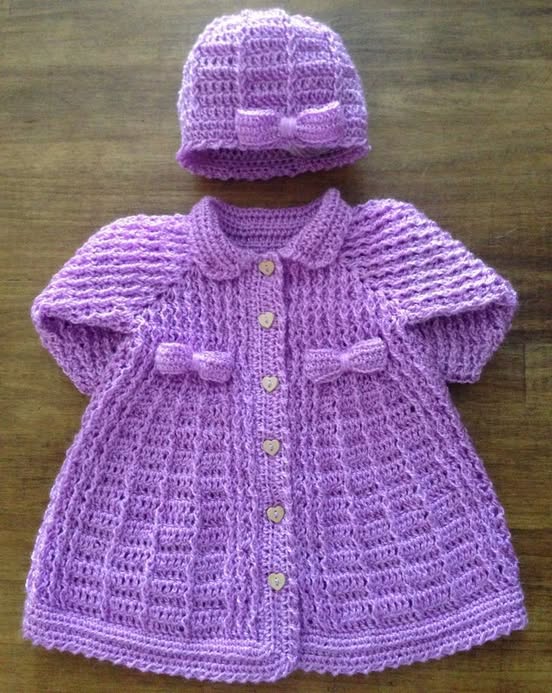
If you’ve ever wondered how to crochet a hooded coat for a baby, you’ve come to the right place. Creating handmade garments for little ones is a joyful and rewarding experience.
A hooded coat is not only adorable but also functional, providing warmth and comfort for babies during cooler seasons.
Learning how to crochet a hooded coat for a baby allows you to create a special gift that’s filled with love and care.
Whether you are making it for your own child, a family member, or a friend’s baby, this project is meaningful and cherished. Plus, you get the chance to personalize it with colors, textures, and patterns.
This tutorial will guide you step-by-step through the process of making a cozy and stylish crochet hooded coat. From selecting the right yarn and tools to understanding the stitches and assembling the pieces, everything you need to know about how to crochet a hooded coat for a baby will be covered here.
The first step in learning how to crochet a hooded coat for a baby is choosing the appropriate materials. Picking the right yarn, hook size, and accessories is essential for the comfort and safety of the baby.
Opt for soft, hypoallergenic yarn that is gentle against a baby’s sensitive skin. Look for yarns labeled as baby-friendly, typically made from cotton, bamboo, or acrylic blends. These materials are soft, lightweight, and machine washable.
The yarn weight should be suitable for the climate. For colder weather, choose worsted weight or chunky yarn. For a lighter coat, sport weight or DK yarn works beautifully while keeping the baby comfortable.
Select a crochet hook size that complements your yarn. Most baby coat patterns recommend a hook between 4.0mm (G) and 5.5mm (I), but always check the yarn label for guidance.
You’ll also need basic crochet tools like scissors, a yarn needle for weaving in ends, stitch markers, and buttons if you plan to add closures to the hooded coat.
Safety is a priority. If you use buttons or decorative elements, make sure they are securely sewn and large enough not to pose a choking hazard.
Before starting, wash and block your yarn if necessary. This ensures any chemicals from production are removed and the yarn is pre-shrunk, especially if made from natural fibers.
To truly master how to crochet a hooded coat for a baby, it’s helpful to understand the basic structure of the garment. This allows you to visualize the process and follow the steps with confidence.
Most crochet hooded coats are made from several basic pieces: the back panel, two front panels, sleeves, and the hood. These pieces are crocheted separately and then assembled.
Begin with the back panel, which is typically a simple rectangle or slightly shaped to fit the baby’s body. This forms the foundation of the coat.
The front panels are mirror images of each other. They are narrower than the back panel and may include shaping for the neckline where the hood will be attached.
Sleeves are usually made as tapered tubes or rectangles. Some patterns work the sleeves directly into the armholes, while others crochet them separately and sew them on later.
The hood is often constructed by crocheting a large rectangle, folding it in half, and seaming the back to form the head shape. It’s then attached around the neckline.
Once all pieces are completed, they are stitched together using a yarn needle and the same yarn, ensuring seamless joins. Borders, button bands, and decorative edges are added last.
Understanding crochet techniques is crucial when learning how to crochet a hooded coat for a baby. While the project sounds big, it uses beginner-friendly stitches that are easy to master.
The most common stitches include single crochet (sc), half double crochet (hdc), and double crochet (dc). These basic stitches create a warm, flexible fabric that’s perfect for baby garments.
Ribbing for cuffs, hems, and borders is typically done using front post and back post double crochet stitches. This gives the coat a stretchy and snug fit in key areas.
Increasing and decreasing stitches are essential to shape the sleeves, armholes, and hood. For increases, you often crochet two stitches into one. For decreases, crochet two stitches together.
Seaming the pieces together is usually done with a whip stitch or mattress stitch, both of which provide a sturdy and nearly invisible seam.
Adding a border or edging helps give the coat a polished look. Common edging techniques include single crochet around the edges or shell stitches for a more decorative finish.
Buttonholes are created by chaining a few stitches and skipping the same number of stitches in the row below. Reinforce them by edging around the buttonhole to prevent stretching.
Once you’ve crocheted all the parts, it’s time to assemble the pieces and add those beautiful finishing touches that make the coat special. This is the most rewarding part of how to crochet a hooded coat for a baby.
Lay out the back panel and attach the front panels at the shoulders using a whip stitch or slip stitch join. Make sure the seams are secure but not too tight.
Attach the sleeves by matching the center of the sleeve to the shoulder seam. Pin the sleeve in place and sew from the center outwards along both sides of the armhole.
Sew the side seams of the coat, starting from the sleeve cuff down to the bottom of the body. This step really brings the coat to life as it starts to take its final shape.
Add the hood by lining up the bottom edge of the hood with the neckline. Use stitch markers to keep it evenly aligned. Seam the hood onto the neckline carefully, ensuring it lays flat.
Finish with borders along the front panels and bottom hem. This not only adds structure but also makes space for buttonholes or other closures. Crochet the button band along one side, spacing buttonholes evenly.
Sew on buttons, pom-poms, or cute appliqués if desired. Always ensure embellishments are baby-safe and securely attached. Weave in all yarn ends neatly for a professional and safe finish.
1. Is crocheting a baby hooded coat suitable for beginners?
Yes, learning how to crochet a hooded coat for a baby is very beginner-friendly, especially if you’re comfortable with basic stitches like single crochet and double crochet.
2. What type of yarn is best for a baby hooded coat?
Soft, hypoallergenic yarn is best. Cotton blends, bamboo, or baby acrylic yarns are ideal because they are gentle, lightweight, and machine washable.
3. How long does it take to crochet a hooded baby coat?
Depending on your skill level and the coat size, it typically takes 6 to 12 hours spread over a few days to complete the project.
4. Can I adjust the pattern for different baby sizes?
Absolutely. Most patterns include instructions for multiple sizes, and you can easily adjust stitch counts or row numbers to fit newborns up to toddlers.
5. Are there safer alternatives to buttons?
Yes. You can use toggles, snaps, or crochet ties instead of buttons. Just ensure whatever you use is securely attached and safe for a baby.
6. Can I machine wash the crochet baby coat?
Yes, if you use machine-washable yarn like acrylic or cotton blends. Always follow the care instructions on the yarn label for best results.
Throughout this guide on how to crochet a hooded coat for a baby, we’ve explored everything from choosing materials, understanding the garment structure, mastering the stitches, and assembling the final coat. This beautiful project is both practical and meaningful, making it a wonderful handmade gift.
If you’ve enjoyed this tutorial, I’d love to hear your thoughts. Please leave your honest opinion in the comments below and share your suggestions or ideas for future crochet projects. Your feedback helps us grow and continue creating valuable content for all crochet enthusiasts!


