
Crocheting is a timeless craft that allows for endless creativity, and learning how to crochet a spiral granny square is a fantastic way to expand your skills.
This unique variation of the traditional granny square creates a mesmerizing spiral pattern that adds texture and depth to any project.
Whether you’re a beginner or an experienced crocheter, this step-by-step guide will help you master this technique effortlessly.
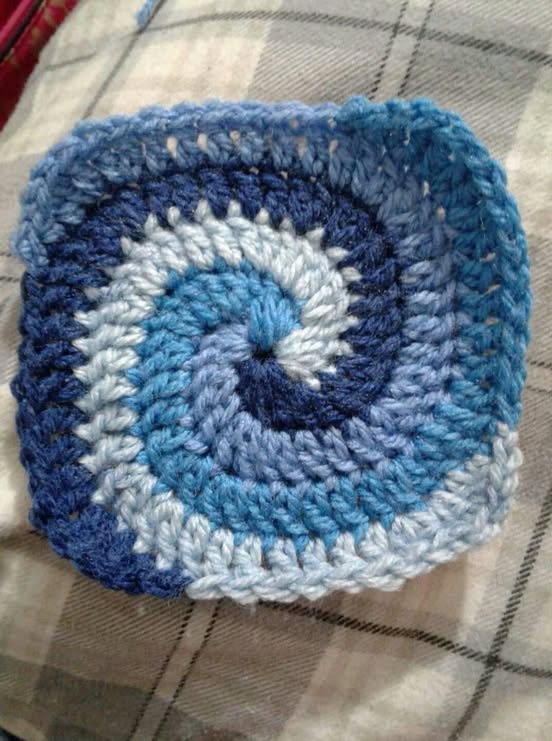
The spiral granny square is perfect for making blankets, pillows, coasters, and even decorative wall hangings. Unlike traditional granny squares, the spiral version does not have visible joins, creating a seamless and modern look.
With just a few simple stitches and some patience, you’ll be able to create a stunning spiral granny square in no time.
Before diving into the steps, let’s go over the materials and basic stitches required. You will need yarn in different colors to achieve the spiral effect, a crochet hook suitable for your chosen yarn weight, scissors, and a yarn needle. Now, let’s begin learning how to crochet a spiral granny square step by step.
1. Materials and Basic Stitches
To successfully crochet a spiral granny square, you’ll need the following materials and skills:
- Choose at least two contrasting yarn colors to make the spiral pattern stand out. Using three or four colors can create an even more vibrant effect.
- Select a crochet hook that complements your yarn weight. A medium-weight yarn usually works well with a 4mm or 5mm hook.
- You’ll need basic crochet stitches such as the chain stitch (ch), slip stitch (sl st), single crochet (sc), and double crochet (dc).
- A pair of sharp scissors for trimming excess yarn and a yarn needle for weaving in ends.
- Optional stitch markers to help keep track of the rounds as you work.
Understanding these basics will make it much easier to follow the upcoming steps in creating a spiral granny square.
2. Starting the Spiral Granny Square
The foundation of a spiral granny square begins with a magic ring. This technique helps create a tight and neat center, making the spiral more visually appealing.
- Begin by making a magic ring and securing it with a chain stitch.
- Insert your hook into the ring and work eight double crochet stitches using your first yarn color.
- Instead of joining the round with a slip stitch, you will continue crocheting into the next stitch using your second yarn color.
- Make another set of eight double crochet stitches with the second color, following the same pattern.
- If using three or four colors, repeat the process by adding the additional yarns, always working in a continuous spiral motion.
- Pull the magic ring tightly to close the center, ensuring a neat finish.
This technique sets up the foundation for a seamless and smooth spiral effect without visible joins.
3. Expanding the Spiral Pattern
As you continue working, the spiral pattern will start taking shape. Increasing stitches evenly ensures that the square remains flat and well-structured.
- Work two double crochet stitches into each previous stitch to increase the size of the spiral.
- Rotate between colors as you move forward, maintaining a consistent pattern to keep the spiral effect uniform.
- Keep an eye on the stitch count to prevent the square from becoming uneven or misshapen.
- Use stitch markers if necessary to track your increases and color transitions.
- Ensure that your tension remains consistent; avoid pulling the stitches too tight or leaving them too loose.
- Continue expanding the spiral by increasing stitches until the square reaches your desired size.
This method allows for customization, making it easy to adjust the square’s size according to your project needs.
4. Finishing Touches and Blocking
Once your spiral granny square reaches the preferred size, it’s time to add the finishing touches.
- Complete the last round by working single crochet stitches around the entire square to give it a clean edge.
- Fasten off the yarn securely and weave in all loose ends using a yarn needle.
- If the edges appear slightly uneven, gently block the square by pinning it onto a flat surface and lightly misting it with water.
- Allow the square to dry completely to set its shape and enhance the stitch definition.
- If making multiple squares for a larger project, ensure they are all blocked to the same size before joining them together.
- Experiment with different color combinations to create unique and eye-catching spiral granny squares.
This final step ensures a polished look, making your project look professional and well-crafted.
FAQ
Q: What type of yarn works best for a spiral granny square?
A: A medium-weight cotton or acrylic yarn is ideal as it provides structure while maintaining softness.
Q: Can I use more than two colors for the spiral effect?
A: Yes! Using three or four colors enhances the spiral effect, adding depth and vibrancy to your project.
Q: How do I ensure my spiral granny square stays flat?
A: Make sure to increase stitches evenly throughout each round and keep consistent tension.
Q: What can I make with spiral granny squares?
A: These squares can be used for blankets, coasters, pillows, and even decorative wall hangings.
Q: Do I need to block my finished square?
A: Blocking is recommended, especially if your square appears uneven or slightly curled at the edges.
Q: Is this pattern suitable for beginners?
A: Yes! With patience and practice, even beginners can master this technique.
Join our VIP broadcast list and gain access to exclusive patterns, all for free. As a VIP member, you’ll receive the best patterns daily, delivered directly to your device. ✨📱 It’s a unique opportunity to stay up-to-date with the latest trends and designs, curated just for you. Don’t miss out on enhancing your projects and discovering new inspirations with the best patterns every day! 🎨🔝
Conclusion
Learning how to crochet a spiral granny square opens the door to endless creative possibilities. This step-by-step guide provides a solid foundation for creating beautiful and seamless squares that can be used in various projects.
By mastering this technique, you can experiment with different color combinations and sizes to bring your crochet projects to life.
Now it’s your turn! Have you tried crocheting a spiral granny square before? Share your experience in the comments below and let us know any tips or variations you’ve discovered!


