
If you’ve been searching for a stylish yet beginner-friendly hat project, then you’re going to love learning How to CROCHET an easy Puff Stitch Hat. This beautiful and cozy hat combines texture, warmth, and charm — all while being surprisingly simple to make.
The puff stitch is a favorite among crocheters for its fluffy, raised texture. It creates a lovely fabric that’s both eye-catching and soft, perfect for winter wear.
And when used in a hat pattern, the puff stitch not only adds beauty but also makes your hat warmer and more luxurious.
In this tutorial, we’ll guide you through everything you need to know to crochet your own puff stitch hat — from materials and sizing to step-by-step instructions and customization tips. Whether you’re making one for yourself, a loved one, or for your small crochet business, this pattern is a must-have in your collection.
Let’s dive into the cozy world of puff stitches and learn how to crochet an easy puff stitch hat together!
1. Why Choose a Puff Stitch for Hats?
The puff stitch isn’t just pretty — it’s practical too. Here’s why it’s perfect for hats:
Warm and cozy
Puff stitches are thick and puffy, creating a denser fabric that traps heat, making your hat extra warm for cold weather.
Full of texture
If you love patterns that look impressive but are easy to do, puff stitches deliver visual appeal with minimal complexity.
Stretch and structure
The stitch naturally adds elasticity and body to your project, so the hat holds its shape well and fits comfortably.
Perfect for gifting or selling
A puff stitch hat has a handmade charm that makes it ideal for thoughtful gifts or as a standout item in your crochet shop.
Versatile style
Change the yarn color or brim style and this hat can go from modern and trendy to soft and feminine — or even bold and funky.
Best of all, the puff stitch hat pattern is easy enough for beginners, especially if you’ve mastered basic stitches like chain (ch), single crochet (sc), and double crochet (dc).
2. Materials You’ll Need for Your Puff Stitch Hat
Before we get started with the tutorial, here’s a list of materials you’ll want to gather:
- Worsted weight yarn (medium #4) – acrylic or wool blend for warmth and comfort
- Crochet hook – Size H/8 (5.0 mm) or size needed to match gauge
- Scissors
- Tapestry needle – for weaving in ends
- Stitch marker (optional, helpful for beginners)
- Pom-pom (optional) – for that finishing flair
Yarn suggestions: Red Heart Soft, Caron Simply Soft, or Lion Brand Wool-Ease are great options. Choose solid colors to highlight the texture, or try ombré yarn for a beautiful gradient effect.
For this easy puff stitch hat, you’ll work in the round from the top down, making it simple to adjust the size as you go.
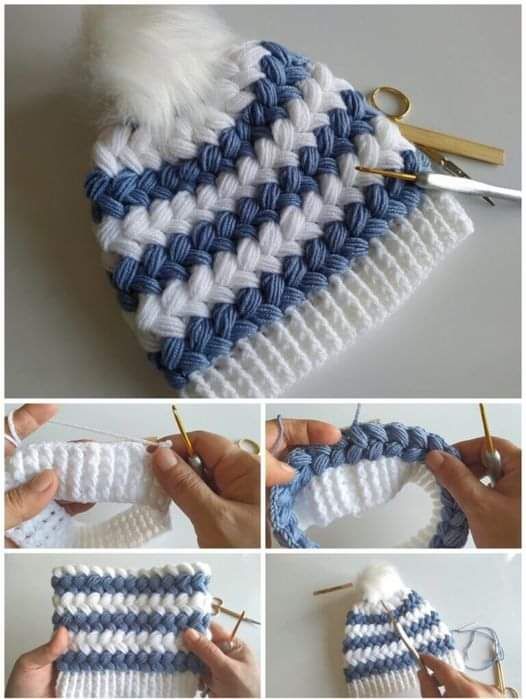
3. How to CROCHET an Easy Puff Stitch Hat – Step-by-Step
Let’s go through the instructions for a basic adult-size puff stitch hat.
Abbreviations:
- ch – chain
- sl st – slip stitch
- sc – single crochet
- dc – double crochet
- puff – puff stitch (explained below)
- st(s) – stitch(es)
Puff Stitch (5 yarn overs):
- Yarn over, insert hook into stitch, yarn over and pull up a loop (3 loops on hook).
- Repeat the above step 4 more times (you’ll have 11 loops on your hook).
- Yarn over and pull through all 11 loops.
- Chain 1 to close the puff (this counts as the top of the puff stitch).
Hat Pattern:
Round 1:
Make a magic ring, ch 1, work 6 sc into the ring. Pull tight. Sl st to first sc. (6 sts)
Round 2:
Ch 1, 2 sc in each st around. Sl st to join. (12 sts)
Round 3:
1 sc in next st, 2 sc in next – repeat around. Sl st. (18 sts)
Round 4:
1 sc in next 2 sts, 2 sc in next – repeat around. Sl st. (24 sts)
Round 5:
Switch to puff stitch. Puff in next st, ch 1, skip 1 st – repeat around. Sl st to top of first puff. (12 puffs)
Round 6–14 (or until desired length):
Work puff in each ch-1 space from previous round. Sl st to join.
Optional Brim:
Switch to sc or dc for 3–5 rounds to create a tighter brim. Use a smaller hook if desired for snug fit.
Finishing:
Fasten off and weave in ends. Attach a pom-pom to the top if you like!
And that’s it! You’ve just learned how to crochet an easy puff stitch hat.
4. Customization Tips for Your Puff Stitch Hat
Once you’ve got the basics down, there are endless ways to customize your puff stitch hat and make it your own.
Add stripes: Use a contrasting color every 2 rounds for a fun striped effect.
Change the brim: Instead of a simple brim, try a ribbed brim using front post/back post double crochet (FPdc/BPdc) for a stretchy, professional look.
Try a slouchy style: Add 2–3 more puff stitch rounds before decreasing or finishing to make a trendy slouch hat.
Go oversized: Use bulky yarn and a larger hook to make a dramatic, chunky version.
Make a matching set: Create a puff stitch cowl, mittens, or headband using the same yarn and stitch for a cohesive winter set.
Add embellishments: Sew on a leather tag, wooden button, or crochet flower to personalize it even more.
No matter how you tweak it, your hat will look amazing thanks to the standout puff stitch texture.
FAQ – How to CROCHET easy Puff Stitch Hat
Is the puff stitch hard to learn?
Not at all! It may seem tricky at first, but with a few practice stitches, you’ll get the rhythm. It’s just repeated yarn overs and pulling through loops.
How many yarn overs are in a puff stitch?
Most puff stitches use 5 yarn overs, but you can adjust the number for a smaller or fuller puff.
Can I make this hat for children or babies?
Yes! Just adjust the initial rounds to a smaller crown, or stop increasing earlier, and work fewer puff rounds for smaller heads.
What yarn works best?
Soft worsted-weight yarn gives a nice puff definition and warmth. Avoid stiff or rough yarns, which can make the hat uncomfortable.
How long does it take to crochet a puff stitch hat?
Depending on your speed, most hats can be finished in 2–4 hours.
Can I sell hats made from this pattern?
Absolutely! Just make sure to write your own product description if selling online, and mention that it’s handmade.
Conclusion
Now that you’ve learned How to CROCHET an easy Puff Stitch Hat, it’s time to grab your yarn and hook and start creating! This project is not only satisfying and fun, but it also makes a beautiful and useful accessory for any wardrobe. Whether you’re making hats for family, friends, or customers, the puff stitch will always add a special touch.
VIDEO TUTORIAL
We’d love to see what you make! Share your creations in the comments below or tag us on social media. And if you have questions or suggestions, feel free to leave them too. Let’s keep inspiring each other—one puff at a time. 🧶💕


