
Creating a beautiful crochet angel can be a rewarding and simple project for all skill levels. Whether you’re a beginner looking for a quick project or an experienced crocheter seeking a heartfelt gift idea, this super easy crochet angel tutorial is perfect for you.
Crochet angels are ideal for holiday decorations, thoughtful gifts, or even keepsakes to treasure year-round. In this article, you’ll learn everything you need to know to craft your very own angel, with step-by-step guidance and tips to ensure success.
This free tutorial is designed with simplicity in mind, making it accessible even if you’re new to crochet. Using basic stitches and a clear pattern, you’ll create a stunning piece that looks far more intricate than it is.
Let’s dive into the materials, techniques, and steps needed to bring this delightful project to life.
By the end of this guide, you’ll have not only mastered the art of crocheting a charming angel but also gained skills that can be applied to other crochet projects. Let’s get started!
1. Gathering Materials for Your Crochet Angel
Before you begin, it’s essential to gather all the necessary supplies. Having everything on hand will make the process smoother and more enjoyable.
- Yarn Selection: Choose a lightweight or medium-weight yarn in white, cream, or any color of your choice. Cotton yarn is a popular option for crochet angels due to its crisp texture and durability.
- Crochet Hook: Use the hook size recommended for your chosen yarn. Typically, a 3.5mm to 4.5mm hook works well for this project.
- Accessories: Consider adding embellishments such as beads, ribbons, or tiny bells to personalize your angel.
- Stitch Markers: These are helpful for keeping track of rounds and ensuring accuracy in your work.
- Scissors: A sharp pair of scissors is essential for cutting yarn cleanly.
- Tapestry Needle: Use this to weave in ends and attach any embellishments.
With your materials ready, you’re all set to begin crocheting your angel. Having high-quality supplies ensures your finished project will be beautiful and durable.
2. Mastering the Basic Stitches
Understanding the basic crochet stitches is key to successfully completing this project. If you’re already familiar with these, consider this a quick refresher.
- Chain (ch): This foundational stitch creates the base for your project.
- Single Crochet (sc): A versatile stitch that’s easy to learn and commonly used.
- Double Crochet (dc): A taller stitch that adds texture and dimension to your work.
- Slip Stitch (sl st): Used to join rounds or move across stitches seamlessly.
- Magic Circle: This technique creates a tight, adjustable loop, perfect for starting circular projects like the angel’s head.
For beginners, practicing these stitches beforehand can build confidence. You’ll find that the combination of these basic stitches creates a stunning angel design without requiring complex techniques.
3. Step-by-Step Instructions for the Crochet Angel
Follow these easy steps to bring your crochet angel to life:
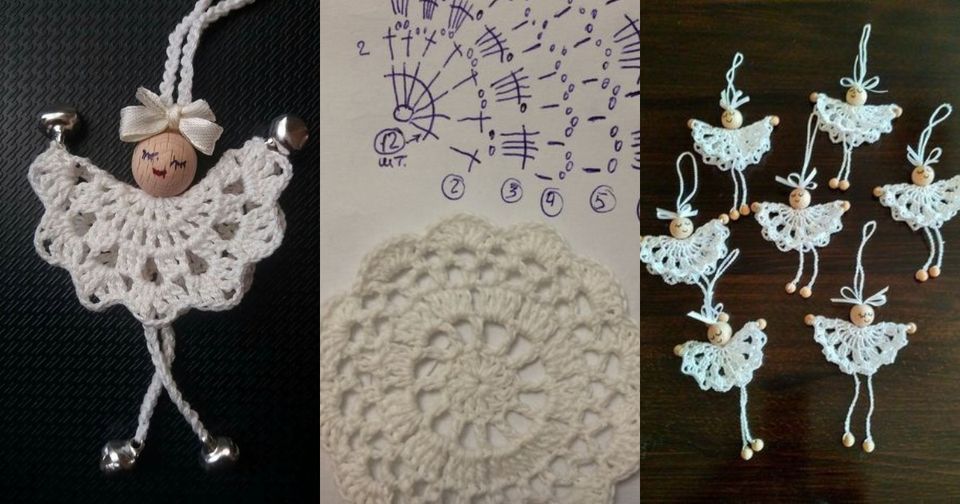
- Start with the Head: Use the magic circle technique to form the angel’s head. Work in rounds, increasing gradually to achieve a spherical shape. Use single crochet stitches to maintain a neat and compact look.
- Create the Body: Transition from the head to the body by increasing the diameter of your rounds. The body will take on a conical shape, representing the angel’s flowing gown.
- Add the Wings: Crochet two separate wing pieces using double crochet stitches for a delicate, airy appearance. Attach the wings symmetrically to the back of the body.
- Form the Halo: Use a small chain loop to create a simple halo. Attach it securely to the top of the angel’s head.
- Add Embellishments: Sew on beads, ribbons, or tiny bells to enhance the angel’s appearance. Personal touches make your project unique.
- Finish with Details: Weave in all loose ends and ensure all parts are securely attached. Lightly block the angel if necessary to shape it perfectly.
Each step is designed to be straightforward, making this a relaxing and enjoyable project for crafters of all levels.
4. Tips for Personalizing Your Crochet Angel
One of the joys of crochet is the ability to customize your creations. Here are some ideas to make your angel uniquely yours:
- Experiment with Colors: While white and cream are traditional, consider pastel shades or even metallic yarn for a modern twist.
- Incorporate Textures: Use yarns with glitter or subtle patterns to add depth and sparkle.
- Adjust Sizes: Vary the hook size and yarn weight to create angels in different sizes. Smaller angels make charming ornaments, while larger ones can serve as statement decor.
- Add Embroidery: Use a fine needle to embroider tiny details, such as stars or flowers, onto the angel’s gown.
- Create Sets: Make multiple angels in complementary colors to form a cohesive collection.
- Include a Hanging Loop: Add a simple chain loop to the top of the angel’s head, making it easy to hang as a decoration.
With these tips, your crochet angel will reflect your creativity and personal style.
FAQ: Common Questions About Crochet Angels
- Can beginners make this crochet angel? Absolutely! This tutorial is designed to be beginner-friendly, using basic stitches and clear instructions.
- How long does it take to complete a crochet angel? Depending on your skill level, it typically takes 2-4 hours to complete one angel.
- What yarn is best for crochet angels? Lightweight or medium-weight cotton yarn works best for a crisp and clean finish.
- Can I wash my crochet angel? Yes, but handwashing is recommended to preserve the shape and details of your work.
- Where can I use crochet angels? They make lovely holiday ornaments, gifts, or decor for special occasions.
- Can I sell the crochet angels I make? Yes, as long as the pattern permits commercial use, you can sell your finished creations.
Join our VIP broadcast list and gain access to exclusive patterns, all for free. As a VIP member, you’ll receive the best patterns daily, delivered directly to your device. ✨📱 It’s a unique opportunity to stay up-to-date with the latest trends and designs, curated just for you. Don’t miss out on enhancing your projects and discovering new inspirations with the best patterns every day! 🎨🔝
Conclusion
Congratulations on completing your super easy crochet angel! This project is a wonderful way to combine creativity with practicality, resulting in a beautiful and meaningful item. Whether you make one angel or a dozen, each piece reflects your time and effort, making it truly special.
We’d love to hear your thoughts! Share your experience with this tutorial and let us know if you have suggestions or ideas for future projects. Happy crocheting!


