
Macrame Heart Bracelet - Free Tutorial

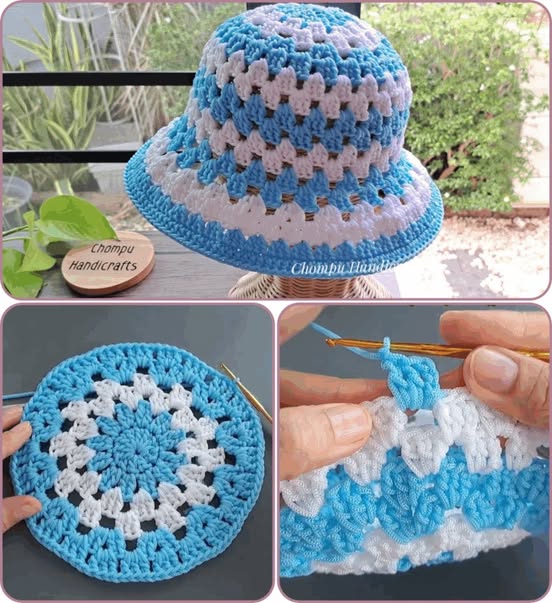
How to make Crochet Sun Hat Tutorial is the perfect guide for anyone looking to craft their own stylish and functional accessory for sunny days.
Whether you’re new to crochet or simply looking for your next handmade project, creating a sun hat by hand offers both fun and practicality.
A crochet sun hat not only protects you from the sun but also adds a charming touch to your summer wardrobe.
In this comprehensive article, we’ll explore every step involved in making your own sun hat from start to finish. From choosing the right yarn and hook size to shaping the crown and adding brims, you’ll discover how satisfying it is to make something wearable with just yarn and your hands. Plus, this project is great for practicing stitches and improving your crochet technique.
The beauty of learning How to make Crochet Sun Hat Tutorial is that it opens the door to endless possibilities. You can customize the color, style, and size to suit your personality or gift it to someone special. Let’s dive in and see how you can crochet a sun hat that’s both fashionable and functional.
Before you start your How to make Crochet Sun Hat Tutorial, gather all the essential tools and materials. Having everything ready will make your crochet experience smoother and more enjoyable.
You’ll need a lightweight, breathable yarn. Cotton yarn is highly recommended because it holds its shape well and is ideal for warm weather. Choose a color that complements your summer wardrobe or go bold with bright, fun shades.
Next, select a crochet hook that matches your yarn’s thickness. The yarn label usually recommends a hook size, but you can adjust depending on how tightly or loosely you crochet.
Other helpful tools include a stitch marker to keep track of your rounds, scissors for trimming yarn, and a yarn needle for weaving in ends. These little accessories will help you maintain neatness and organization.
Read through the full pattern if you’re following one, or create a basic structure by planning your rounds. Understanding the structure will make it easier to visualize how your hat will come together.
Lastly, find a comfortable and well-lit space to work in. Crochet is meant to be relaxing, so setting the mood will enhance the experience and help you enjoy the full How to make Crochet Sun Hat Tutorial.
The crown is the top part of the hat and where most sun hat patterns begin. It sets the foundation for the rest of the shape and needs to be smooth and rounded.
Start with a magic ring or a chain loop to begin crocheting in the round. This method allows for a seamless and adjustable beginning, essential for a well-shaped crown.
Use basic stitches like single crochet or double crochet depending on the texture and look you want. Work in increasing rounds to build the crown outward in a flat circle.
Mark the first stitch of each round to keep your count accurate. As you increase each round, follow a pattern such as “2 stitches in one, followed by 1 stitch” to maintain a circular shape.
Check the crown’s diameter after a few rounds. It should fit comfortably on the top of your head. If it starts to curve too early, you might be increasing too little; if it’s ruffling, you may be adding too many increases.
Continue crocheting until the crown reaches the width that sits nicely on the top of your head. This is the core base of your How to make Crochet Sun Hat Tutorial, so take your time to get it right.
Once the crown is done, it’s time to shape the sides that fall down around the head. This section transitions from a flat circle to a gentle curve, which gives the hat its wearable form.
Begin by working rounds without increasing. This causes the sides to naturally curve downward. You can use the same stitch throughout or alternate for a decorative pattern.
Try on your hat as you go to check the fit. You may want to adjust stitch tightness or add rows to make the hat deeper, depending on how much coverage you want.
Once the sides are complete, you’ll move on to the brim. This is where your hat starts to really take on its sunny-day personality.
To make the brim, begin increasing again. You can do this gradually or all at once, depending on how wide and floppy you want the brim to be.
Make sure to keep your stitch count consistent around the brim to avoid rippling or uneven edges. A good brim will hold its shape and gently shade your face from the sun—an essential goal in any How to make Crochet Sun Hat Tutorial.
Now that the structure is complete, it’s time to focus on finishing your hat with style and functionality. These final steps make a big difference in the appearance and durability of your sun hat.
Start by gently steaming or blocking your hat. This helps it relax into its shape and ensures the brim lays flat instead of curling. Blocking is especially important if you used cotton yarn, which holds its shape better after a good steam.
Use your yarn needle to carefully weave in all loose ends. This not only makes your hat look cleaner but also prevents unraveling over time. Always secure your ends tightly.
Want to personalize your hat? Add a ribbon, buttons, or even a crochet flower to the side. Decorative elements add charm and give your project a truly unique touch.
For added structure, some crocheters sew a piece of thin wire into the brim’s edge. This helps keep the brim firm and shapely—especially helpful for large brims.
Consider making a matching set with other summer accessories, like a tote bag or beach cover-up, to go with your sun hat. Using the same yarn ensures color coordination and a cohesive look.
Take photos of your finished piece! Sharing your work not only feels rewarding but also inspires others who are learning How to make Crochet Sun Hat Tutorial just like you.
What is the best yarn for a crochet sun hat?
Cotton yarn is the best option for a crochet sun hat. It’s breathable, durable, and helps maintain the shape of the hat in warm weather.
Can I make a crochet sun hat if I’m a beginner?
Yes, absolutely! Many sun hat patterns use basic stitches and simple rounds, making them ideal for beginners who want to try a wearable project.
How do I make the brim stiff?
To stiffen the brim, you can crochet tightly, use thicker yarn, or insert thin wire or plastic cord around the edge. Some crafters also use fabric stiffener or starch.
How do I know the hat will fit me?
Try the hat on as you go, especially after completing the crown and during the side rounds. Adjust your stitch count and rows to achieve a comfortable fit.
Is it possible to make a sun hat for kids using the same tutorial?
Yes! Just reduce the number of rounds for the crown and sides to fit a child’s head. You can follow the same steps with adjusted measurements.
Can I machine wash my crochet sun hat?
It depends on the yarn used. Most cotton yarns are machine washable, but always check the label. Handwashing and laying flat to dry are safest for preserving the shape.
We hope this How to make Crochet Sun Hat Tutorial has guided and inspired you to try your hand at this enjoyable and practical crochet project. From choosing your materials to shaping the crown, adding the brim, and personalizing your final piece, every step brings joy and creativity into your hands.
Creating your own crochet sun hat is not only a rewarding craft but also a useful skill that can turn into gifts or wardrobe staples. With patience and practice, you’ll be surprised at how professional your handmade hat can look.
If you enjoyed this guide or have any questions about the process, please leave a sincere opinion or share your suggestions in the comments. We love hearing from you and learning how we can make our tutorials even better!


