
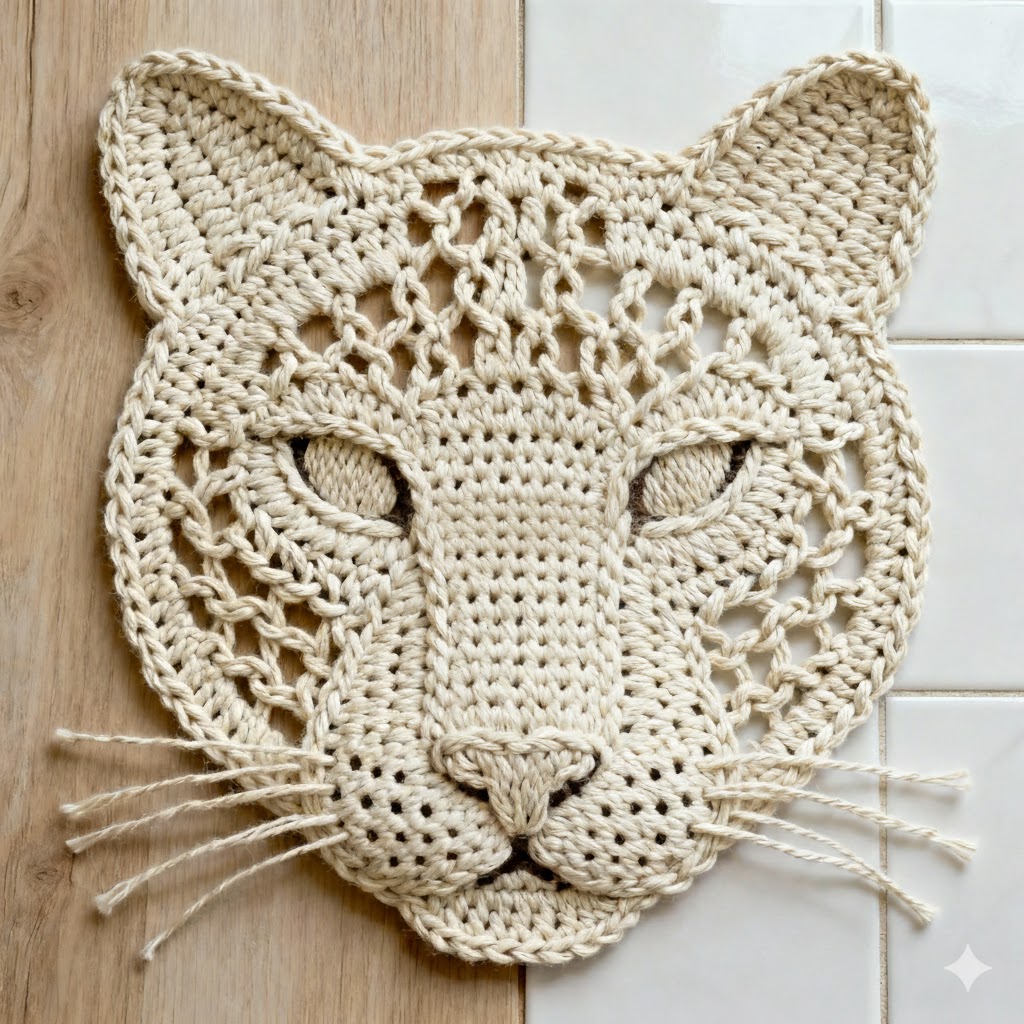
The Leopard Rug – Crochet Pattern is a striking and creative project that allows crocheters to bring the wild elegance of a leopard into their home decor. This pattern transforms yarn into a beautifully detailed rug, featuring the characteristic spots and contours of a leopard.
Whether you are a beginner looking for a challenging yet rewarding project, or an experienced crocheter seeking a decorative piece, the Leopard Rug – Crochet Pattern offers endless possibilities for customization and personal expression.
Creating a Leopard Rug may seem intricate at first glance, but the structured pattern breaks the project down into manageable steps. Using different colored yarns and a combination of crochet techniques, you can achieve the realistic look of a leopard’s fur.
Each part of the rug, from the head to the tail and paws, comes together seamlessly, producing a unique and eye-catching home accessory.
The versatility of the Leopard Rug – Crochet Pattern is one of its most appealing features. You can make the rug in various sizes, depending on your space and needs, and choose yarn types that suit your style—soft cotton for a luxurious feel or acrylic for durability and ease of care.
The end result is not just a rug, but a statement piece that adds personality and warmth to any room.
1. Materials and Preparation for the Leopard Rug
Before starting your Leopard Rug – Crochet Pattern, gathering the right materials is essential to ensure a smooth crafting process. Choose yarns in several shades—typically golden yellow, tan, dark brown, and black—to accurately mimic the leopard’s fur pattern. Consider using soft, plush yarn for comfort underfoot, or a sturdier yarn for a more durable rug.
A suitable crochet hook is important for maintaining even tension and clean stitches. Most crafters prefer a hook size between 5 mm and 6.5 mm for rugs, depending on the yarn weight. You will also need scissors, a yarn needle for sewing the pieces together, and stitch markers to help track complex sections. For extra detail, a bit of embroidery thread can be used to accentuate spots or edges.
Creating a workspace is also important. Lay out your yarn and tools within easy reach and ensure good lighting. Preparing a flat, comfortable surface for the rug as it grows helps maintain consistent tension and prevents mistakes. Following the Leopard Rug – Crochet Pattern step-by-step ensures that even the more challenging sections, like shaping the legs and head, are achievable.
Planning your color layout in advance is highly recommended. Crocheting a leopard rug involves multiple color changes, and having a visual guide can save time and reduce errors. Experiment with different shades to match your home décor or your vision for the project.
Additionally, read through the entire pattern before starting. Understanding the sequence of creating individual parts—head, body, legs, tail—makes the assembly process more straightforward. The Leopard Rug – Crochet Pattern can be a lengthy project, but preparation ensures a satisfying and enjoyable crafting experience.
Keeping your yarn organized is crucial. Using small bins or bags for each color prevents tangling and allows for smooth color transitions, which is especially important when forming the leopard’s characteristic spots and intricate patterns.
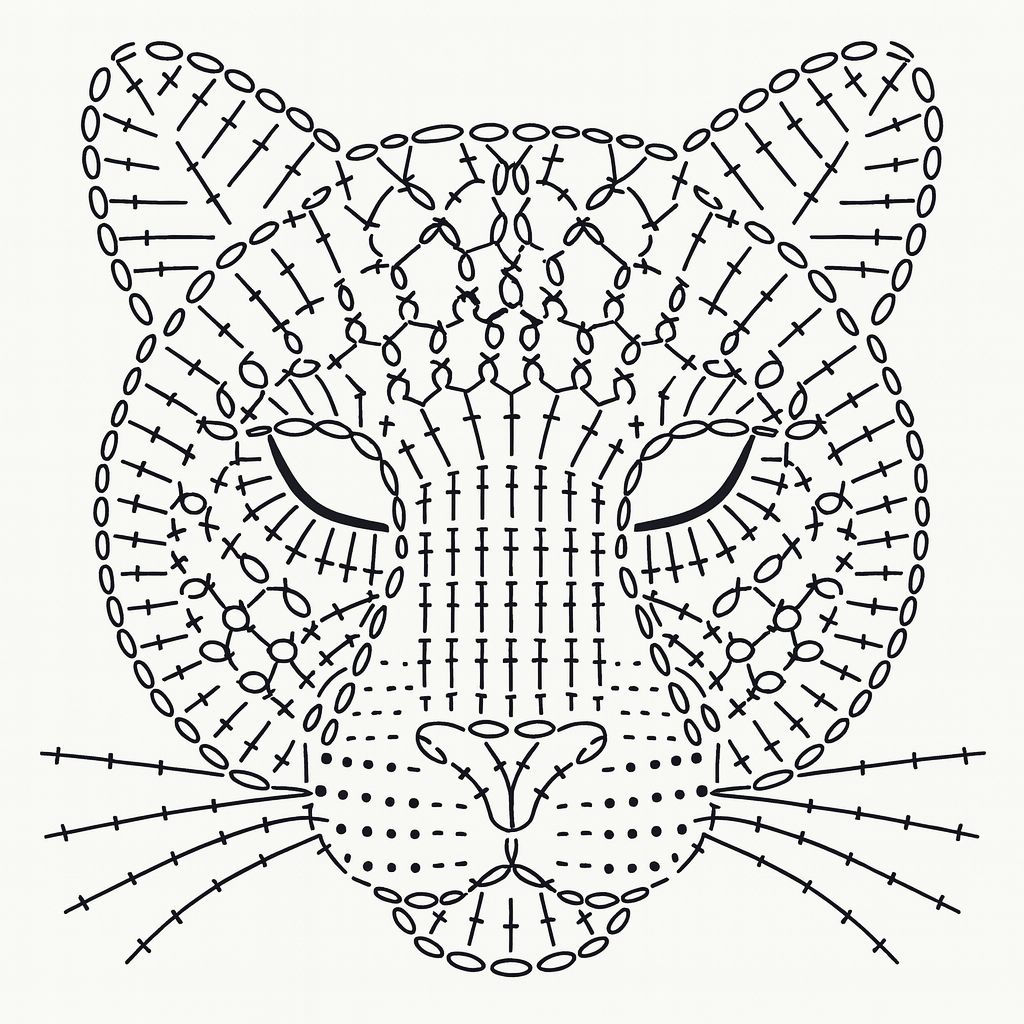
2. Step-by-Step Instructions for the Leopard Rug
The Leopard Rug – Crochet Pattern begins with creating the main body. Work in rounds, gradually increasing stitches to achieve the desired width and shape. The base should be wide enough to provide stability while maintaining the proportions of a leopard. Consistent tension is key to keeping the rug flat and even.
Next, focus on the head. Use the appropriate color yarn for the face, adding dark spots or features as you crochet. The eyes and nose can be embroidered or stitched with contrasting yarn for realism. A slightly raised stitch can give dimension to the facial features, making the leopard appear more lifelike.
The legs are created separately, often in cylindrical forms, then attached securely to the body. Careful attention to placement ensures the rug lies flat and resembles a resting leopard. The paws can be highlighted with a different yarn color for added detail and charm.
The tail is typically crocheted in a long, tapered shape, with dark stripes or spots along its length. Securely attach the tail to the back of the rug. This part of the Leopard Rug – Crochet Pattern brings balance to the overall shape and adds to the rug’s visual appeal.
Once all parts are complete, sew them together using invisible stitches. This ensures a polished and professional look. Adjust the body, head, and legs as needed to achieve a natural resting position. Filling small sections lightly with yarn can add dimension without making the rug too stiff.
Finally, create the leopard’s spots. Use short embroidery stitches or contrasting yarn pieces to form the characteristic rosettes. Varying the size and placement of spots adds realism. Your Leopard Rug – Crochet Pattern will now have the distinctive markings that make this rug a show-stopping piece.
3. Creative Ideas for Using the Leopard Rug
The Leopard Rug – Crochet Pattern is more than just a decorative item; it can enhance various spaces in your home. Place it in a child’s room for a playful and cozy addition. Its soft texture provides comfort for reading, playing, or lounging on the floor.
For living rooms, position your leopard rug in front of a sofa or armchair. Its unique design becomes a conversation starter, adding character and warmth to the space. Pair it with complementary throws or cushions to create a cohesive and inviting look.
In nurseries, the rug can serve both as a visual attraction and a soft play mat. The realistic yet whimsical design engages children’s imaginations, making the room feel adventurous and cozy. The Leopard Rug – Crochet Pattern is perfect for animal-themed décor.
If you are gifting this rug, consider matching the color scheme to the recipient’s home. Handmade gifts like this showcase craftsmanship and thoughtfulness, making them cherished keepsakes. Personalizing the size, colors, or spots enhances the uniqueness of each rug.
Another creative idea is to make a set of animal-themed rugs. Combine the leopard rug with other animal patterns, such as zebra or cheetah designs, for a bold and eclectic display. These can be arranged in playrooms, bedrooms, or even as decorative wall hangings.
Lastly, use the Leopard Rug – Crochet Pattern as a base for other crochet decorations. Adding small crochet flowers, leaves, or vines can transform the rug into a jungle-inspired centerpiece. It’s an opportunity to experiment with texture, color, and layering for a truly personalized creation.
4. Tips, Tricks, and Finishing Touches
Crocheting a Leopard Rug – Crochet Pattern requires attention to detail and patience. Maintain consistent tension throughout to ensure the rug lays flat and the shapes remain proportional. Take breaks to avoid fatigue and prevent uneven stitching.
Blocking the completed pieces is helpful. Lightly dampen the finished rug and shape it on a flat surface. Allow it to dry completely to retain the correct dimensions and achieve a professional look. This step also helps accentuate the spots and contours of the leopard.
Pay attention to color transitions. When changing yarn colors for the leopard’s spots or body, do so smoothly to prevent noticeable gaps or bulky stitches. Using a yarn needle for weaving in ends ensures a clean finish.
For extra realism, embroider small details such as whiskers or eye accents. These finishing touches make the rug more lifelike and visually appealing. Don’t hesitate to experiment with variations to personalize your Leopard Rug – Crochet Pattern.
Consider adding a non-slip backing if you plan to use the rug on hardwood or tile floors. This ensures safety and keeps your crochet creation in place, especially in high-traffic areas.
Lastly, care for your rug properly. Hand wash or gently machine wash in cold water to maintain the shape and color of the yarn. Proper care ensures your Leopard Rug – Crochet Pattern remains a stunning centerpiece for years to come.
FAQ – Leopard Rug Crochet Pattern
1. Is the Leopard Rug suitable for beginners?
While some experience with crochet is helpful, following the step-by-step Leopard Rug – Crochet Pattern allows even intermediate beginners to succeed.
2. What type of yarn is best for a leopard rug?
Soft cotton or acrylic yarn is ideal for comfort, durability, and easy maintenance.
3. How long does it take to complete the rug?
Depending on size and skill level, completion may take 10–20 hours, or longer for larger designs.
4. Can I make the rug larger or smaller?
Yes, adjust the hook size or yarn weight to scale the rug while keeping the pattern proportional.
5. How do I maintain the rug’s shape?
Blocking and lightly stuffing certain parts help maintain form and prevent curling.
6. How can I add realistic leopard spots?
Use embroidery or contrasting yarn to create irregular rosettes, mimicking a real leopard’s markings.
Conclusion
The Leopard Rug – Crochet Pattern is an engaging and rewarding project that combines creativity, precision, and the beauty of the animal kingdom. From preparing materials to assembling and detailing each part, crocheting this rug offers both challenge and satisfaction. You’ve learned how to create a realistic leopard shape, add spots, and customize the rug for your space.
This project demonstrates how crochet can transform simple yarn into a stunning decorative piece. Handmade rugs like this are perfect for home décor, gifts, or themed collections. The process encourages patience, attention to detail, and artistic expression.
I’d love to hear your thoughts! Leave your opinion and suggestions below—your feedback not only inspires future projects but also strengthens our creative crochet community.


