
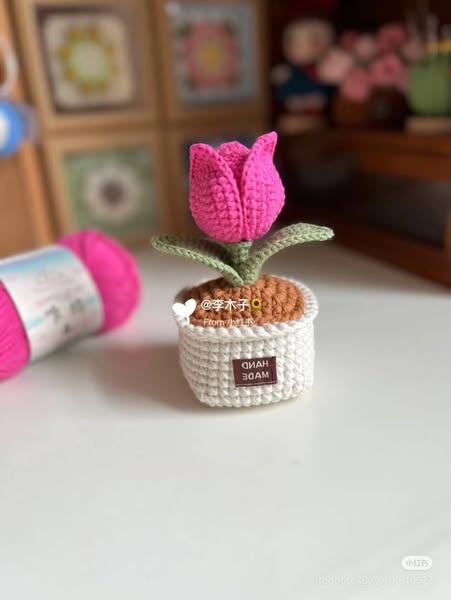
If you’ve been looking for a delicate and quick project to brighten up your day, this Mini Crochet Rose – Free Pattern is exactly what you need.
Whether you’re a beginner looking to practice shaping techniques or a seasoned crocheter aiming to create small embellishments, this project is a joyful way to add handmade charm to anything.
The beauty of the mini crochet rose lies in its simplicity and versatility. These adorable flowers can be used as hair accessories, gift toppers, appliqués for bags or clothing, brooches, or even wedding and party décor.
The pattern is not only easy to follow, but it’s also completely free—making it perfect for a relaxing weekend project.
In this step-by-step guide, we’ll teach you how to make a mini crochet rose, starting from materials, through to the final shaping and ideas for use. By the end, you’ll have your own garden of yarn roses blooming in your hands!
1. Materials Needed for Your Mini Crochet Rose
Before we get started with our Mini Crochet Rose – Free Pattern, let’s gather the supplies. Since this is a small project, you likely already have everything you need in your stash.
First, choose your yarn. Lightweight yarns like cotton or sport-weight work beautifully for mini roses, but you can also use medium (worsted) yarn for a fuller flower. Pick any color you like—classic reds and pinks are popular, but pastel or bright tones can be just as charming.
Next, select a crochet hook size suitable for your yarn. Generally, a 3.5mm to 4mm hook works well for mini roses. Using a smaller hook than usual will help keep the rose tight and structured.
You’ll also need scissors and a yarn needle for weaving in ends. Optionally, you might want a hot glue gun if you plan to attach the rose to clips, pins, or decorations.
With these basic materials, you’re ready to dive into the beautiful world of the Mini Crochet Rose – Free Pattern.
2. Step-by-Step Instructions for Crocheting the Rose
The heart of the Mini Crochet Rose – Free Pattern is the spiral shape that folds into a flower. Don’t worry—this part is fun and beginner-friendly!
Start by chaining 26 (or adjust depending on how many petals you want). This chain will form the base of the rose.
In the second chain from the hook, work a single crochet. Then continue the row using the following sequence in every stitch: [single crochet, half double crochet, double crochet, half double crochet, single crochet]. This mix of stitches forms the gentle waves that will later become petals.
Continue this pattern all the way to the end of the chain. Once complete, fasten off, leaving a long tail for sewing. You now have a wavy strip that will be rolled into your rose.
To shape the rose, begin rolling the strip from one end like a cinnamon roll. As you roll, sew the base together using your yarn needle and tail. Stitch through multiple layers at the bottom to secure the flower.
Adjust the petals to open them slightly. You’ll be amazed at how this flat strip becomes a three-dimensional mini rose right in your hands—one of the true pleasures of working with the Mini Crochet Rose – Free Pattern.
3. Tips for Customizing Your Mini Crochet Rose
Once you’ve mastered the basic Mini Crochet Rose – Free Pattern, you’ll want to make more—and maybe even experiment with your own versions.
Try changing the petal pattern slightly to achieve different effects. For example, using more double crochets in each petal will make them taller and more open. Using just single and half double crochets will create a tighter rosebud.
Adjust the length of your starting chain to control the number of petals. A longer chain makes a fuller flower, while a shorter one results in a small bud—both beautiful in different ways.
You can also add leaves! Simply crochet a small leaf using single crochets and sew it to the back of the rose. Green yarn in a lighter or darker tone than the flower creates a realistic look.
If you’re working on a bouquet or garland, consider using wire floral stems. Wrap the bottom of the rose around the wire and secure with green floral tape or yarn to give the illusion of a real stem.
With just a few variations, you’ll soon have a whole collection of mini crochet roses, each one unique and lovely.
4. Creative Ways to Use Your Mini Crochet Roses
Now that you’ve created your flower using the Mini Crochet Rose – Free Pattern, it’s time to think about how to use it!
One of the most popular uses is to make hair clips. Hot glue the rose onto a snap clip or hairpin for an adorable accessory that adds handmade charm to any outfit.
They also make wonderful brooches. Simply glue or stitch a pin backing to the flower and wear it on a sweater, jacket, or tote bag.
For a romantic touch, use them as wedding or party décor. Attach them to napkin rings, scatter them on tables, or use them in a bouquet for a no-wilt floral look.
Crochet roses are great for gift wrapping too. Tie them onto presents for a memorable and eco-friendly embellishment that the recipient can keep.
Another fun idea is to attach them to headbands, baby bonnets, or even slippers for a soft and stylish detail.
The possibilities are endless, and that’s what makes the Mini Crochet Rose – Free Pattern so rewarding—it’s quick, cute, and endlessly customizable.
FAQ – Mini Crochet Rose – Free Pattern
Q: Is the mini crochet rose pattern beginner-friendly?
A: Yes! It uses basic stitches (single, half double, double crochet) and simple construction. Even a beginner can create a beautiful rose on the first try.
Q: How long does it take to make one rose?
A: Typically, it takes 15–30 minutes to complete one rose, making it perfect for last-minute gifts or relaxing craft sessions.
Q: Can I use different types of yarn?
A: Absolutely! Just know that thicker yarns will make larger roses, while thinner yarns make more delicate ones. Choose yarn based on your desired outcome.
Q: Will the rose lose shape over time?
A: If sewn securely, your mini rose will hold its shape well. You can also lightly steam block it if needed to reshape after storage.
Q: Can I wash items with the mini rose attached?
A: If the yarn is washable, yes. However, hand washing is recommended to preserve the shape and stitching.
Q: How can I make the rose stiffer?
A: Use a smaller hook for tighter stitches, or apply a fabric stiffener or light starch spray to the finished rose.
Conclusion
The Mini Crochet Rose – Free Pattern is the perfect blend of beauty, simplicity, and creative expression. Whether you’re crafting for yourself or making something heartfelt for someone else, these tiny roses bring big joy.
You’ve learned how to crochet the base, shape the petals, and finish the flower—all in a way that’s easy to follow and fun to customize. Now it’s time to let your creativity bloom.
PATTERN HERE:

We’d love to hear what you thought of this pattern! Please leave a sincere comment with your experience, suggestions, or ideas for future tutorials. Your voice helps us grow our community and continue sharing free, high-quality patterns made with love.


