
Macrame Heart Bracelet - Free Tutorial

If you’re searching for a quick and festive crochet project, the Mini Pumpkin Keychain – Crochet Pattern is a perfect option to add charm to your accessories this fall season.
This adorable mini pumpkin brings autumn vibes wherever it goes and makes a thoughtful gift, craft fair item, or fun seasonal décor. Best of all, it’s small, simple, and perfect for beginners or experienced crocheters looking for a satisfying project.
The Mini Pumpkin Keychain – Crochet Pattern is both functional and decorative. Its small size makes it ideal as a bag charm, zipper pull, or keychain.
Whether you’re celebrating Halloween, Thanksgiving, or just love the cozy colors of fall, this crochet pumpkin will bring a smile to your face. Plus, it’s a great way to use up leftover yarn from other projects.
This project is perfect for on-the-go crafting. You only need a few basic materials and a short amount of time to make one, making it an ideal choice for crafters with busy schedules.
With just a small amount of yarn and a few stitches, you can create your very own Mini Pumpkin Keychain – Crochet Pattern that’s as cute as it is practical.
Before diving into your Mini Pumpkin Keychain – Crochet Pattern, gather the right materials to make your process smoother and more enjoyable. Luckily, this pattern doesn’t require anything fancy.
You’ll need worsted weight yarn in orange for the pumpkin body. A small amount of green or brown yarn will be used for the stem. Cotton yarn works well for this project because it holds shape and detail better, but acrylic is also a fine option if it’s what you have on hand.
Choose a small crochet hook—usually a 3.5mm or 4mm works best for creating tight stitches that give the pumpkin its firm shape. A smaller hook helps ensure your stuffing won’t peek through the stitches.
Other important tools include a tapestry needle for sewing parts together and weaving in ends, scissors, and polyester fiberfill stuffing. You’ll also need a keyring or lobster clasp to turn your pumpkin into a functional keychain.
For extra flair, consider using embroidery floss to create little ridges or a smiling face on your pumpkin. You can even add beads or buttons for decoration, just be sure they’re secure and safe if the keychain will be used by children.
Prepare your crafting space with good lighting and organize your materials in a tray or small basket. Since this is a small and portable project, you can take it with you to the park, coffee shop, or even work on it while watching your favorite show.
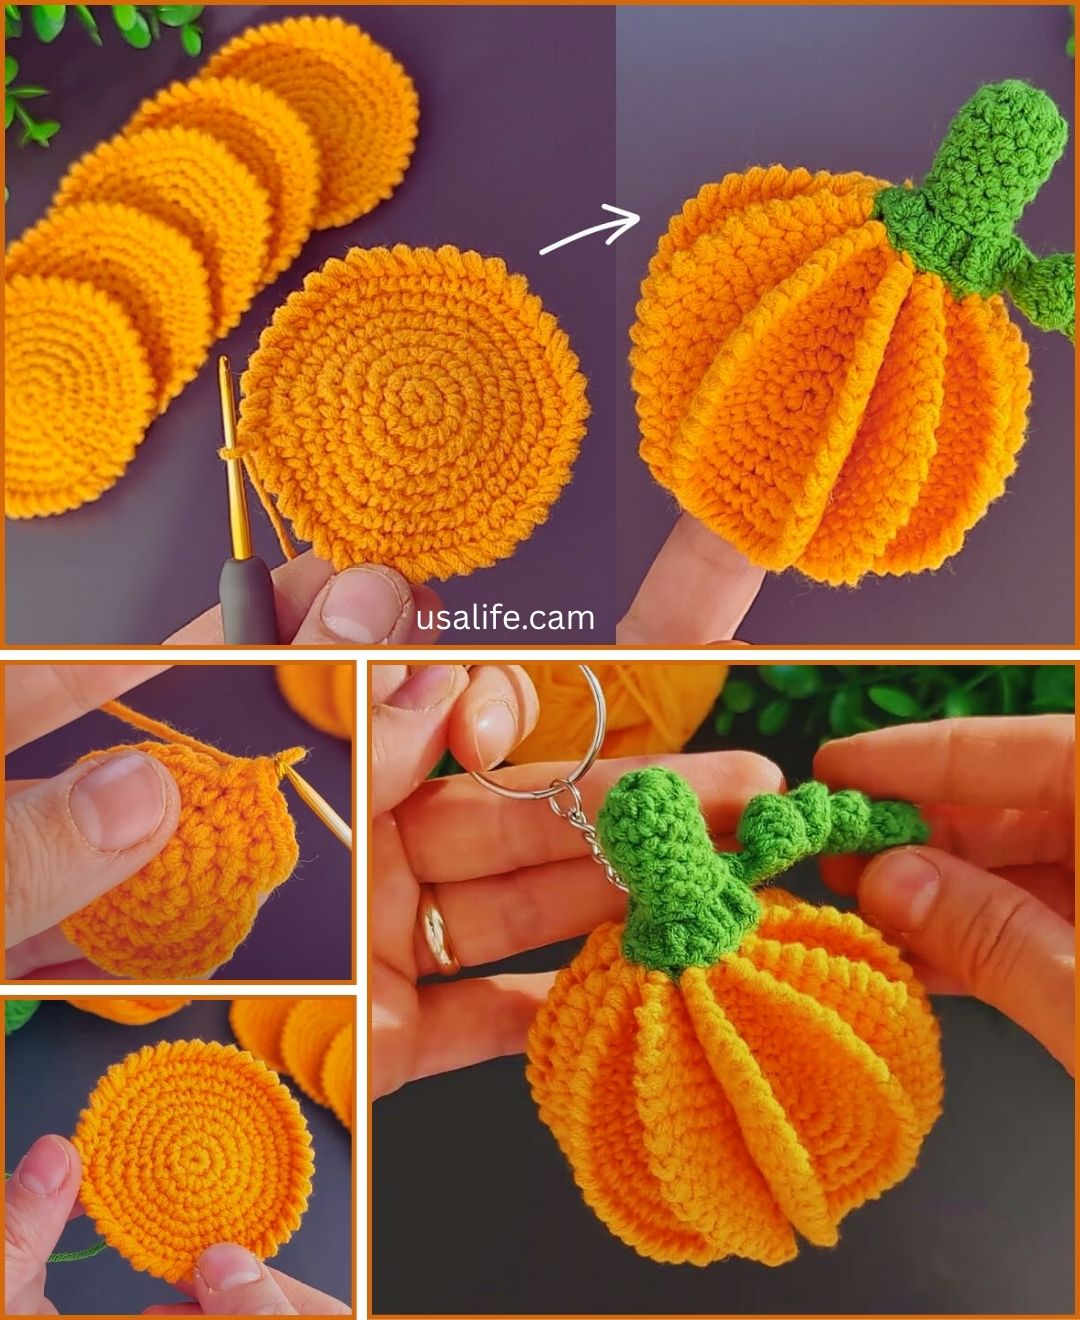
The Mini Pumpkin Keychain – Crochet Pattern starts with a simple round base worked in continuous rounds. Begin with a magic ring and make a series of single crochet stitches to form a small circle. This technique creates a closed center and gives your pumpkin a neat look.
After establishing the base, you’ll continue to increase your stitches in each round to build up the pumpkin’s body. The trick here is to keep the increases evenly spaced to maintain a smooth, round shape.
Once you’ve reached the desired width, you’ll stop increasing and begin several rounds of single crochet without changes. This builds height and gives your pumpkin a plump, three-dimensional shape. Remember to stuff the pumpkin with fiberfill as you go—don’t wait until the end or it might be difficult to shape.
After stuffing, you’ll start decreasing your stitches evenly across the round. This closes the top of your pumpkin, forming a nice dome. Make sure to fasten off securely and use your yarn needle to close any remaining gap.
To create the pumpkin’s ridges, thread a long piece of yarn through the top and bottom of the pumpkin, then wrap it around the body and pull tightly. Repeat this several times to create 4–6 evenly spaced ridges that give the pumpkin its characteristic look.
Finally, crochet a small stem using brown or green yarn. This can be done by chaining a few stitches and working single crochets back across, or simply wrapping and securing yarn to form a stubby stem. Sew it securely to the top, and attach your keychain ring through a loop or stitch.
One of the most enjoyable aspects of the Mini Pumpkin Keychain – Crochet Pattern is the opportunity to customize it. This pattern can easily be adapted to suit your personal style or the recipient’s taste.
Try different colors. Traditional orange is always a favorite, but you can create white pumpkins for a more modern farmhouse look or even use pastel yarns for a whimsical style. Variegated yarn can give your pumpkins a more natural, rustic appearance.
Add facial expressions or designs. Embroider cute kawaii-style eyes and smiles for a playful look. You can also stitch initials or little motifs like stars, hearts, or flowers onto the pumpkin’s body.
Change the size by adjusting your yarn thickness and hook size. Thicker yarn and a larger hook will produce a chubby pumpkin, while a fine yarn and small hook create a mini version suitable for earrings or dollhouse décor.
Attach your pumpkin to different items. Instead of a keychain, use a lobster clasp to turn it into a bag charm, or add it to a fall garland or string of bunting. It also makes a charming party favor or stocking stuffer.
You can even add scent! Lightly spray the stuffing with a fall-scented essential oil like cinnamon or pumpkin spice for a sensory treat every time you grab your keys.
Personalized Mini Pumpkin Keychains are perfect for gifts, giveaways, or craft fairs. With just a few tweaks, each one becomes a unique creation full of handmade love.
The Mini Pumpkin Keychain – Crochet Pattern isn’t just cute—it offers many benefits for crafters of all skill levels. It’s a satisfying, quick project that teaches or reinforces fundamental crochet skills in a fun way.
It’s ideal for beginners who want to practice working in the round, increasing, and decreasing. It also teaches shaping and assembly, which are useful in countless other patterns.
This pattern is also fantastic for those looking to make use of scrap yarn. Because it requires such a small amount of material, it’s a perfect project to use leftovers from larger pieces.
Mini projects like this are incredibly portable. You can keep one in your bag and pull it out anytime you have a few spare minutes. They’re a great way to fill small bits of time with creativity and productivity.
Crocheting small items for others is deeply rewarding. These keychains make excellent last-minute gifts or additions to a gift basket. They’re thoughtful, handcrafted, and show that you care.
If you’re a seller, the Mini Pumpkin Keychain – Crochet Pattern is a smart addition to your craft fair or online shop inventory. They’re quick to make, inexpensive to produce, and often sell well during fall and holiday seasons.
Finally, finishing a project—no matter how small—brings joy and confidence. It’s a little celebration of your creativity and a reminder of the joy of handmade things.
Q1: How long does it take to complete the Mini Pumpkin Keychain?
A1: Most crafters can finish one keychain in 30–60 minutes, depending on their skill level.
Q2: Is this pattern suitable for beginners?
A2: Yes! The Mini Pumpkin Keychain – Crochet Pattern uses basic stitches and techniques, making it perfect for beginners looking to build confidence.
Q3: What type of yarn is best for this pattern?
A3: Worsted weight cotton yarn works best for definition and structure, but acrylic yarn is also a good alternative.
Q4: Can I sell finished keychains made from this pattern?
A4: Absolutely! Handmade pumpkin keychains are popular items at fall craft fairs and in online stores. Just be sure not to resell the pattern itself if it’s not yours.
Q5: Can I make this pattern larger or smaller?
A5: Yes! Use thicker yarn and a bigger hook for a larger pumpkin, or finer yarn and a smaller hook for a tiny version.
Q6: How do I make the ridges on the pumpkin?
A6: Use a long piece of yarn threaded through the center, then wrap and pull it tightly around the body several times to form indentations.
Q7: Is this project safe for children?
A7: Yes, as long as all small pieces are securely attached. Avoid using beads or buttons for very young children.
The Mini Pumpkin Keychain – Crochet Pattern is a delightful, easy, and rewarding project for any crochet enthusiast. Whether you’re looking for a seasonal craft, a cute gift, or a market-ready item, this pattern delivers charm, creativity, and fun in a compact size. With simple stitches and endless customization options, it’s a perfect project to try today.
Have you made your own pumpkin keychain? We’d love to hear your experience! Leave a comment with your thoughts, suggestions, or creative variations below. Your feedback inspires others and helps our crafting community grow stronger every day. Happy crocheting!


