
Macrame Heart Bracelet - Free Tutorial

The Necked Duck Wear Hat Crochet Pattern is one of those delightful creations that instantly brings a smile to your face. Whether you’re an experienced crocheter or just starting out, this charming pattern offers a lighthearted way to explore your creativity.
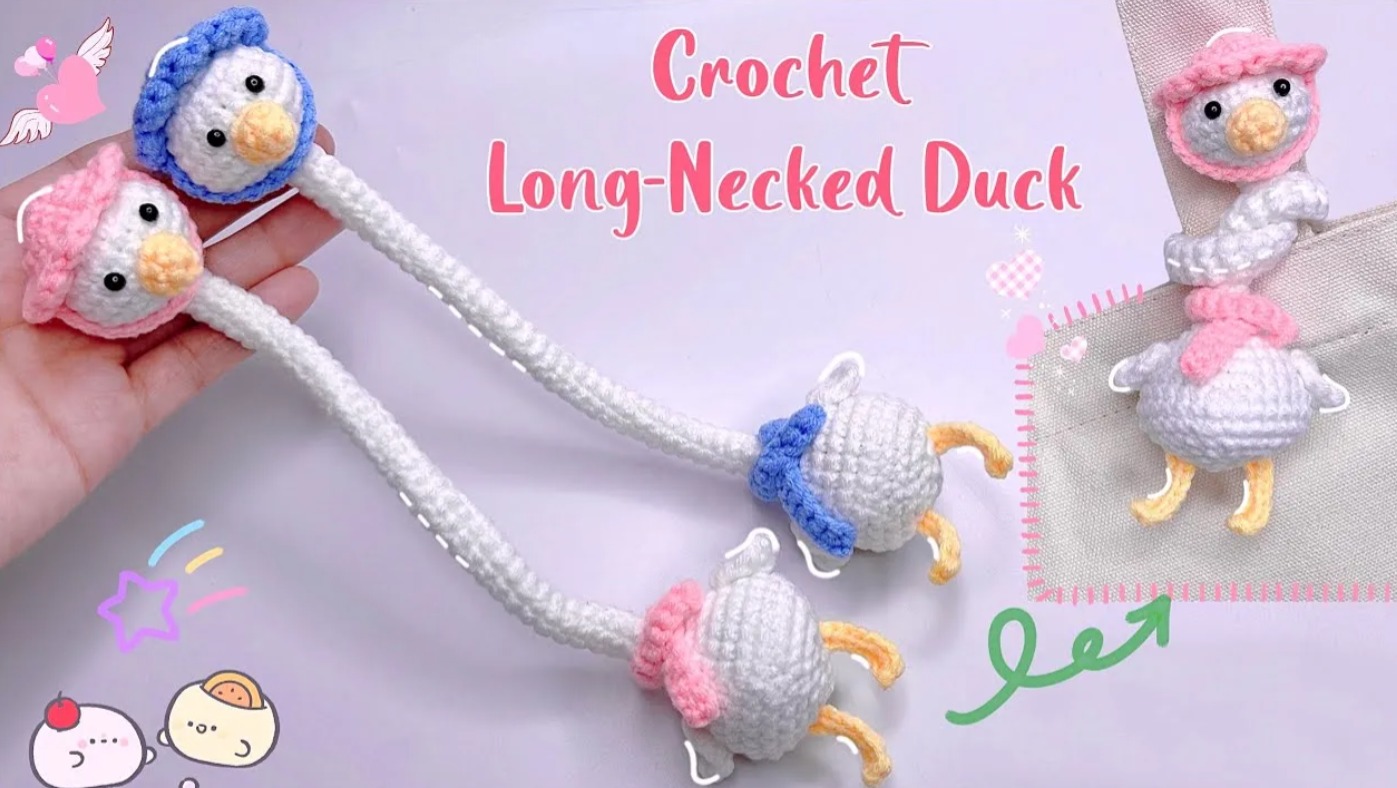
With its quirky character—a duck with a long neck and a tiny hat—it’s the perfect mix of fun and style. The best part? It’s beginner-friendly and makes for a great handmade gift or decoration.
Crocheting animals has long been a beloved craft tradition, and the Necked Duck Wear Hat Crochet Pattern taps into that nostalgic joy while adding a whimsical twist. The exaggerated neck and playful hat give this little duck a personality of its own.
You’ll love how the simple stitches come together to form a soft, lovable character that can be customized with different yarn colors, accessories, and even expressions.
In this article, we’ll guide you through the key elements of the Necked Duck Wear Hat Crochet Pattern, from the materials needed to the step-by-step process of crafting each part of the duck. We’ll also share tips on how to add personal flair, troubleshoot common issues, and display or gift your finished creation. By the end of this tutorial, you’ll feel confident in taking on this adorable crochet project.
To successfully bring your Necked Duck Wear Hat Crochet Pattern to life, it’s important to gather the right materials before you begin. Having everything prepared will make the process smoother and more enjoyable.
Start with a soft, medium-weight yarn, preferably cotton or acrylic, which works best for amigurumi-style figures like this duck. You can choose classic white and yellow for the body and beak, or get creative with colorful combinations to add your own twist to the duck’s personality.
You’ll need a crochet hook that suits the weight of your yarn—usually a 3.5 mm to 4.0 mm hook works well. Make sure the stitches are tight enough to hold stuffing inside without gaps. If in doubt, try a smaller hook size to create a firmer structure.
Don’t forget your stuffing material. Polyester fiberfill is the most popular choice because it’s lightweight, washable, and easy to use. You’ll also need a yarn needle for sewing the pieces together and weaving in the ends.
To give your duck a little extra charm, consider using safety eyes or embroidering eyes with black yarn. Add a small button or felt accessory for the hat to enhance the duck’s unique style. Stitch markers can also help keep your rounds even and prevent you from losing your place.
Lastly, make sure you have a printed or digital copy of the Necked Duck Wear Hat Crochet Pattern nearby for reference as you go. It’s a good idea to read through the entire pattern first to understand the construction steps before you start crocheting.
The core of the Necked Duck Wear Hat Crochet Pattern lies in its quirky and elongated neck. This feature sets it apart from other crochet animal projects and adds a playful twist that everyone will adore.
Begin by crocheting the body in the round using basic stitches like single crochet and increases. This section forms the base of the duck, and you can stuff it firmly to give it shape and structure. Keeping your stitches consistent will ensure a smooth and round body.
Once the body is complete, it’s time to move on to the neck. This is typically done as a long tube made of continuous rounds. The neck should be stuffed lightly so it maintains flexibility without being floppy. Use stitch markers to keep your rounds even and help maintain a symmetrical shape.
The transition from the neck to the head is important for achieving a cohesive look. Make sure the top of the neck is tightly stitched to avoid gaps. Begin decreasing the stitches as you move upward to shape the head gradually.
Creating the head is much like the body but on a smaller scale. You’ll work in the round again, increasing and then decreasing as you go to form a ball-like shape. Be sure to stuff the head before closing it off, and double-check the placement of safety eyes before finalizing.
Attach the head securely to the top of the neck using your yarn needle and matching yarn. Use tight, clean stitches to give your duck a polished appearance. This connection point is key to giving the duck that upright, whimsical pose.
Once the head and neck are attached, you can adjust the shape slightly by massaging the stuffing into place. Your Necked Duck Wear Hat Crochet Pattern is now coming to life, and the personality is beginning to shine through!
Now it’s time to give your duck more features, starting with the beak. This small piece can be crocheted separately and then sewn onto the face. Typically, it’s made with orange or yellow yarn and shaped like a tiny cone or oval.
Sew the beak carefully in the center of the duck’s head, just below the eyes. Make sure it’s symmetrical and aligned. You can use pins to position it before sewing to get the placement just right.
Next, move on to the feet. These can be made as flat or slightly stuffed ovals, depending on your preference. Using a bright color for the feet adds a playful element and helps them stand out against the duck’s body.
Sew the feet to the bottom of the body, slightly angled outward for a fun and balanced look. If you want your duck to stand upright, be strategic about foot placement and stuffing distribution.
Wings can be made as small teardrop shapes and attached to the sides of the body. They don’t need to be functional—just adorable! Using the same yarn as the body keeps things cohesive, or you can mix colors for a more whimsical result.
All these small parts add depth and dimension to your Necked Duck Wear Hat Crochet Pattern. Take your time with each one, and don’t be afraid to personalize them with embroidery or embellishments. These finishing touches make your project truly one of a kind.
The tiny hat is the highlight of the Necked Duck Wear Hat Crochet Pattern. It brings charm, whimsy, and a sense of fashion to your little duck. This accessory is simple to make but has a big impact on the final look.
Start by crocheting a small round base for the hat using the same stitch techniques you used for the body. This typically involves single crochet rounds that increase outward to form a flat circle, which becomes the brim.
Once the brim is complete, you’ll build the crown of the hat by working in rounds without increases. This gives it a bowl-like shape that fits perfectly on the duck’s head. You can make it a beanie-style hat or a fancier top hat depending on your taste.
Play with color combinations for the hat to give your duck extra personality. Bright reds, blues, or pastels can add flair, while neutral tones offer a more classic look. You can even add stripes or use variegated yarn for a multicolored effect.
After completing the hat, consider adding small embellishments like a flower, button, or pom-pom. These elements elevate the design and show off your creativity. Make sure all accessories are securely attached, especially if the toy is for a child.
Position the hat on your duck’s head and sew it in place. If you prefer versatility, you can leave it detachable, turning the duck into a fun dress-up toy. Both options work depending on how you plan to use or gift the duck.
With the hat in place, your Necked Duck Wear Hat Crochet Pattern is complete! Take a moment to admire your work and snap a few pictures—you’ve created something adorable, unique, and full of charm.
What skill level is required for this pattern?
The Necked Duck Wear Hat Crochet Pattern is beginner-friendly but includes techniques like working in the round and increasing/decreasing, making it suitable for confident beginners or intermediate crocheters.
What type of yarn is best for this project?
Medium-weight cotton or acrylic yarn works best. It holds shape well and is easy to crochet, especially for creating structured pieces like the neck and hat.
Can I customize the size of the duck?
Yes! By using thicker yarn and a larger hook, you can create a larger version. For a smaller duck, use fine yarn and a smaller hook size. Adjust the stuffing accordingly.
Is this pattern suitable for children’s toys?
Absolutely, but ensure that all parts, especially safety eyes and embellishments, are securely attached. For infants, consider embroidering the eyes instead of using plastic safety eyes.
How long does it take to complete the pattern?
Depending on your experience level, it typically takes 4 to 6 hours to complete. This can vary based on your speed and the amount of customization you add.
Can I sell ducks made from this pattern?
Yes, handmade items made from the Necked Duck Wear Hat Crochet Pattern can usually be sold. Just be sure to credit the original pattern if required by the pattern designer.
The Necked Duck Wear Hat Crochet Pattern is a delightful, creative project that brings both joy and satisfaction. From the long neck to the quirky hat, every part of this duck radiates charm. It’s a wonderful way to practice key crochet techniques while making something uniquely fun.
Whether you’re crafting for yourself, making gifts, or adding to your collection of handmade animals, this pattern is a perfect choice. It’s easy to personalize, fun to assemble, and endlessly lovable.
We hope this tutorial inspired you to pick up your yarn and hook and try the Necked Duck Wear Hat Crochet Pattern for yourself. If you’ve already made one, we’d love to hear your thoughts! Leave a sincere opinion and share any suggestions you may have—we’re always excited to see how you bring your creativity to life.


