
Creating a delicate and decorative doily can be an enjoyable and rewarding experience. The Pretty Pinwheel Doily – FREE PATTERN is a perfect project for those who love intricate crochet work and want to add a touch of elegance to their home decor.
This pattern is designed to be beginner-friendly while offering enough complexity to keep experienced crocheters engaged.
Doilies have long been a staple in home decoration, offering both practical and aesthetic value. Whether used as table centerpieces, coasters, or decorative wall art, a well-crafted doily can elevate any space.
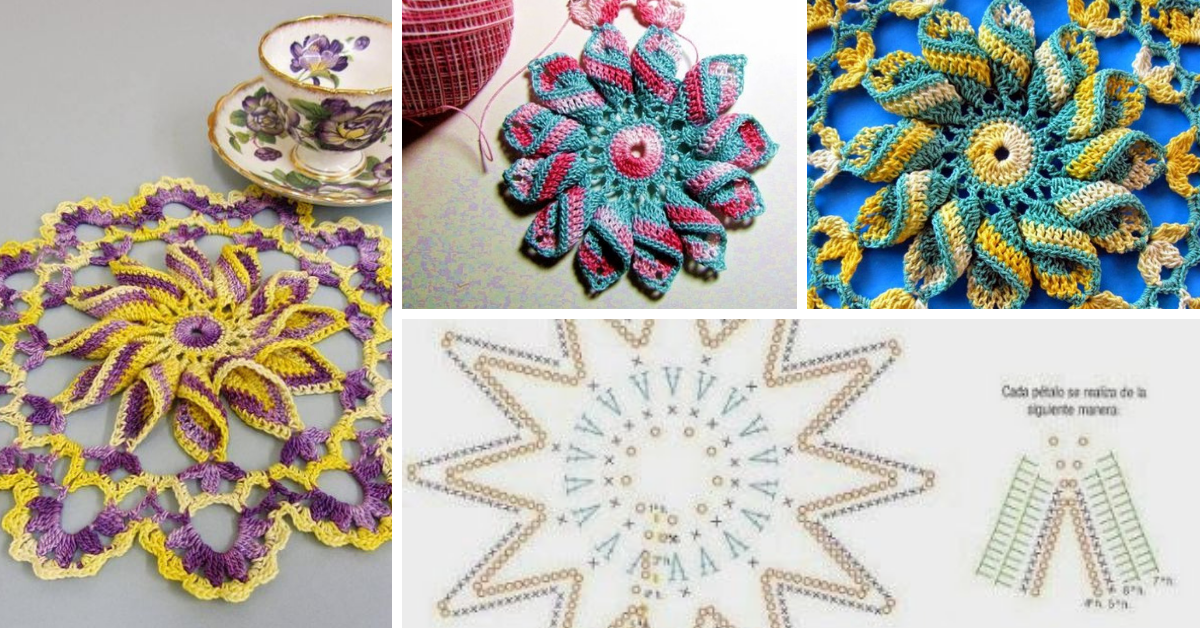
The Pretty Pinwheel Doily – FREE PATTERN features a unique swirling design that creates a mesmerizing visual effect, making it a standout piece in any collection.
This tutorial will guide you through the process of creating your own Pretty Pinwheel Doily – FREE PATTERN, ensuring that you have all the necessary materials, techniques, and step-by-step instructions to complete the project successfully.
1. Materials and Tools Needed
Before starting your Pretty Pinwheel Doily – FREE PATTERN, it’s essential to gather all the necessary materials and tools to ensure a smooth crochet experience.
- Yarn Selection: Choose a fine crochet thread or lightweight cotton yarn for the best results. Cotton ensures durability and a crisp finish for your doily.
- Crochet Hook: A small-sized crochet hook (between 1.5mm and 2.5mm) is ideal for intricate doily patterns.
- Scissors: A sharp pair of scissors will help with precise cutting and finishing.
- Stitch Markers: Useful for keeping track of stitch counts, especially in intricate patterns.
- Blocking Materials: Blocking your finished doily will enhance its shape and definition.
Having all these materials ready before you begin will make the process more enjoyable and efficient.
2. Step-by-Step Instructions
Now that you have your materials ready, let’s dive into the process of crocheting your Pretty Pinwheel Doily – FREE PATTERN. Follow these steps carefully to achieve the best results.
- Foundation Ring: Begin with a magic ring or chain four and join with a slip stitch to form a small loop.
- First Round: Crochet double crochets into the center of the ring to create a solid foundation.
- Creating the Pinwheel Effect: Utilize chains and clusters of stitches to form the swirling effect.
- Increasing Rounds: Gradually increase stitches in each round to maintain the doily’s shape and pattern symmetry.
- Final Edging: Add a decorative border using picots or scallops for an elegant finish.
- Blocking the Doily: Soak the doily in water, pin it to the desired shape, and allow it to dry completely for a polished look.
By following these steps, your doily will develop its characteristic pinwheel design beautifully.
3. Common Mistakes and How to Avoid Them
Even experienced crocheters can encounter challenges while working on intricate patterns. Here are some common mistakes and how to prevent them.
- Uneven Tension: Maintaining consistent tension is crucial to achieving a uniform appearance. Practice controlling your grip on the yarn.
- Miscounting Stitches: Always double-check stitch counts at the end of each round to avoid errors that can disrupt the pattern.
- Skipping or Adding Stitches: Use stitch markers to keep track of key points in the pattern.
- Not Blocking the Doily: Blocking helps to define the intricate details of the pattern. Skipping this step may result in a less polished appearance.
- Using the Wrong Yarn: Opt for a fine thread or cotton yarn to achieve the best results. Bulky yarns may not capture the delicate details effectively.
- Improper Joining of Rounds: Ensure slip stitches are correctly placed to maintain a seamless design.
By being mindful of these pitfalls, your Pretty Pinwheel Doily – FREE PATTERN will turn out flawless.
4. Creative Uses for Your Doily
Once your Pretty Pinwheel Doily – FREE PATTERN is complete, there are numerous ways to incorporate it into your decor.
- Table Decor: Place it under vases, candles, or tableware for an elegant touch.
- Wall Art: Frame your doily to create a unique decorative piece.
- Gift Idea: Handmade doilies make thoughtful and personalized gifts.
- Lace Overlay: Use it as a decorative overlay on fabric or furniture.
- Festive Decorations: Incorporate doilies into holiday or special event decor.
- Coasters or Placemats: Small doilies can be used as coasters or larger ones as placemats.
With so many creative possibilities, your handmade doily will surely be a cherished piece in your collection.
FAQ
Q: What type of yarn is best for a doily?
A: Fine crochet thread or lightweight cotton yarn is ideal for creating intricate and well-defined doilies.
Q: Can beginners attempt this pattern?
A: Yes! While some experience with crochet is helpful, this pattern is designed to be beginner-friendly with step-by-step instructions.
Q: How do I ensure my doily lays flat?
A: Proper stitch counts and blocking after completion will help maintain a flat and symmetrical shape.
Q: Can I use a larger hook size?
A: While possible, using a larger hook may result in a looser and less defined doily pattern.
Q: How do I block my finished doily?
A: Soak the doily in water, pin it into the desired shape on a flat surface, and allow it to dry completely.
Q: How long does it take to complete the pattern?
A: Depending on skill level and time availability, this doily can take a few hours to complete.
Join our VIP broadcast list and gain access to exclusive patterns, all for free. As a VIP member, you’ll receive the best patterns daily, delivered directly to your device. ✨📱 It’s a unique opportunity to stay up-to-date with the latest trends and designs, curated just for you. Don’t miss out on enhancing your projects and discovering new inspirations with the best patterns every day! 🎨🔝
Conclusion
The Pretty Pinwheel Doily – FREE PATTERN is a beautiful and rewarding crochet project that adds charm and elegance to any setting. With the right materials, patience, and attention to detail, you can create a stunning piece that showcases your crochet skills.
Have you tried this pattern? Share your thoughts and suggestions in the comments below!


