
Macrame Heart Bracelet - Free Tutorial

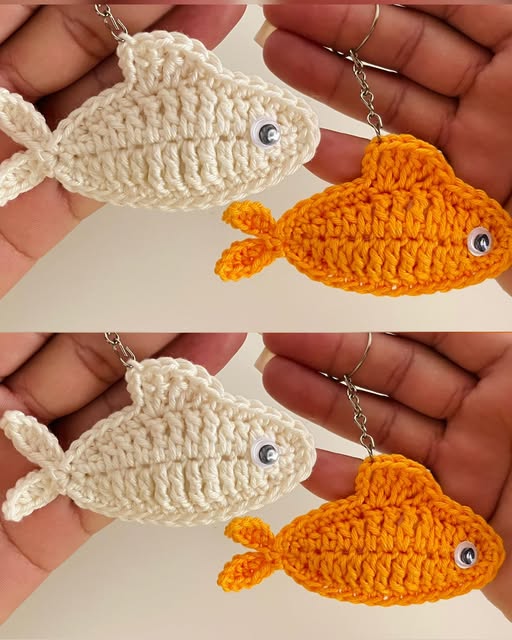
If you’re looking for a small, satisfying project that’s both functional and adorable, then this Quick and easy fish crochet keychain step by step tutorial is just what you need.
Whether you’re a seasoned crocheter or a beginner trying something new, creating a little fish keychain is a joyful and fast-paced experience. It’s perfect for gifts, craft fairs, or even just to brighten your own keyring or backpack.
Crochet keychains are trendy, lightweight, and endlessly customizable. This fish-shaped keychain in particular adds a splash of charm with its playful shape and vibrant colors.
Plus, it’s a great way to use up leftover yarn and practice shaping techniques without committing to a large project. The best part? You can finish it in under an hour!
This tutorial will walk you through every step, from choosing materials to assembling your finished fish. The Quick and easy fish crochet keychain step by step guide is designed to be simple, quick, and fun—ideal for crafters of all levels. Grab your hook, and let’s dive in!
Before you begin crocheting your cute fish keychain, you’ll need to gather a few simple materials. All the items are affordable and easy to find at local craft stores or online.
Yarn:
Choose lightweight cotton or acrylic yarn in two or more contrasting colors. Bright and bold hues are best to mimic the playful appearance of fish. You’ll only need a small amount of yarn for each keychain.
Crochet Hook:
Use a 2.5 mm to 3.5 mm hook depending on your yarn. A smaller hook helps create tight stitches, which are ideal for amigurumi-style keychains.
Fiberfill or Stuffing:
You’ll need just a pinch of fiberfill to stuff the fish and give it dimension. Be careful not to overstuff, as this could distort the shape.
Keychain Ring:
You can use a lobster clasp, D-ring, or standard keyring to attach your fish. These are available at most craft or hardware stores.
Yarn Needle and Scissors:
A yarn needle is essential for sewing pieces together and weaving in the ends neatly. Scissors will help you cut yarn with clean edges.
Optional: Safety Eyes or Embroidery Floss:
For added detail, consider using small safety eyes or embroidering eyes directly with black yarn or thread.
Now that you have all your materials, let’s begin the quick and easy fish crochet keychain step by step process. This pattern uses simple stitches and can be completed in a few minutes.
Step 1: Start with a Magic Ring
Begin with a magic ring and crochet 6 single crochets (sc) into the loop. Pull tight to close the circle. This forms the nose of the fish.
Step 2: Increase the Body
In the next round, increase by doing 2 sc in each stitch around (12 stitches total). Continue to increase in a circular pattern for the next few rounds until you reach the widest part of the body.
Step 3: Work Even Rounds
Crochet a few rounds without increasing to build up the body of the fish. Typically 3–4 rounds of 12 stitches will be enough for a small, rounded body.
Step 4: Decrease to Form the Tail Base
Begin decreasing gradually to close the back end of the body. Once the opening is narrow, stuff the fish gently with fiberfill.
Step 5: Shape the Tail
Chain a small number (like 6) and work back in slip stitches or half double crochet to form the tail fin. You can repeat this step to make a second fin, then attach both to the end of the body.
Step 6: Add Details and Attach the Ring
Sew on a keyring at the top of the fish using yarn or a small jump ring. Use safety eyes or embroider small black dots on both sides for eyes. You can also add side fins or decorative stripes for extra flair.
This Quick and easy fish crochet keychain step by step pattern is a fantastic base, but don’t be afraid to add your creative spin to make each fish unique. Here are some ideas to inspire you.
Use Variegated Yarn
Create a multicolor fish with no effort by using variegated yarn. These yarns automatically switch shades and give a marbled or striped effect.
Add Embellishments
Sew on tiny beads for bubbles, sequins for scales, or even a tiny bow to turn your fish into a character. These are great for personal gifts or themed keychains.
Different Shapes for the Tail
Try experimenting with fan-shaped, pointed, or heart-shaped tails. This adds variety to your collection and makes each fish look a bit different.
Make a Mini School of Fish
Crochet multiple fish in various sizes and colors, then hang them from a single keychain ring for a “school of fish” look. It’s a cute and fun conversation starter!
Turn It Into a Bag Charm
Instead of a keychain, add your fish to a zipper pull, backpack, or tote bag. This is especially popular with kids and teens.
Use Glow-in-the-Dark Yarn
For a playful nighttime surprise, use glow-in-the-dark yarn or thread to crochet or embroider accents.
This Quick and easy fish crochet keychain step by step tutorial is not just adorable—it’s also beginner-friendly, budget-friendly, and extremely satisfying to complete. Here’s why it’s the perfect project to start with or use as a break between bigger patterns.
Simple Stitches Only
The entire fish can be made with single crochet, increases, and decreases. No complex stitch work needed!
No Shaping Stress
The body is made in the round and shaped mostly by increasing and decreasing—ideal for practicing basic 3D crochet techniques.
Fast to Finish
Even with embellishments, the entire project can be done in under an hour. Instant gratification is a huge motivator for new crocheters.
Low Material Cost
You only need a small amount of yarn, making this an excellent stash-buster and budget-friendly craft.
Portable Project
Take your yarn and hook anywhere! This is a great on-the-go project for waiting rooms, travel, or relaxing at a café.
Builds Confidence
Finishing a cute, complete item boosts confidence and encourages crafters to try more detailed amigurumi or accessories.
Q1: Can I make this keychain with leftover yarn?
A1: Absolutely! This pattern is perfect for using up small scraps of yarn. Just make sure the yarns are of similar weight.
Q2: How do I attach the keychain ring securely?
A2: Use strong yarn or embroidery thread to sew the ring directly into the top of the fish. Wrap tightly several times and tie off securely.
Q3: Can I wash the fish keychain?
A3: Yes, but handwashing is recommended. If you use cotton or acrylic yarn, your fish will be durable and easy to spot-clean.
Q4: What if I don’t have safety eyes?
A4: You can embroider eyes using black thread or use small buttons, beads, or even felt pieces glued on.
Q5: How big is the finished fish?
A5: Typically around 2 to 3 inches long, depending on your yarn and hook size. You can make it smaller or larger by adjusting your materials.
Q6: Is this a good project for kids?
A6: Yes, as long as an adult handles the sewing and keyring attachment. Older children can help crochet the body with supervision.
This Quick and easy fish crochet keychain step by step project is the perfect blend of fun, creativity, and simplicity. Whether you’re making one for yourself, as a gift, or as part of a craft fair set, each fish brings a touch of handmade joy wherever it goes.
We’ve covered everything from materials and step-by-step instructions to personalizing and finishing your fish keychain. With just a few supplies and a little bit of time, you can crochet something truly delightful.
Have you tried this pattern or added your own twist? We’d love to hear your experience! Please leave a comment below with your thoughts, suggestions, or a photo of your fish keychain. Your feedback helps inspire other crafters in our community!


