
Ribbon Accent Bag – Free Pattern is a stylish and functional accessory that brings charm and personality to your handmade collection. Whether you are an experienced crafter or just beginning your sewing journey, this project offers a perfect blend of creativity and practicality.
Using simple materials and beginner-friendly techniques, you can create a beautiful ribbon-accented bag that suits your personal style.
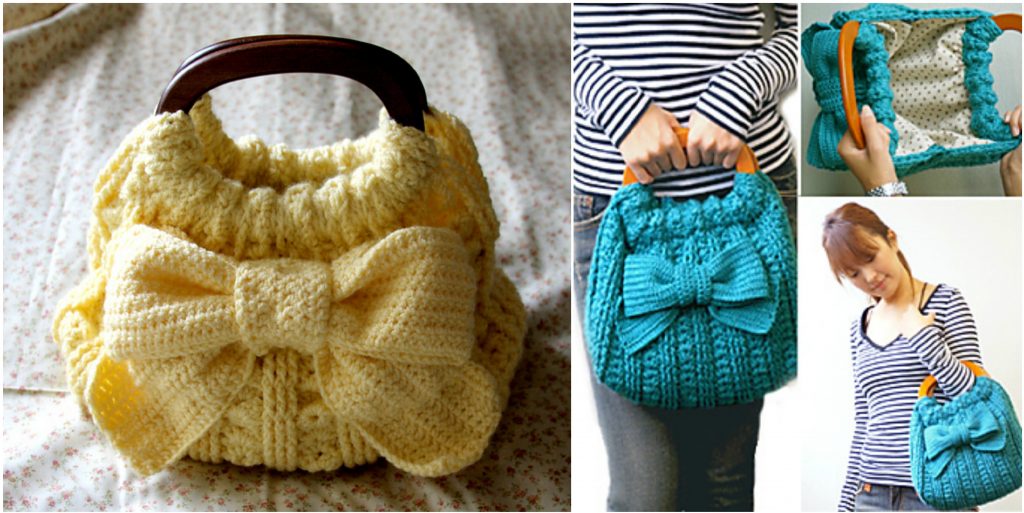
The beauty of the Ribbon Accent Bag – Free Pattern lies in its versatility. You can customize the size, color, and ribbon details to match any outfit or occasion. It makes a thoughtful handmade gift or a delightful addition to your own wardrobe.
With a bit of fabric, some ribbon, and your sewing machine, you can complete this project in just a few hours.
In this tutorial, we will explore everything you need to know to complete your bag: choosing the right materials, cutting and preparing the fabric, assembling and sewing the bag, and finishing touches to give your bag a professional look. By the end, you’ll have a chic and practical bag that you’ll be proud to carry or gift to someone special.
1. Choosing Materials and Preparing the Pattern
The first step in making your Ribbon Accent Bag – Free Pattern is selecting the right materials. Start with medium-weight cotton or canvas fabric, which provides both structure and durability. Consider using a lining fabric as well to give your bag a polished interior.
The ribbon is the star of this design, so choose one that complements your main fabric. Satin, grosgrain, or velvet ribbons all work beautifully. Depending on your design, you might need between 1 to 2 yards of ribbon.
You’ll also need basic sewing supplies such as scissors, pins, a measuring tape, a sewing machine, and matching thread. A rotary cutter and self-healing mat can help ensure precise cuts.
Before cutting your fabric, wash and press it to prevent any shrinking or distortion. This also gives a neater, smoother finish to your completed bag.
Print or draw your pattern pieces if you’re following a downloadable version. Most Ribbon Accent Bag – Free Pattern templates include body panels, straps, and a facing or lining.
Once you have your materials ready and pattern pieces cut out, lay everything out on your workspace. This helps you visualize the process and ensures nothing is missing before sewing begins.
2. Cutting and Assembling the Fabric Pieces
Begin by cutting your outer fabric, lining, and interfacing (if using) according to the pattern. Make sure each piece is the correct size and shape, as accuracy is key to a well-made bag.
Apply interfacing to the wrong side of the outer fabric if you want extra stability. This step is optional but recommended, especially if your fabric is soft or thin.
With all pieces cut and prepped, start assembling the bag by attaching the ribbon. Place the ribbon on the right side of the outer fabric where desired and secure it with pins before sewing it down.
Topstitch the ribbon carefully to keep it flat and avoid puckering. You can sew multiple ribbons or create a bow detail depending on your style.
Next, sew the outer panels together, right sides facing. Leave the top open and press the seams to one side.
Repeat the same for the lining pieces, leaving a small opening at the bottom for turning the bag later.
3. Sewing the Bag Together
Now that the outer shell and lining are assembled, it’s time to join them. Place the outer bag inside the lining, right sides facing each other, and align the seams.
Pin or clip the top edges together, making sure the ribbon and straps (if already attached) are tucked inside. Sew around the top edge completely.
Turn the bag right side out through the opening in the lining. Push out the corners and edges gently to shape the bag.
Sew the opening in the lining closed using a small, neat stitch. You can do this by hand or with your machine.
Push the lining into the bag and press the top edge flat. Topstitch around the top of the bag to give it a clean, finished look and help it hold its shape.
Add any final ribbon accents, such as a bow or decorative trim, to personalize your Ribbon Accent Bag – Free Pattern.
4. Adding Straps and Finishing Touches
Straps can be made from fabric, webbing, or even matching ribbon, depending on your preference. Cut them to your desired length and attach securely to the top edge of the bag.
Make sure the straps are even and reinforced with backstitching for durability. If your bag is larger or intended to carry heavier items, consider double stitching.
Optional closures like magnetic snaps, zippers, or button loops can be added at this stage. These help keep your belongings safe and add extra polish.
Press your entire bag carefully, paying attention to seams and edges. A crisp finish makes your project look professional and ready to use.
If you want to add a label, charm, or any other embellishments, now is the time. These small details make your bag one-of-a-kind.
Take a moment to admire your finished Ribbon Accent Bag – Free Pattern—a beautiful, handmade accessory that reflects your creativity and skill.
FAQ about Ribbon Accent Bag – Free Pattern
What kind of ribbon is best for this bag? Satin, grosgrain, and velvet ribbons work well. Choose a width and texture that complements your main fabric and desired style.
Can I make this bag without a sewing machine? Yes, though it will take longer. Hand-stitching is possible with strong thread and patience.
Is this pattern good for beginners? Absolutely! This project is simple and straightforward, making it ideal for those new to sewing.
How can I make the bag more durable? Use interfacing, strong fabrics, and double-stitch stress points like the strap attachments.
Can I resize the bag pattern? Yes, simply scale your pattern pieces up or down based on your needs.
What is the best fabric for this pattern? Medium-weight cotton or canvas provides the right balance of structure and flexibility.
Join our VIP broadcast list and gain access to exclusive patterns, all for free. As a VIP member, you’ll receive the best patterns daily, delivered directly to your device. ✨📱 It’s a unique opportunity to stay up-to-date with the latest trends and designs, curated just for you. Don’t miss out on enhancing your projects and discovering new inspirations with the best patterns every day! 🎨🔝
Conclusion
The Ribbon Accent Bag – Free Pattern is not only a fun and rewarding sewing project, but it also gives you a practical accessory that’s completely customizable. From fabric selection to final details, this tutorial has guided you through each step to ensure success. Whether you’re making this for yourself or as a heartfelt gift, the end result is sure to impress.
We’d love to hear what you think—please leave a sincere comment below and let us know how your project turned out, or share suggestions for future patterns!


