
Macrame Heart Bracelet - Free Tutorial

The Shamrocks in a Row Crochet Hat is a fun and festive crochet project that’s perfect for celebrating St. Patrick’s Day or adding a touch of luck to your wardrobe.
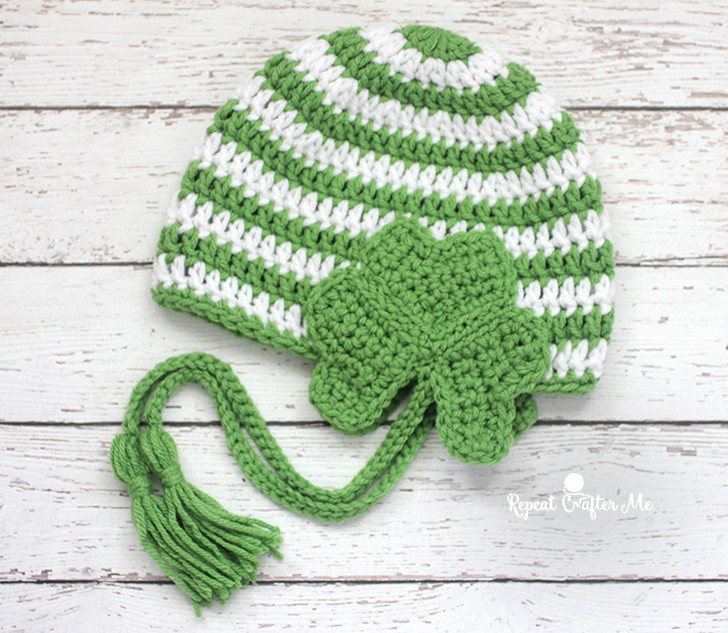
This hat features adorable shamrocks stitched in a row, creating a delightful design that adds charm to any outfit. Whether you’re a beginner or an experienced crocheter, this project offers an opportunity to practice your skills while creating a beautiful and wearable piece.
Crocheting a Shamrocks in a Row Crochet Hat is an enjoyable experience that allows you to experiment with different yarns and colors. The design itself is simple yet striking, making it an excellent choice for those who want to add a little creativity to their crochet projects.
By the end of this tutorial, you’ll have a stylish and unique hat that you can wear with pride or gift to someone special.
In this step-by-step guide, we’ll walk you through the materials needed, the crochet techniques involved, and how to make the hat. We’ll also cover the shamrock motif and how to incorporate it into the design. Let’s get started on making this charming Shamrocks in a Row Crochet Hat!
Before you begin, it’s essential to gather the necessary materials for this project. Here’s what you’ll need to make your Shamrocks in a Row Crochet Hat:
Yarn: Choose a yarn that is soft and comfortable to wear. A worsted-weight yarn (such as Red Heart Super Saver or Lion Brand Vanna’s Choice) works well for this project. For the main hat, you can choose a neutral color like green, white, or black, and for the shamrocks, use a contrasting green color to make them stand out.
Crochet Hook: A 5mm (H-8) crochet hook is recommended for this pattern, but you can adjust the hook size depending on your yarn and the fit you desire for your hat.
Scissors: Always have a pair of scissors on hand to cut your yarn when you finish a round or need to change colors.
Yarn Needle: A yarn needle is necessary to weave in the ends when you finish your hat. It will help keep your work tidy and polished.
Stitch Markers: If you’re new to crochet, stitch markers can be helpful in marking the beginning of each round, ensuring that your stitches are evenly spaced.
Now that you have your materials ready, you’re all set to begin your Shamrocks in a Row Crochet Hat!
To begin the Shamrocks in a Row Crochet Hat, you’ll first need to crochet the base of the hat. The base is made by working in rounds, and it starts with a foundation circle that gradually increases in size.
1. Start with a Magic Ring: Begin by making a magic ring, which allows you to crochet in a circle without leaving a hole in the center. Alternatively, you can chain 4 and join with a slip stitch to form a ring.
2. Round 1: Crochet Double Crochet Stitches: For the first round, chain 3 (counts as a double crochet) and work 11 more double crochet stitches into the magic ring. Join with a slip stitch to the top of the beginning chain-3. You should now have 12 double crochet stitches in your first round.
3. Round 2: Increase Stitches: In the second round, crochet 2 double crochet stitches into each stitch from the previous round. This will double the number of stitches, giving you 24 stitches by the end of the round. Join with a slip stitch to the top of the first chain-3.
4. Round 3: Continue to Increase: For round 3, work 1 double crochet stitch in the first stitch, then 2 double crochet stitches in the next stitch. Repeat this pattern around the entire round. You should now have 36 stitches. Join with a slip stitch.
5. Rounds 4-6: Maintain the Same Stitch Count: Continue crocheting in rounds, working 1 double crochet stitch in each stitch around without increasing. These rounds will form the body of the hat.
6. Check for Fit: Try the hat on as you work to ensure that it fits snugly around your head. You may need to add or subtract rounds depending on your desired size. Once you’ve reached the correct height, it’s time to move on to the fun part: the shamrock row!
The Shamrocks in a Row is what makes this hat truly special. Crocheting the shamrock motif requires a few additional techniques, but don’t worry—we’ll walk you through it step by step.
1. Make the Shamrock Motif: Start by creating the shamrock’s first leaf. To do this, chain 6 and join with a slip stitch to form a small ring. In this ring, work 3 double crochets, followed by 2 chain stitches. Then, crochet 3 more double crochets into the ring. This forms the first leaf.
2. Add the Second and Third Leaves: Repeat the previous step to create the second and third leaves of the shamrock. Each leaf should be made of 3 double crochets with 2 chain stitches between them.
3. Finish the Shamrock: Once you have three leaves, finish the shamrock by adding a chain stem. Chain 5, then join the chain to the base of the first leaf with a slip stitch.
4. Repeat the Shamrock Pattern: Make multiple shamrocks, depending on how many you want in a row. Keep in mind that you’ll need to space them evenly along the hat.
5. Attach the Shamrocks to the Hat: Once your shamrocks are made, attach them to the hat by using a yarn needle to sew them along the edge of the hat. Space them evenly so that they form a beautiful row of shamrocks.
6. Add Final Touches: Weave in any loose ends and make sure the shamrocks are securely attached. You can also add a decorative button or charm to the center of each shamrock to give them an extra pop!
Now that the shamrocks are in place, it’s time to finish off the hat and make it look polished.
1. Crochet a Brim (Optional): If you want to add a brim to your hat, you can work a few rounds of single crochet stitches around the bottom edge. This will give the hat a neat, finished look and help it maintain its shape.
2. Weave in the Ends: Use a yarn needle to weave in any loose yarn ends. Be sure to hide the ends inside the stitches to keep them secure and prevent them from unraveling.
3. Add Any Embellishments: If you like, you can add extra embellishments to your hat. For example, add small beads, rhinestones, or fabric flowers to further decorate the shamrocks or to create a unique design.
4. Block the Hat: If you want the hat to keep its shape and look crisp, consider blocking it. To block the hat, lightly dampen it with water and shape it over a bowl or head form. Let it dry completely before wearing.
5. Try It On: After finishing all the details, try the hat on for fit. Make any necessary adjustments and ensure it fits comfortably around your head.
6. Enjoy Your New Hat: Congratulations! You’ve successfully completed your Shamrocks in a Row Crochet Hat. You can now wear it to celebrate St. Patrick’s Day or as a fun and stylish accessory any time of the year.
Q1: What is the best yarn to use for this hat?
A: A worsted-weight yarn is ideal for this project. Choose soft, comfortable yarn such as Red Heart Super Saver or Lion Brand Vanna’s Choice.
Q2: How can I make sure my hat fits properly?
A: To ensure a good fit, crochet the hat to the size of your head, and try it on as you go. If needed, adjust the number of rounds to achieve the perfect size.
Q3: Can I use other colors for the shamrocks?
A: Yes! While green is traditional for shamrocks, you can experiment with other colors for a fun and unique twist on the pattern.
Q4: How do I attach the shamrocks to the hat?
A: Use a yarn needle to sew the shamrocks onto the hat, spacing them evenly across the brim.
Q5: Can I make this pattern in a child’s size?
A: Yes, you can easily adjust the size by reducing the number of rounds or using a smaller hook.
Q6: Can I add a pom-pom to the top of the hat?
A: Absolutely! Adding a pom-pom can give the hat a playful and finished look.
Join our VIP broadcast list and gain access to exclusive patterns, all for free. As a VIP member, you’ll receive the best patterns daily, delivered directly to your device. ✨📱 It’s a unique opportunity to stay up-to-date with the latest trends and designs, curated just for you. Don’t miss out on enhancing your projects and discovering new inspirations with the best patterns every day! 🎨🔝
The Shamrocks in a Row Crochet Hat is a charming and festive project that’s perfect for adding a touch of St. Patrick’s Day spirit to your wardrobe. By following this easy-to-understand tutorial, you can create a beautiful hat with adorable shamrocks stitched in a row. We hope you’ve enjoyed this project and that it inspires you to try more crochet patterns in the future.
Feel free to share your thoughts and creations with us in the comments below. We’d love to see how your Shamrocks in a Row Crochet Hat turned out, and we look forward to hearing your suggestions for future tutorials! Happy crochet


