
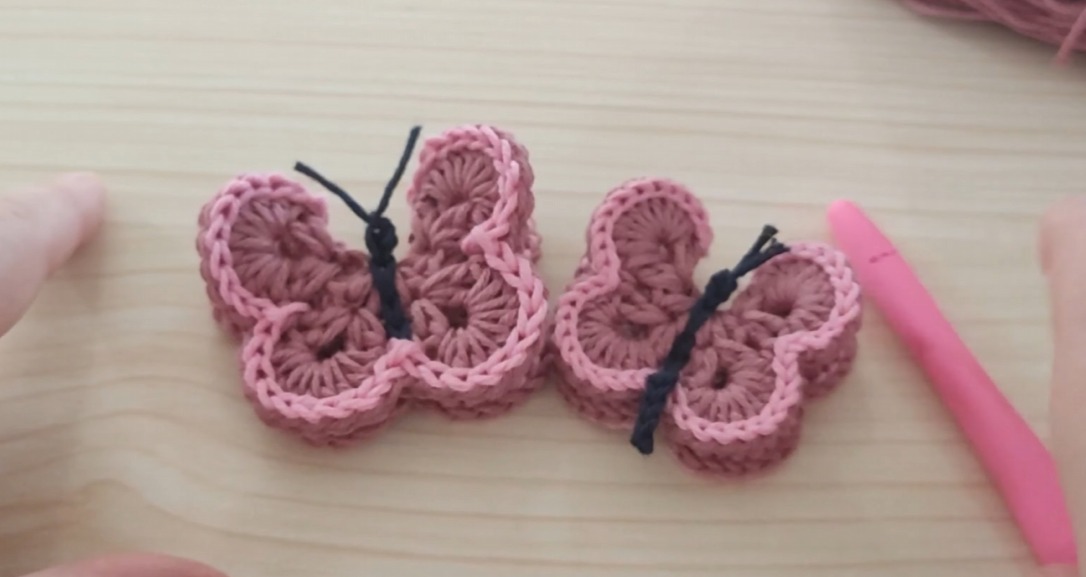
If you are looking for a beautiful and easy project, the Simple Relief Butterfly – Crochet Pattern is a wonderful choice. This charming butterfly design adds texture and elegance to any crochet piece.
Whether you are embellishing a blanket, scarf, bag, or simply creating cute decorations, this pattern offers creativity and joy.
Learning how to crochet the Simple Relief Butterfly – Crochet Pattern is perfect for crafters of all skill levels. Its textured look gives the illusion of complexity while being surprisingly simple to make.
This project is also a fantastic way to use leftover yarn, offering a sustainable and satisfying crafting experience.
In this complete guide, you will discover how to create your own Simple Relief Butterfly – Crochet Pattern, from choosing the right materials to understanding stitches and finishing touches. Follow this step-by-step tutorial to bring your butterfly to life in a fun and relaxing way.
1. Materials and Tools You Will Need
To start making the Simple Relief Butterfly – Crochet Pattern, the first step is gathering your materials. Having the right tools makes your crochet experience smooth and enjoyable.
Choose a soft, high-quality yarn that highlights the texture of the butterfly. Cotton yarn is a popular choice for its stitch definition, but you can also use acrylic or blended yarns based on your project’s needs.
Select a crochet hook size that complements your yarn. Typically, a 3.5mm to 4.5mm hook works well for detailed motifs like the Simple Relief Butterfly – Crochet Pattern, but always check the yarn label for recommendations.
You’ll also need scissors for trimming yarn and a yarn needle for weaving in the ends. Stitch markers can be helpful if you want to keep track of your rounds or stitch counts, especially if you’re new to crochet.
Adding optional elements like beads, buttons, or embroidery can enhance your butterfly’s appearance. Make sure that any decorations are securely attached, especially if the butterfly is used on items for children.
Safety is essential, so choose non-toxic, washable materials if the butterfly will be part of wearable items or baby accessories. Always prioritize comfort and durability.
Before you begin, organize your tools and choose your favorite yarn colors. Bright shades, pastels, or even variegated yarns can bring beautiful effects to your Simple Relief Butterfly – Crochet Pattern.
2. Basic Stitches and Techniques
Understanding the stitches involved is key to mastering the Simple Relief Butterfly – Crochet Pattern. Luckily, this pattern uses basic techniques that are beginner-friendly yet look impressive.
The main stitches commonly used include chain (ch), single crochet (sc), double crochet (dc), and slip stitch (sl st). These form the foundation for creating the butterfly’s shape and texture.
The “relief” aspect comes from using front post and back post double crochet stitches. These stitches raise certain parts of the butterfly, giving it a 3D appearance that pops from the fabric.
To form the wings, crochet increases and cluster stitches are typically used. These help shape the rounded parts of the butterfly, making them symmetrical and full.
For the body of the butterfly, a small set of tight stitches creates a narrow, elongated shape. This part connects the wings and serves as the center of the butterfly design.
Joining different parts together may require simple sewing with a yarn needle or crocheting directly into previous stitches, depending on the chosen method.
Finally, adding antennae is a simple but effective detail. You can create these by chaining a small number of stitches and securing them, or by using yarn tails left from finishing your work.
3. Step-by-Step Guide to Crochet the Butterfly
Now let’s dive into creating the Simple Relief Butterfly – Crochet Pattern step by step. This process is both fun and rewarding, resulting in a lovely decorative motif.
Begin by making a magic ring or a small chain circle. This forms the center of your butterfly and is where the wings will connect.
Crochet the upper wings first. Typically, these are larger and involve a combination of double crochets, chains, and clusters. Work several stitches into one space to create the curved, full shape.
Move on to the lower wings. These are usually smaller and require fewer stitches but should mirror the upper wings in symmetry and balance.
Once the wings are complete, work on the butterfly’s body. This is often a row of single crochet stitches worked vertically between the two sets of wings to form a straight center.
Create the antennae by chaining a few stitches on both ends of the top of the body. Secure them with a slip stitch or knot to prevent unraveling.
Finish by weaving in all ends securely. If you want, you can also lightly block the butterfly to help it lay flat or hold its shape better, especially if using cotton yarn.
4. Creative Uses and Finishing Touches
The Simple Relief Butterfly – Crochet Pattern isn’t just a pretty motif; it’s a versatile addition to many projects. You can use it in countless creative ways.
Sew the butterfly onto blankets or throws to add a touch of charm and color. They make perfect embellishments for baby items, adding a whimsical feel.
Use the butterfly as an applique for bags, hats, or scarves. Its textured design stands out beautifully on plain backgrounds, giving everyday items a unique look.
Turn your crochet butterflies into fridge magnets by attaching a small magnet to the back. They brighten up kitchen spaces and make lovely handmade gifts.
Make garlands by stringing several butterflies together. This is a great decoration idea for nurseries, birthdays, or festive occasions.
Add finishing touches with beads, glitter yarn, or embroidery details. These small accents elevate the appearance of the Simple Relief Butterfly – Crochet Pattern, making it even more eye-catching.
If you prefer functional items, you can even attach a keychain ring or brooch pin to your butterfly. This turns it into a portable, wearable piece of art.
FAQ About Simple Relief Butterfly – Crochet Pattern
1. Is the Simple Relief Butterfly – Crochet Pattern beginner-friendly?
Yes! The pattern uses basic stitches like chain, single crochet, and double crochet. Even the relief stitches are easy to learn with a bit of practice.
2. What is the best yarn for crocheting a butterfly?
Cotton yarn is highly recommended for its stitch definition and durability. However, acrylic yarn and blended yarns also work well depending on your project needs.
3. How big is the finished butterfly?
The size depends on your yarn and hook. Typically, it ranges between 3 to 5 inches wide, but you can adjust by changing the hook size or yarn thickness.
4. Can I use this pattern to decorate clothing?
Absolutely. The Simple Relief Butterfly – Crochet Pattern is perfect for embellishing clothing items like hats, baby dresses, jackets, or bags.
5. How do I make the butterfly stiff for decorations?
You can stiffen the butterfly by using a fabric stiffener, a diluted glue mixture, or by blocking it using water and pins to shape it as it dries.
6. Can I sell items made with this pattern?
Yes, handmade items created using the Simple Relief Butterfly – Crochet Pattern can be sold. Just make sure you are not reselling the pattern itself if it belongs to a designer.
Conclusion
In this complete guide to the Simple Relief Butterfly – Crochet Pattern, you’ve learned how to choose materials, master the stitches, create the butterfly step-by-step, and apply creative uses for your finished piece. This adorable crochet motif is both simple and impressive, perfect for adding a handmade touch to your projects.
VIDEO TUTORIAL
I hope this tutorial has inspired you to create your own butterflies. If you enjoyed this guide, please leave a sincere opinion below. Your suggestions and feedback are incredibly valuable and help us continue bringing helpful crochet content to you and other makers. Happy crocheting!


