
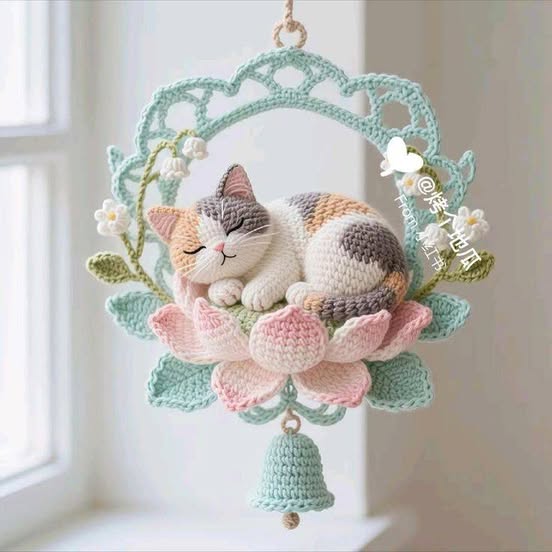
If you’ve ever wanted to create an adorable crochet project, this SLEEPING CAT Amigurumi Tutorial is perfect for you. This step-by-step guide will help you craft a cute little cat that looks like it’s peacefully napping.
Whether you are a beginner or an experienced crocheter, this project offers the perfect blend of simplicity and charm.
The SLEEPING CAT Amigurumi Tutorial is designed to teach you how to crochet a cozy, sleeping feline using basic stitches and techniques. It’s a relaxing and enjoyable project, and the result is a soft, cuddly companion perfect for gifts, decor, or even as a stress-relief item.
Throughout this article, we will walk you through the materials, stitches, and detailed steps needed to create your very own SLEEPING CAT Amigurumi.
You’ll also find helpful tips to make the process smoother and more enjoyable. Let’s dive into the creative world of amigurumi together!
1. Materials Needed for the SLEEPING CAT Amigurumi Tutorial
Before you start crocheting, it’s important to gather all the materials you’ll need for this SLEEPING CAT Amigurumi Tutorial. Having everything prepared will make the process much more enjoyable and efficient.
First, you’ll need the right type of yarn. Soft cotton or acrylic yarn works best for amigurumi because it holds its shape well. A medium-weight yarn is highly recommended for this project.
Next, choose a crochet hook that matches the yarn weight. Typically, a 2.5mm to 3.5mm hook works perfectly for the SLEEPING CAT Amigurumi Tutorial. A smaller hook ensures tighter stitches, which is ideal for stuffing.
You’ll also need fiberfill or polyester stuffing. This material will give your SLEEPING CAT Amigurumi a plush and firm shape, making it look neat and cuddly.
Don’t forget a yarn needle. You’ll use it to sew the parts together and weave in the loose ends. Sharp scissors are also essential for cutting yarn cleanly.
Safety eyes are optional but highly recommended. They give your sleeping cat a professional and adorable finish. Alternatively, you can embroider the eyes for a softer look.
Finally, stitch markers are helpful to keep track of your rounds. Since most amigurumi patterns work in continuous spirals, markers will help prevent mistakes.
2. Basic Stitches and Techniques for the SLEEPING CAT Amigurumi
Understanding the basic stitches is crucial for successfully following the SLEEPING CAT Amigurumi Tutorial. If you’re familiar with these stitches, you’ll find the process much smoother.
The foundation stitch for most amigurumi, including this SLEEPING CAT Amigurumi, is the magic ring. This technique creates a tight, adjustable ring that starts the piece with no hole in the center.
Single crochet (sc) is the primary stitch used. It creates a dense fabric, perfect for stuffed animals. You’ll use single crochet throughout the body, head, and limbs.
Increasing stitches (inc) are used to widen your work. This involves making two single crochets in the same stitch. It’s crucial for shaping the cat’s body and head.
Decreasing stitches (dec) help taper your work. This stitch involves crocheting two stitches together, and it’s essential for closing parts like the head and limbs of the SLEEPING CAT Amigurumi.
Slip stitch (sl st) is often used to join rounds or finish pieces neatly. It creates a seamless look and is commonly used at the end of the tail or ears.
Lastly, knowing how to change colors seamlessly can add character to your SLEEPING CAT Amigurumi. Whether you want stripes or patches, color changes are simple but make a huge visual difference.
3. Step-by-Step Guide to Making the SLEEPING CAT Amigurumi
Now that you have your materials and understand the basic stitches, let’s start creating the SLEEPING CAT Amigurumi step by step. Follow each section carefully for the best results.
Start with the body. Using the magic ring technique, crochet in continuous spirals, gradually increasing to create a round, plump body. After reaching the widest point, you’ll decrease to shape the bottom.
Next, create the head. The process is similar to the body but slightly smaller. Begin with a magic ring, increase to form the head’s width, then decrease to close it. Stuff it firmly before sealing.
Move on to the ears. Crochet two small triangles using single crochet stitches. Once done, slightly fold them and sew them onto the head to give the ears a natural sleeping-cat position.
Craft the front paws. These are small cylindrical shapes that start with a magic ring, followed by several rounds of single crochet. Stuff lightly before closing and attaching to the body.
The hind legs are shaped differently, slightly larger and curved to mimic the cat’s natural sleeping pose. This detail adds realism to your SLEEPING CAT Amigurumi.
Finally, make the tail. Crochet a thin, long tube, then lightly stuff it and curve it into a relaxed position around the body. Attach it securely to complete the look.
4. Finishing Touches and Tips for the SLEEPING CAT Amigurumi
With all parts assembled, it’s time to give your SLEEPING CAT Amigurumi its final touches. Small details can make a big difference in the finished look.
Begin by sewing the head securely onto the body. Make sure it’s aligned properly to maintain the cat’s sleeping posture. Take your time with this step.
Attach the ears symmetrically. Position them slightly tilted to reflect a relaxed, peaceful look. This small adjustment enhances the cuteness factor.
Sew the front and back legs carefully. Position them so they look naturally folded, mimicking how a real cat sleeps. This gives your SLEEPING CAT Amigurumi a lifelike appearance.
Add facial features. If using safety eyes, insert them before closing the head. For a softer look, embroider closed eyes with black yarn to create a gentle sleeping expression.
Use a little pink or light-colored yarn to embroider a tiny nose. This adds an adorable touch and brings more character to your creation.
Finally, check for any loose ends or gaps. Weave in all ends securely, and adjust the stuffing if necessary. Your SLEEPING CAT Amigurumi is now complete and ready to bring smiles to anyone who sees it!
FAQ About SLEEPING CAT Amigurumi Tutorial
1. Is the SLEEPING CAT Amigurumi Tutorial suitable for beginners?
Yes, this tutorial is beginner-friendly. It mainly uses basic stitches like single crochet, increases, and decreases. If you know these, you can follow along easily.
2. How long does it take to make the SLEEPING CAT Amigurumi?
On average, it takes about 4 to 6 hours to complete, depending on your crochet speed and experience level.
3. What type of yarn is best for the SLEEPING CAT Amigurumi?
Cotton or acrylic yarn is ideal. Choose a medium-weight yarn for the best results, as it holds its shape well and is easy to work with.
4. Can I customize the color of the SLEEPING CAT Amigurumi?
Absolutely! While the classic design may use neutral or tabby colors, you can use any color you like to make it unique.
5. Do I have to use safety eyes for this project?
No, safety eyes are optional. You can embroider the eyes if you prefer a softer or safer option, especially for gifts intended for young children.
6. How do I keep the stitches tight enough for amigurumi?
Use a smaller hook than recommended for your yarn and maintain even tension. This prevents gaps between stitches and keeps the stuffing inside securely.
Conclusion
In this SLEEPING CAT Amigurumi Tutorial, we’ve covered everything you need to create your very own adorable sleeping cat. From choosing materials and learning essential stitches to assembling and adding final touches, this guide offers a comprehensive approach for crocheters of all levels.
VIDEO TUTORIAL
We hope you enjoyed following this tutorial and feel proud of your finished project. If you tried making this SLEEPING CAT Amigurumi, please leave your honest opinion in the comments. We’d love to hear about your experience, suggestions, or ideas for future tutorials. Your feedback helps us grow and continue sharing joyful crochet projects!


