
Macrame Heart Bracelet - Free Tutorial

Solid Granny Square Crochet – Free Pattern is a timeless crochet pattern that has been loved by crafters for generations. Its simplicity, versatility, and ease of customization make it a perfect project for both beginners and experienced crocheters alike.
Whether you’re making a blanket, a pillow cover, or even a scarf, the solid granny square adds texture and color to any creation.
In this article, we’ll provide a step-by-step guide to help you create your own beautiful granny squares, and we’ll explain how you can adapt the pattern to suit your personal style.
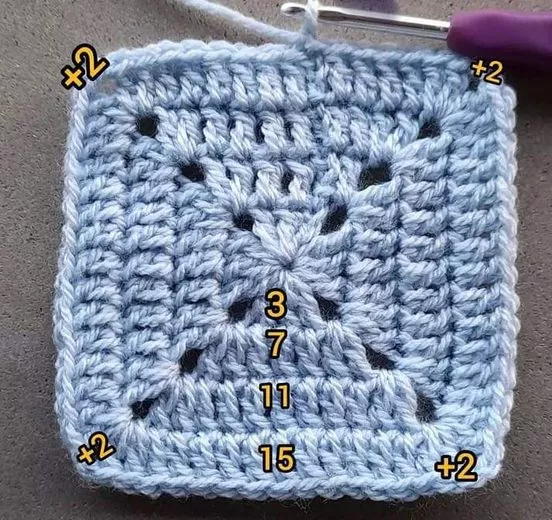
Image from google.
The solid granny square pattern is simple to learn and can be used in many different ways. It involves working in the round, starting from a small center and expanding outward.
The key to mastering this pattern is understanding how to work the stitches in each round and how to adjust the number of stitches to create the perfect square. By using different color combinations, you can create stunning visual effects in your crochet projects.
In this tutorial, we will teach you how to make a solid granny square crochet – free pattern. We’ll walk you through the steps of creating your own granny square, provide tips for beginners, and explain how you can make this pattern your own.
If you’re new to crocheting or looking for a new pattern to try, the solid granny square is a great place to start.
Before you begin, it’s important to gather all the necessary materials. Having the right tools and yarn will make your crocheting experience much smoother and more enjoyable.
To start your solid granny square crochet – free pattern, you will need yarn. For beginners, it’s recommended to choose a medium-weight yarn such as worsted weight yarn (Category 4). This type of yarn is ideal because it’s easy to work with and produces a nice, sturdy square. You can choose any color combination you like, depending on the look you want to achieve. Many crocheters like to use multiple colors to create a vibrant and eye-catching design, but a single color also works beautifully for a more uniform appearance.
In addition to the yarn, you’ll need a crochet hook. The size of your hook will depend on the yarn you’re using. For worsted weight yarn, a H-8 (5mm) crochet hook is generally a good choice. You can adjust the size of your hook based on your personal tension and how loose or tight you crochet.
You’ll also need a scissors to cut your yarn when you’re finished with each round, and a yarn needle for weaving in the ends. The yarn needle is particularly helpful for securing the yarn at the end of your project, ensuring your work stays intact.
Lastly, consider having some stitch markers on hand. These are not essential but can help keep track of your rounds and ensure you’re working in the right place. They are especially useful when you’re working with color changes or when making a large project with many squares.
Now that you have your materials ready, it’s time to start creating your solid granny square crochet – free pattern. Follow these step-by-step instructions to make your first square.
Begin by making a slip knot with your yarn and placing it on your crochet hook. Then, chain 4 stitches. After chaining 4, join the last chain to the first chain using a slip stitch to form a small ring. This ring will be the center of your granny square.
Now, chain 3 stitches. This will count as your first double crochet stitch. Then, work 2 double crochets into the ring. After that, chain 2 stitches, and make 3 more double crochets into the ring. Continue this pattern of making 3 double crochets, followed by a chain 2 space, until you have a total of four groups of 3 double crochets. Join the round by using a slip stitch into the top of the starting chain 3.
For the second round, start by chaining 3 stitches. This again counts as your first double crochet. Then, make 2 more double crochets into the space between the first two groups of double crochets. After that, chain 2 stitches. Continue to work 3 double crochets into the next space, and repeat this process for each space around the square. When you complete the round, join with a slip stitch into the top of the starting chain.
For the third round, repeat the same steps as Round 2. You will now be working into the spaces between the previous clusters of double crochets. For each space, make 3 double crochets, followed by 2 chain stitches. After finishing the round, join with a slip stitch into the top of the starting chain.
Repeat the steps for additional rounds if you want to make your square larger. Each new round will add more stitches, expanding the square. Continue working in the same manner, always creating 3 double crochets in each space and chaining 2 stitches between the groups.
Once your square has reached the desired size, finish off by cutting the yarn and pulling it through the last loop. Use a yarn needle to weave in the ends, ensuring they are secure and hidden within the stitches.
To help you master the solid granny square crochet – free pattern, here are some helpful tips and tricks.
Consistency is key when crocheting granny squares. Keeping your tension even will ensure that each square has the same size and shape. If you notice your squares are becoming too tight or too loose, adjust your tension to make the stitches more uniform.
Using stitch markers is a great way to keep track of your rounds and ensure your stitches are in the right place. Place a stitch marker in the first stitch of each round to make it easier to join the rounds together later.
While the solid granny square is typically made with one color, you can get creative with color changes. Try adding a new color in each round for a multicolored square, or use gradient yarn for a smooth transition between colors.
Blocking your finished squares is an excellent way to shape them and ensure they all have the same dimensions. Wet block your squares by dampening them and pinning them into place on a flat surface. Allow them to dry completely before joining them together.
When you’re ready to join your granny squares, there are several methods you can use, including whip stitch, slip stitch, or even crocheting them together. Choose the method that best suits your project for a clean, professional finish.
If you’re new to making granny squares, start with a small project, such as a coaster or a small pillow cover. This will allow you to practice the technique without feeling overwhelmed by a larger project.
Once you’ve mastered the solid granny square crochet – free pattern, the possibilities for your projects are endless. Here are some creative ideas to inspire your next crochet project.
One of the most popular uses for granny squares is to create a blanket or throw. You can make squares of different colors and join them together to create a cozy and colorful blanket that will add warmth to any room.
If you’re looking for a wearable crochet project, a granny square scarf or shawl is a great choice. Use smaller squares and join them together to create a lightweight and stylish accessory for any season.
A pillow cover made from granny squares is a quick and easy project. You can create a unique design by using different colors or adding special stitches to your squares.
Crochet bags are always in style, and granny squares are a fantastic way to make a unique, custom bag. Choose bold colors or soft pastels, and you’ll have a bag that’s perfect for everyday use.
A baby blanket made from soft, colorful granny squares is a thoughtful gift for a new parent. Use soft yarn and pastel colors to create a sweet and cozy blanket for a baby’s nursery.
Granny squares can also be used to make unique wall hangings or tapestries. Combine different patterns of granny squares to create a beautiful piece of art for your home.
1. What is a solid granny square crochet pattern?
A solid granny square crochet pattern is a type of crochet square that is worked in the round, with each round adding more double crochet stitches and chain spaces to form a square shape.
2. How do I make my granny squares uniform in size?
To make your granny squares uniform in size, it’s important to keep your tension consistent. Make sure each stitch is the same size, and use stitch markers to keep track of each round.
3. Can I use any yarn for making granny squares?
Yes, you can use any yarn, but medium-weight yarn such as worsted weight (Category 4) is a great option for beginners. It’s easy to work with and provides a sturdy texture for your squares.
4. How do I join granny squares together?
You can join granny squares using a variety of methods, including whip stitch, slip stitch, or crocheting them together. Choose the method that works best for your project.
5. Can I use the solid granny square pattern for large projects?
Yes, the solid granny square pattern is perfect for larger projects like blankets, throws, and pillows. Just make more squares and join them together to create larger items.
Join our VIP broadcast list and gain access to exclusive patterns, all for free. As a VIP member, you’ll receive the best patterns daily, delivered directly to your device. ✨📱 It’s a unique opportunity to stay up-to-date with the latest trends and designs, curated just for you. Don’t miss out on enhancing your projects and discovering new inspirations with the best patterns every day! 🎨🔝
In this tutorial, we’ve explored the basics of the solid granny square crochet – free pattern, from gathering materials to completing your first square. We’ve provided tips for beginners and suggestions for creating a variety of projects using this versatile pattern. Whether you’re making a blanket, scarf, or bag, the solid granny square is a fun and rewarding crochet technique to master.
We’d love to hear your thoughts on this tutorial! If you have any questions or suggestions, please leave a comment below. Your feedback helps us improve and provide more helpful content. Happy crocheting!


