
The Square Flower Crochet Bag – Free Pattern is a delightful project that combines function and beauty in the world of handmade crafts. Whether you’re a beginner or a seasoned crocheter, this pattern provides a satisfying and enjoyable experience.
The use of vibrant colors and floral motifs makes this bag not only practical for everyday use but also stylish and full of personality.
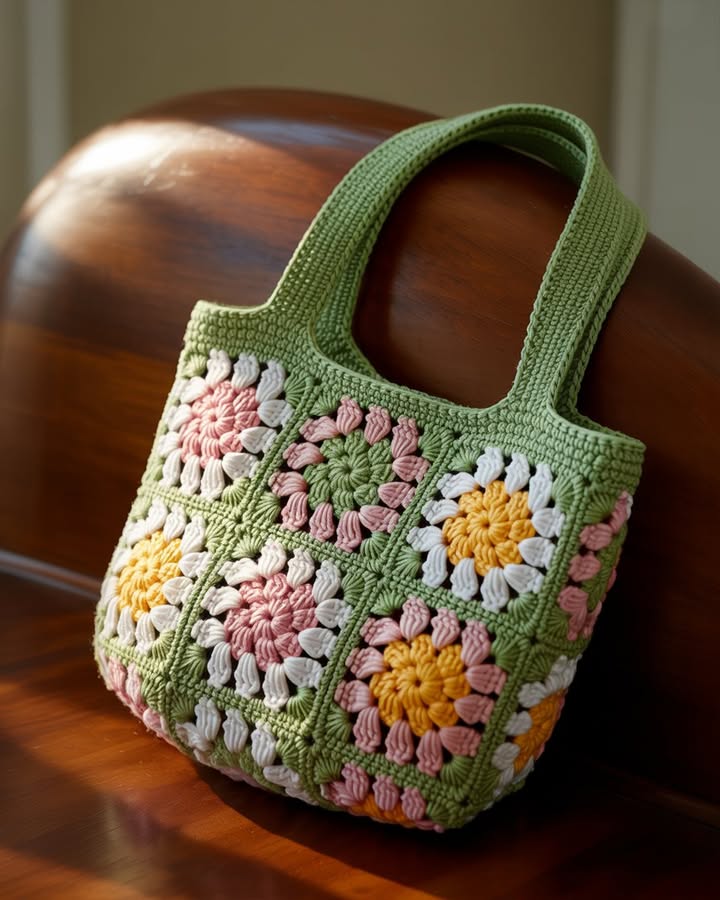
Creating a crochet bag from squares is one of the most charming and versatile techniques in crochet. The process allows crafters to explore individual motifs before assembling them into a cohesive piece.
This approach is also perfect for using leftover yarn and turning it into something both beautiful and functional. The Square Flower Crochet Bag – Free Pattern gives you the chance to experiment with color, texture, and layout while producing a practical accessory.
The charm of this project lies in its simplicity and adaptability. The bag can be resized by adding more squares or changing the hook and yarn weight.
It’s also a great pattern to personalize with different flower styles or even combine squares from various patterns. Whether for personal use, a handmade gift, or a product to sell, this pattern offers an ideal balance between creativity and practicality.
1. Materials Needed for Your Crochet Bag
To begin your Square Flower Crochet Bag – Free Pattern, you’ll need some basic crochet supplies. These materials are easy to find and will help ensure that your final product is sturdy, functional, and beautiful.
First, select your yarn. Cotton yarn is a popular choice for crochet bags because of its durability and soft texture. Choose multiple colors to create contrast between your flower center, petals, and square background. Worsted weight or DK weight yarn works well for this pattern.
Next, choose a crochet hook appropriate for your yarn. Most worsted weight yarns work best with a 5.0mm or 5.5mm hook. Be sure to check the yarn label for guidance and consider making a gauge swatch.
You’ll also need a pair of scissors and a yarn needle. These tools will help you finish off ends and sew the squares together. Stitch markers are optional but can be helpful to keep track of your rounds or to mark joins.
A lining fabric can be added if you want extra durability or to prevent smaller items from slipping through the crochet stitches. This is optional but adds a professional finish to your bag.
Lastly, consider bag handles or straps. You can crochet your own or purchase leather or wooden handles to elevate the look of your finished bag. Handles should be sturdy and securely attached.
2. How to Crochet the Flower Squares
The heart of the Square Flower Crochet Bag – Free Pattern lies in its floral square motifs. These squares are made by crocheting a flower center and building outward into a square shape. They can be worked individually and then joined together later.
Start by creating a magic ring and work your flower’s center. This usually includes a round of double crochets or puff stitches to create texture. Change colors for the petals to make the flower pop.
The second round forms the petals. This often involves working clusters or puff stitches into each stitch from the previous round. Using a different color for the petals can make your flower stand out beautifully.
To turn your round flower into a square, the third and fourth rounds will include chain spaces and corner stitches. This step creates the square shape necessary for assembling the bag.
Make as many squares as needed based on the size of your bag. Most bags will require 13 to 17 squares, depending on dimensions and strap design. Lay them out to visualize the final look before joining.
Join the squares using a slip stitch, whip stitch, or single crochet seam. Each technique gives a different finish, so choose one that complements your style.
Weave in all the yarn tails carefully. A neat finish adds to the overall look of your bag and ensures that it lasts through repeated use.
3. Assembling the Crochet Bag
After completing your flower squares, the next step in the Square Flower Crochet Bag – Free Pattern is assembly. This stage transforms your pile of beautiful motifs into a structured, functional bag.
Begin by arranging your squares on a flat surface. Lay them in the shape of the bag, usually with one central square as the base and the rest forming the sides. Visualizing the layout helps you avoid mistakes.
Start joining the squares row by row. If you’re using the single crochet seam, ensure all joins are consistent and the right sides are facing outward. Keep the seams clean and even.
Once the body of the bag is complete, fold the sides up and join them together. You’ll now have a basic box shape with an open top. Take your time to align corners properly for a polished finish.
Add a border to the top edge of the bag using single crochet or a decorative stitch like crab stitch. This reinforces the opening and adds a professional touch.
If you chose to line your bag, now is the time to cut your fabric to size. Sew the lining separately and attach it to the inside of the bag with a whip stitch or sewing machine.
Finally, attach your chosen handles or straps. Crochet straps can be reinforced by doubling the yarn, while purchased handles can be sewn or riveted securely in place.
4. Creative Customization Ideas
One of the best parts of the Square Flower Crochet Bag – Free Pattern is how customizable it is. You can modify the pattern to match your personality, the seasons, or a specific color palette.
Use gradient yarns for a beautiful transition of colors across your squares. This adds visual interest without needing to change colors manually between rounds.
Try different flower styles for each square. You might combine daisies, roses, or sunflowers depending on your skill level and preference. Each variation adds uniqueness to your project.
Decorate your bag with buttons, beads, or embroidery. These small details add charm and showcase your creativity. Be sure all embellishments are securely attached.
Change the shape of your bag by adjusting the number and layout of squares. You can make a rectangle, cube, or even a small clutch depending on how you join them.
Add a zipper or magnetic snap for security. These options help keep your belongings safe while maintaining a sleek look.
Lastly, make matching accessories like a coin purse or phone holder using leftover yarn. These extras make wonderful gifts and complete your handmade set.
FAQ – Square Flower Crochet Bag – Free Pattern
How many squares do I need to make the Square Flower Crochet Bag? Most designs require between 13 to 17 squares, depending on the desired bag size and style. Adjust the number for larger or smaller bags.
What type of yarn is best for crochet bags? Cotton yarn is ideal because of its strength and shape retention. However, you can also use acrylic or blends depending on your preference and availability.
Can beginners make this pattern? Yes! The Square Flower Crochet Bag – Free Pattern is beginner-friendly. It’s a great way to practice granny squares, color changes, and simple seaming techniques.
Do I need to line the bag? Lining is optional but recommended if you want to carry small items or want extra structure. It also gives your bag a more polished appearance.
Can I sell bags made from this pattern? Yes, as long as the pattern is not sold or claimed as your own, you can sell finished products made from this design. It’s a popular choice for craft fairs and handmade shops.
What stitches are used in the flower square? Common stitches include magic ring, double crochet, puff stitch, chain spaces, and slip stitches. The combination gives the flower its texture and shape.
Conclusion
The Square Flower Crochet Bag – Free Pattern is a wonderful project for anyone looking to combine creativity with practicality. With just a few materials and a bit of time, you can make a personalized, beautiful accessory that’s sure to get compliments wherever you go. This project is not only fun and relaxing but also useful—perfect for gifts, everyday use, or your handmade shop.
VIDEO TUTORIAL
We hope you’ve enjoyed this complete guide to creating your own crochet flower bag. Now it’s your turn! Try the pattern, experiment with colors and textures, and share your results with the community. We’d love to hear your thoughts—leave a sincere comment below and feel free to offer suggestions for future tutorials!


