
Macrame Heart Bracelet - Free Tutorial

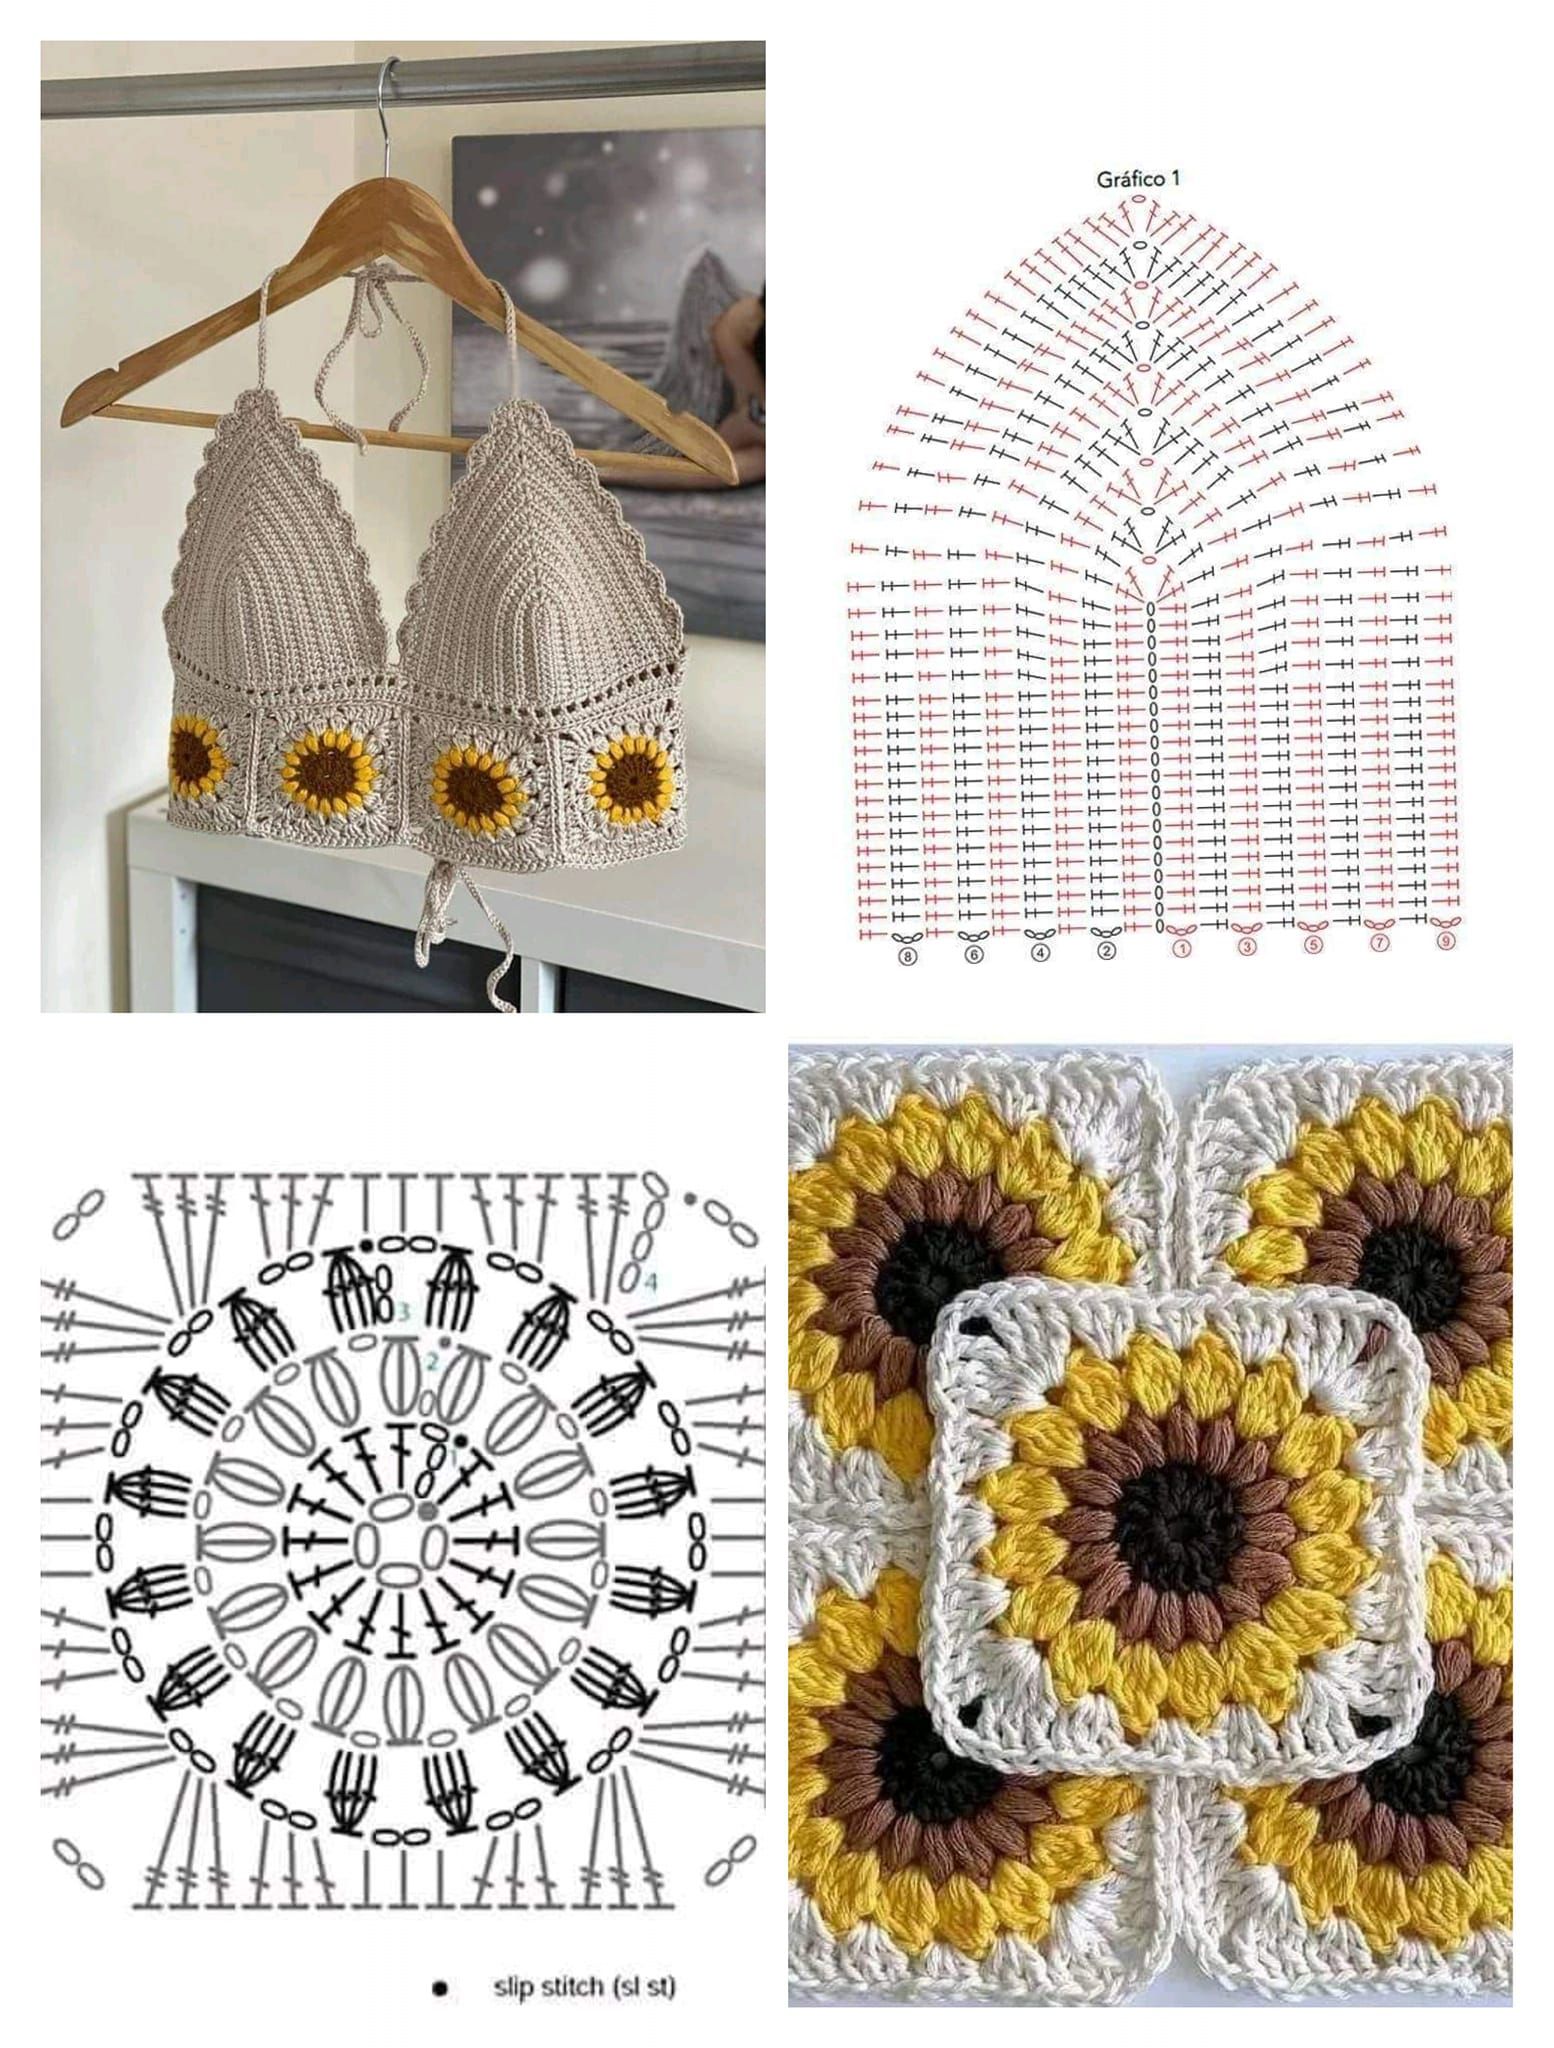
The Sunflower crop top – Free Tutorial is the perfect project for crocheters and crafters who love combining creativity with fashion. This beautiful top features the bold and cheerful sunflower motif, ideal for sunny days, festivals, beachwear, or casual summer outfits.
With this free guide, you’ll learn how to create a unique and vibrant piece that not only showcases your talent but also brightens your wardrobe.
A sunflower crop top is more than just a trendy garment—it’s a statement piece. The sunflower design symbolizes positivity, warmth, and confidence, which is why it’s a popular choice for summer attire.
Making your own crop top gives you control over colors, sizing, and details, making each piece truly one-of-a-kind.
In this Sunflower crop top – Free Tutorial, you’ll find step-by-step instructions, tips on materials and sizing, and customization ideas to personalize your creation.
Whether you’re crafting it for yourself or as a handmade gift, this tutorial is designed to be clear, beginner-friendly, and deeply satisfying to complete.
To begin your Sunflower crop top – Free Tutorial, the first step is selecting the right yarn and tools. A cotton or cotton-blend yarn is the most recommended, as it provides breathability, structure, and comfort. Cotton is also durable and washes well, making it perfect for wearable items.
Pick vibrant colors for your sunflower motif: golden yellow for petals, brown for the center, and green for leaves or accents. You can also experiment with pastel tones or earthy shades for a softer or boho-inspired look.
A lightweight (DK or 3 weight) yarn is ideal for keeping the top breathable and light on the skin. Pair it with a 3.5mm or 4mm crochet hook for tighter, more defined stitches, especially for the flower details that need to hold their shape.
Besides yarn and hooks, you’ll need scissors, a yarn needle for weaving in ends, stitch markers (optional but helpful), and possibly buttons, ties, or elastic depending on your top’s design. If you want adjustable straps, you may also use metal or plastic rings.
Having all your materials ready before starting ensures a smoother crocheting experience. Organize your workspace and keep your yarn untangled, especially if you’re using multiple colors in one sunflower motif.
When choosing your yarn, always test a small swatch to see how the colors work together and how the fabric behaves. A well-chosen material base sets the tone for a beautiful and durable sunflower crop top.
The highlight of this Sunflower crop top – Free Tutorial is the sunflower motif itself. It typically starts with a magic ring or small circle worked in brown yarn to create the flower’s center. This section uses single crochet (sc) or half double crochet (hdc) stitches for a compact base.
Next, the petals are added using golden or yellow yarn. You’ll work chain spaces and double crochet (dc) stitches to shape each petal. Repeat around the center to create the full sunflower bloom. Petals can be slightly overlapped for a 3D effect or laid flat for a clean, classic design.
Each sunflower motif usually consists of two to three rounds for the center and an additional round or two for the petals. The number of petals can vary, but 12–16 petals often create a balanced look.
After completing the flower, you may want to add a border around the motif to square it off. This makes it easier to join multiple motifs or integrate the flower seamlessly into the crop top’s bodice.
If you’re making multiple sunflowers for the top, try to keep your tension consistent so each flower is the same size. Blocking each motif after finishing can help improve shape and appearance.
Once your motifs are complete, you can start attaching them together with whip stitch or slip stitch methods. Make sure the joins are neat and flat to keep the top comfortable and stylish.
Once you’ve prepared your motifs, it’s time to shape the top. Most sunflower crop tops consist of a front panel featuring one or more sunflowers, with straps and a back panel added afterward. You can create a bandeau-style top, a halter neck, or a bralette-style depending on your preference.
To build the front panel, join the sunflower motifs edge to edge, then crochet rows above and below the motifs to achieve your desired height. Use single or half double crochet for a solid and flattering fabric.
Straps can be crocheted separately or directly onto the top. Use chain stitches followed by a row or two of single crochet for basic straps, or try twisted cords or braided yarn for a boho look. Make sure straps are comfortable and secure.
For the back, you can add a solid panel or a lace-up design using chain spaces or eyelets for a tie-up effect. This allows for a better fit and an adjustable design, which is especially useful for handmade garments.
Always try the top on or measure against a well-fitting garment as you work. This helps ensure the top will hug your body nicely without being too tight or too loose. A good fit is key to both comfort and style.
Consider adding an edging or border in a contrasting color to finish the edges and add a polished look. Picot edging, scallops, or simple slip stitch borders all work well for crop tops.
A great part of the Sunflower crop top – Free Tutorial is the freedom to personalize your piece. Change the color palette to suit your wardrobe or the season. Try white petals for a daisy-inspired look, or add ombre yarn for a sunset effect.
You can also modify the length. Turn the crop top into a full-length tank or add fringe for a festival-ready vibe. Extending the body length with more rows or motifs gives the top more coverage while keeping its sunflower charm.
Add embellishments like wooden buttons, lace trims, or even beads for a more personalized touch. You can also pair it with matching accessories like sunflower earrings or headbands for a cohesive outfit.
Layering is another option. Wear the sunflower crop top over a tank, bralette, or lightweight blouse for a cute and modest style. It’s versatile and suitable for different occasions when styled right.
To care for your top, handwashing is best, especially if you’ve added delicate details or mixed yarn types. Dry it flat to preserve the shape and avoid stretching. This will keep your handmade piece looking fresh all season.
Whether you wear it to a summer picnic, beach day, or handmade market, your sunflower crop top is sure to attract compliments. It reflects creativity, positivity, and personal style in every stitch.
Q: Is this sunflower crop top beginner-friendly?
A: Yes! This Sunflower crop top – Free Tutorial uses basic stitches and simple motifs, making it suitable for advanced beginners. Detailed steps are included for every part.
Q: What yarn works best for summer crop tops?
A: Cotton or cotton blends are ideal. They’re breathable, comfortable, and hold shape well, which is perfect for warm-weather wear.
Q: How many sunflower motifs do I need?
A: It depends on your top’s size and design. A simple front panel might use 1–4 motifs. Add more if you want a full sunflower design across the bust.
Q: Can I make the top longer or add sleeves?
A: Absolutely. You can add rows to extend the length or crochet additional motifs to create a longer or sleeved version.
Q: How do I make the crop top adjustable?
A: Add lace-up back details, adjustable straps, or elastic along the top edge. These methods help ensure a better fit for different body types.
Q: What’s the best way to clean my crochet crop top?
A: Hand wash in cold water with mild detergent and dry flat. Avoid wringing or hanging to prevent stretching.
The Sunflower crop top – Free Tutorial is more than just a crochet project—it’s a fun and empowering journey into handmade fashion. You’ve learned how to choose the best yarns, craft sunflower motifs, build the shape of your top, and customize it for your own style.
This guide was created to help you bring color, confidence, and sunshine into your wardrobe. Now it’s your turn to crochet your own sunflower crop top, share your photos, and enjoy the compliments that will surely follow.
If you enjoyed this tutorial, please leave your honest feedback and suggestions. We’d love to hear how your project turned out and what other free crochet tutorials you’d like to see next!


