The Swirly Easter Bunny Crochet – Free Pattern is a delightful and creative project perfect for celebrating the Easter season.
Whether you want to add a whimsical touch to your decorations or create a thoughtful handmade gift, this pattern offers charm and versatility.
Advertising
With its intricate swirls and adorable bunny design, it’s a project that combines fun and craftsmanship.
Crocheting Easter-themed designs has become a beloved tradition for many crafters. This pattern stands out for its unique swirly details, which add a playful and artistic element to the classic bunny motif. Even beginners can enjoy crafting this project, as the pattern is straightforward and easy to follow.
In this guide, we’ll explore everything you need to know about creating your very own Swirly Easter Bunny Crochet – Free Pattern, from materials and instructions to creative ways to use the finished product. Let’s hop right into it!
1. Materials You’ll Need for the Swirly Easter Bunny
To get started on your Swirly Easter Bunny Crochet – Free Pattern, gather the following materials:
Advertising
Yarn: Choose soft pastel shades like pink, blue, or yellow for a classic Easter look. Acrylic or cotton yarn works best.
Crochet Hook: Match the hook size to your yarn weight, typically a 3.5mm to 4mm hook for this project.
Stuffing: Use fiberfill to give your bunny a plush and cuddly appearance.
Scissors: Sharp scissors for trimming yarn and finishing details.
Tapestry Needle: For sewing parts together and weaving in ends.
Optional Embellishments: Add small beads, ribbons, or buttons for extra charm.
Having the right materials ensures that your bunny will turn out both adorable and durable.
2. Step-by-Step Instructions for the Swirly Easter Bunny
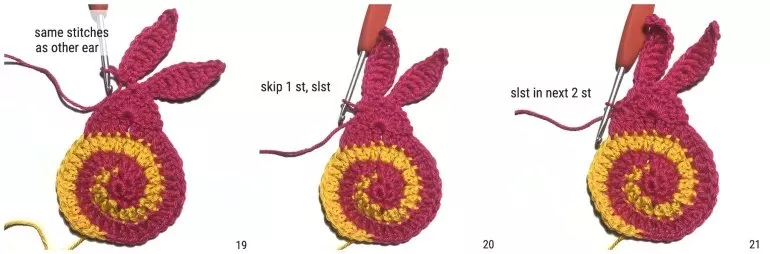
Creating the Swirly Easter Bunny Crochet – Free Pattern involves several steps, each designed to bring the bunny to life:
Start with the Head: Begin by crocheting a round shape for the bunny’s head. Use a magic circle to create a seamless start.
Make the Body: Crochet a larger oval shape for the body, ensuring it complements the size of the head.
Add Swirly Details: Incorporate swirly patterns by using contrasting yarn to create surface crochet or appliqué effects.
Create the Ears: Crochet two elongated ovals for the ears, and attach them securely to the top of the head.
Assemble the Parts: Sew the head, body, and ears together. Add the swirly details to enhance the bunny’s unique look.
Finish with a Tail: Add a small pom-pom or crochet a tiny ball to serve as the bunny’s tail.
3. Tips for Perfecting Your Swirly Easter Bunny
To ensure your Swirly Easter Bunny Crochet – Free Pattern turns out beautifully, keep these tips in mind:
Choose High-Quality Yarn: The texture and softness of your yarn will significantly affect the finished product’s appearance and feel.
Practice Surface Crochet: If you’re new to adding swirly details, practice on a scrap piece of fabric before working on your bunny.
Maintain Consistent Tension: Even stitches create a polished look and prevent any parts from appearing lopsided.
Customize the Colors: Don’t be afraid to experiment with bold or unconventional color combinations for a unique bunny.
Use Safety Eyes: If gifting to children, opt for safety eyes or embroider the eyes to ensure the bunny is safe for all ages.
Take Your Time: Rushing can lead to mistakes. Enjoy the process and focus on each step to create a bunny you’ll be proud of.
4. Creative Uses for the Swirly Easter Bunny
The finished Swirly Easter Bunny Crochet – Free Pattern can be used in various ways to celebrate the Easter season:
Easter Decorations: Display the bunny as part of your festive décor, adding charm to your home.
Gift for Children: These bunnies make perfect Easter basket additions or standalone gifts for kids.
Table Centerpiece: Arrange several bunnies in a basket for a unique and eye-catching centerpiece.
Keychains or Bag Charms: Create smaller versions of the bunny and attach them to keychains or bags.
Charity Projects: Donate handmade bunnies to hospitals or charities to spread Easter joy.
Teaching Aid: Use the bunny to introduce children to crochet or as a prop in storytelling activities.
FAQ About Swirly Easter Bunny Crochet
Q: Is this pattern suitable for beginners?
A: Yes! The instructions are simple and include basic stitches, making it beginner-friendly.
Q: Can I use different yarn weights?
A: Absolutely! Just remember that thicker yarn will create a larger bunny, while thinner yarn results in a smaller one.
Q: How long does it take to complete one bunny?
A: On average, it takes 2-4 hours, depending on your skill level and the size of the bunny.
Q: Can I sell bunnies made from this pattern?
A: Many free patterns allow for finished items to be sold, but check the pattern’s specific terms before selling.
Q: How do I make the swirly details stand out?
A: Use contrasting yarn colors or metallic threads for the swirls to make them pop against the bunny’s body.
Q: Is this project suitable for children?
A: Yes, but ensure small parts like safety eyes or embellishments are securely attached or replaced with embroidery for safety.
Join our VIP broadcast list and gain access to exclusive patterns, all for free. As a VIP member, you’ll receive the best patterns daily, delivered directly to your device. ✨📱 It’s a unique opportunity to stay up-to-date with the latest trends and designs, curated just for you. Don’t miss out on enhancing your projects and discovering new inspirations with the best patterns every day! 🎨🔝
The Swirly Easter Bunny Crochet – Free Pattern is a charming and enjoyable project that brings the spirit of Easter to life. By following this guide, you’ll create a beautiful and unique bunny that can be used in countless ways to celebrate the season.
PATTERN HERE
We hope this tutorial has inspired you to give it a try and experiment with your creativity. Share your finished projects and suggestions in the comments below—we’d love to hear from you! Happy crocheting!