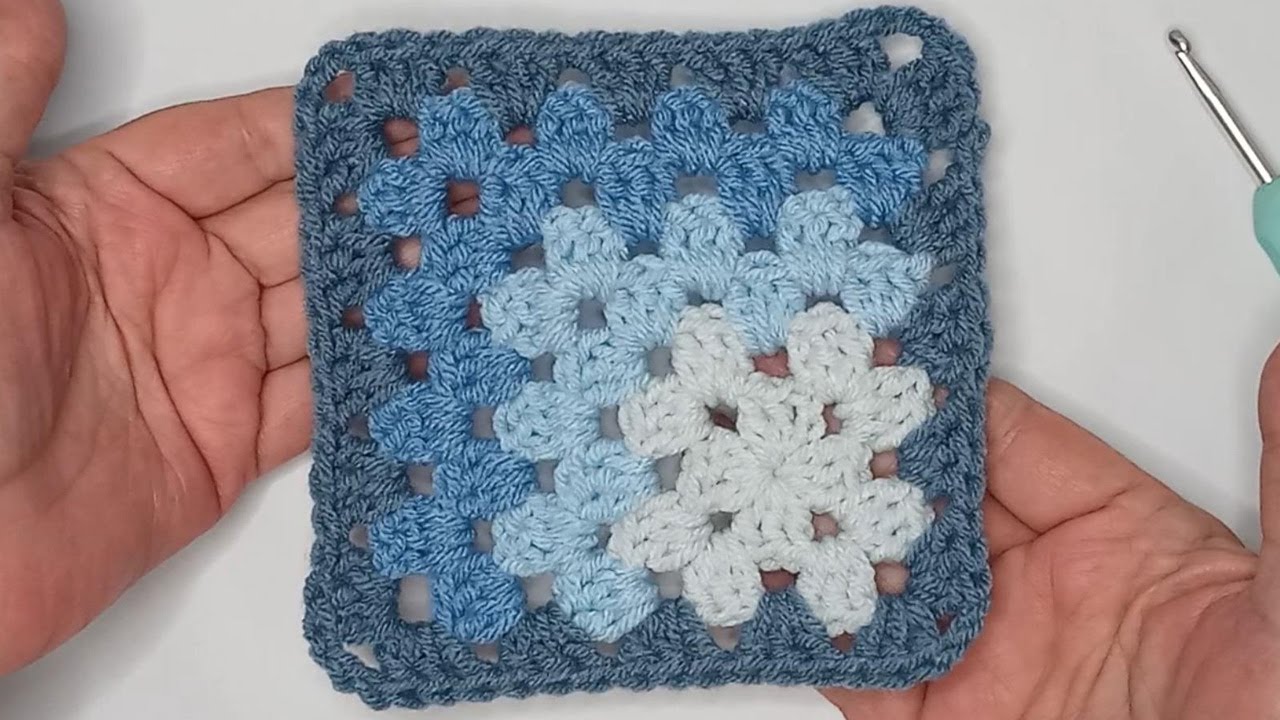
The Mitered Corner Granny Square – Pattern is a delightful and creative variation of the traditional granny square, perfect for crafters who want to add a modern twist to a beloved classic. This pattern features neat corners and a diagonal structure that sets it apart from standard designs.
Whether you are a beginner or an experienced crocheter, this unique square can elevate your projects, making them stand out with a fresh geometric look. The beauty of the Mitered Corner Granny Square – Pattern lies in its versatility, allowing you to use it in everything from baby blankets to cushion covers.
One of the reasons the Mitered Corner Granny Square – Pattern is gaining popularity is because of how it blends traditional techniques with a contemporary aesthetic. The diagonally-built structure creates a sense of movement, drawing the eye naturally to the center and outward toward the corners. It’s not only enjoyable to make but also visually satisfying when pieced together in larger projects.
As you work through this pattern, you’ll appreciate how each row contributes to a balanced and symmetrical look, even with minimal color changes.
Using the Mitered Corner Granny Square – Pattern, you can create fabric with both texture and visual appeal. The angled corners make this pattern ideal for projects that benefit from clean lines and clear edges.
Crafters often enjoy combining vibrant yarns to highlight the diagonals and create contrast. If you’re looking to build a blanket with an eye-catching design or make a series of squares to turn into a scarf or wrap, this pattern offers endless possibilities for customization.
To begin using the Mitered Corner Granny Square – Pattern, you’ll want to gather a few basic materials. Standard medium-weight yarn works beautifully, though you can also experiment with cotton or acrylic blends depending on your final project. A 4.0mm or 4.5mm crochet hook is typically recommended, but always refer to your yarn label for best results. Choose colors that inspire you—this square looks particularly striking in bold combinations or gradient tones.
Start by creating a magic ring or chaining four and slip-stitching to form a ring. This foundational circle is where your work begins. The first row usually consists of a set of three double crochets, followed by chain spaces to form the initial corners. As you progress, each round will build on the corners, increasing the square while maintaining the mitered alignment.
What sets this pattern apart is the way it increases. Rather than expanding uniformly on all sides, the Mitered Corner Granny Square – Pattern develops diagonally, which means you’ll be working strategically at the corners. Paying attention to stitch placement is key to maintaining the mitered look.
As with any granny square variation, tension control is important. Keeping your stitches even ensures a uniform shape and prevents the piece from warping. If you find your edges curving or bowing, adjusting your hook size slightly can help.
Marking the center chain spaces with stitch markers can also be helpful, especially for beginners. These markers guide you to make increases in the right places and keep your corners sharp. This tip becomes especially useful when working on larger squares where it’s easy to lose track.
Lastly, remember to weave in your ends carefully. With diagonal stitching, loose tails can shift over time and become visible. Use a yarn needle and secure your ends firmly by weaving in different directions.
The Mitered Corner Granny Square – Pattern isn’t just fun to make—it’s incredibly functional. One of the most popular uses for this pattern is in baby blankets. The clean diagonal lines and bold geometric shapes make for a beautiful and unique nursery accessory that is both soft and durable.
You can also use these squares for larger throw blankets or afghans. Combining multiple squares in alternating colors creates a quilt-like effect that is visually dynamic and cozy. The symmetry of each square adds a sense of order even with varied color palettes.
For home décor, consider turning your Mitered Corner Granny Square – Pattern creations into pillow covers. Sew two squares together with a cushion insert inside and add a decorative border for a polished finish. They add a handmade charm to couches, armchairs, or even outdoor furniture.
Fashion projects are also a great way to use this pattern. Try stitching several squares into a scarf or even a poncho. The clean lines and color-blocked potential of the mitered corners give your piece a high-end, designer look with a personal handmade touch.
Bags and totes made from these granny squares are sturdy and stylish. Join the squares together and line your finished bag for added strength. The angular corners naturally provide structure, making this pattern ideal for accessories.
Even smaller items like coasters or pot holders benefit from this square’s structure. Choose heat-resistant yarn and finish with a tight border to keep everything neat and functional. These items make lovely handmade gifts that showcase your skills beautifully.
Color plays a huge role in how your Mitered Corner Granny Square – Pattern turns out. Because of the angular construction, each color choice enhances the illusion of depth and movement. Experimenting with bold or gradient color schemes allows you to highlight the mitered design and make your project pop.
For a modern look, try using monochromatic tones in a gradient—from light in the center to dark at the edges. This creates a sophisticated ombré effect that looks elegant in larger projects like throws or shawls.
If you prefer a playful or retro feel, go with contrasting or even neon colors. The graphic nature of the Mitered Corner Granny Square – Pattern pairs well with lively color combinations and can brighten up any space.
Using scrap yarn is another great way to customize your square. This eco-friendly approach allows you to mix and match remnants from previous projects while still producing a cohesive and beautiful result. Be sure to keep yarn thickness consistent for a balanced finish.
You can also vary the size of your squares. While the standard size may be around six inches, adjusting the number of rounds lets you scale up or down depending on your project. Smaller squares are ideal for intricate layouts, while larger ones work well for statement pieces.
To further personalize your square, consider adding a decorative border. Shells, picots, or even fringe can frame your work and add an extra touch of style. This small detail often makes your piece look more finished and professional.
Once you’ve made several squares using the Mitered Corner Granny Square – Pattern, it’s time to think about joining and finishing. The most seamless method is the invisible whip stitch, especially when done with the same color as the square’s edge. This technique hides the seams and keeps the diagonal pattern flowing.
Another option is the join-as-you-go method, where you connect squares during the final round. This approach is faster and ensures consistency across your project. It also reduces the number of ends to weave in later.
Blocking your squares before assembly helps maintain uniformity. Use a spray bottle with water or a steam iron and shape each square on a blocking board. Let them dry completely to set the shape. This step is especially useful when working with natural fibers like cotton or wool.
When arranging your squares, lay them out on a flat surface to decide the best visual order. Alternating light and dark squares, or rotating them for pattern variation, can create intriguing mosaic effects.
Add a final border around your assembled piece to unify the squares and frame your project. Choose a neutral or complementary color and work one or two rows around the entire edge. This also helps stabilize the structure.
Always take time to inspect your work. Fix any loose threads or uneven edges before gifting or using your finished item. Taking pride in these small details ensures that your Mitered Corner Granny Square – Pattern projects stand the test of time.
What is a Mitered Corner Granny Square? It is a variation of the traditional granny square that features diagonal growth, creating a sharp cornered, geometric look. It differs from standard squares in that the pattern builds out from the center on the diagonal.
Is the Mitered Corner Granny Square suitable for beginners? Yes, although it may require close attention to corner placement and counting stitches. Beginners who are familiar with basic crochet stitches like chains and double crochets can follow this pattern successfully.
Can I use any yarn type for this pattern? Absolutely. Medium-weight yarn is common, but cotton, acrylic, or even blends work well depending on the project. Just ensure that your yarn type and hook size are compatible.
How do I keep the shape from warping? Maintaining consistent tension, using stitch markers for corners, and blocking your finished squares will help preserve the square shape.
What projects can I make with this pattern? This pattern is ideal for blankets, pillow covers, scarves, bags, and even small items like coasters or potholders. Its versatility makes it perfect for many types of handmade gifts or home décor.
How do I join multiple squares together? You can use whip stitch, slip stitch, or the join-as-you-go method depending on your preference. Blocking the squares first will help align them evenly.
The Mitered Corner Granny Square – Pattern is a refreshing and modern take on a classic design. With its clean lines, diagonal construction, and endless customization options, it’s a pattern that suits a wide range of projects. Whether you’re making a baby blanket, a stylish scarf, or decorative home accessories, this square brings a unique flair to your crochet repertoire.
By following the tips shared in this article—from color planning to finishing techniques—you’ll be well-equipped to make the most of this beautiful pattern. Let your creativity shine through and have fun exploring all the ways you can use the Mitered Corner Granny Square – Pattern.
We’d love to hear your thoughts! Leave a comment with your experience, suggestions, or photos of your own granny square creations.