
Macrame Heart Bracelet - Free Tutorial

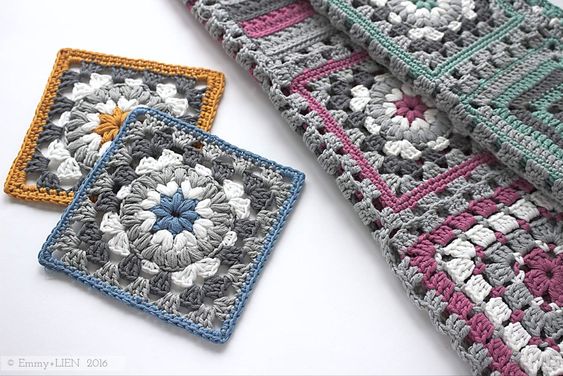
The Triple Puff Granny Square – Free Pattern is a fun and textured crochet design that adds a unique touch to any project. This pattern is great for crocheters of all skill levels, from beginners to more advanced crafters.
The triple puff stitch creates a beautiful, raised texture that stands out in any crochet work. Whether you’re using it to make blankets, cushions, or even bags, this pattern can be adapted for various crochet projects.
The Triple Puff Granny Square is a versatile and eye-catching design, and it’s perfect for adding dimension and flair to your crochet creations.
The puff stitch is one of the most popular techniques in crochet because it creates a raised, 3D effect that adds visual interest to your project. By following this free pattern, you will be able to master the technique of the triple puff stitch and create your own unique granny squares.
In this tutorial, we’ll guide you step by step through the process of making a Triple Puff Granny Square. You’ll learn the materials needed, the basic steps of creating the square, and how to join your squares together to form a larger project. So, grab your crochet hook and yarn, and let’s get started with this fun and creative pattern!
Before starting the Triple Puff Granny Square, it’s essential to gather all the necessary materials. Having everything prepared beforehand will make your crochet experience more enjoyable and efficient. Here’s what you’ll need:
Yarn: Choose a medium-weight yarn (such as worsted weight) for this project. You can pick any color you prefer, but using different colors for each round of the granny square will add vibrancy to your design. Some popular yarn brands to consider include Red Heart, Lion Brand, or Bernat.
Crochet Hook: You’ll need a crochet hook that suits the yarn you’re using. For medium-weight yarn, a 5mm (H-8) hook is typically recommended. However, feel free to adjust the hook size depending on your tension or the look you want to achieve.
Scissors: Keep a pair of scissors handy for cutting your yarn when finishing each round or when changing colors.
Yarn Needle: A yarn needle is essential for weaving in the ends after completing your granny square. This will help keep your work neat and tidy.
Stitch Markers: If you are new to crochet, stitch markers can be helpful in keeping track of your rounds and ensuring that your stitches are evenly spaced.
With these materials ready, you’re all set to begin your Triple Puff Granny Square!
The Triple Puff Granny Square is built around the triple puff stitch, which is the key element of this pattern. Let’s break down how to create this stitch step by step:
1. Yarn Over Three Times: Begin by yarn over three times, which will give you the puff effect. You’ll have four loops on your hook.
2. Insert Hook Into the Stitch: Insert your hook into the stitch where you want to create the puff. For a granny square, this will usually be a chain or a stitch from the previous round.
3. Pull Through the Stitch: Yarn over again and pull through the stitch. You should now have five loops on your hook.
4. Yarn Over and Pull Through Two Loops: Yarn over and pull through the first two loops on the hook. Repeat this step until you have only two loops remaining on your hook.
5. Yarn Over and Pull Through Two Loops: Finally, yarn over and pull through the last two loops on your hook. You’ve now completed your triple puff stitch!
6. Repeat the Process: To create a triple puff stitch, repeat the process until you have a puff with three yarn over loops. This technique will add texture and dimension to your Triple Puff Granny Square.
Now that you know how to create the triple puff stitch, you can begin incorporating it into your granny square!
Once you’re familiar with the triple puff stitch, it’s time to begin creating your Triple Puff Granny Square. Follow these steps to make the square:
1. Start with a Foundation Ring: Begin by making a magic ring (also called a magic circle). This will be the center of your granny square. If you prefer, you can also chain 4 and join the last chain to form a ring.
2. Round 1: Start with Chain 3: To begin the first round, chain 3. This counts as your first double crochet stitch. Then, work 2 more double crochet stitches into the center ring. Repeat this process until you have a total of 12 double crochets in the ring. Join the round with a slip stitch to the top of the beginning chain-3.
3. Round 2: Start the Puff Stitches: For the second round, chain 3 again (this counts as your first double crochet), then work 2 double crochet stitches into the same stitch. Next, work a triple puff stitch into the next space, as described in the previous section. Continue working 2 double crochets into the next stitch and a triple puff stitch into the next space until you have completed the round.
4. Round 3: Continue the Pattern: In the third round, continue alternating between 2 double crochet stitches and a triple puff stitch in the spaces between the puff stitches from the previous round. This will create the signature zig-zag pattern of the Triple Puff Granny Square. Remember to join each round with a slip stitch to the top of the first chain-3.
5. Round 4 and Beyond: Continue this pattern for additional rounds, adding a new color in each round if desired. Each round will continue to expand the square, and you’ll continue to alternate between double crochet stitches and triple puff stitches.
6. Finish Off the Square: When your square reaches the desired size, finish off the yarn and weave in any loose ends with a yarn needle. Your Triple Puff Granny Square is now complete!
If you’re planning to make a larger project, such as a blanket or cushion cover, you’ll need to join multiple Triple Puff Granny Squares together. Here’s how to join your squares:
1. Lay Out Your Squares: Arrange your completed granny squares in the desired layout. You can arrange them in rows and columns or in a diagonal pattern—whatever suits your design.
2. Use a Whip Stitch to Join the Squares: To join the squares, use a whip stitch to sew the edges of the squares together. Insert your needle into the top loops of the squares, making sure that the stitches are aligned evenly.
3. Join Square by Square: Continue sewing the squares together, making sure the edges are even and the triple puff stitches line up to create a continuous design. You can use the same color of yarn as the squares or a contrasting color for added interest.
4. Joining in Rows: If you are joining squares in rows, it’s best to join all the squares in one row first, then attach each row to the next. This method makes it easier to keep everything aligned and ensures that your final piece looks seamless.
5. Finish Off and Weave in Ends: Once your squares are joined, finish off the yarn and weave in any loose ends. This will give your project a polished and professional look.
6. Add a Border: For an extra touch, you can add a border around the entire quilt or blanket. This can be done with single crochet stitches or even a scalloped edge for a delicate finish.
Q1: What type of yarn is best for the Triple Puff Granny Square?
A: For best results, use medium-weight yarn, such as worsted weight (4), which gives the puff stitches a nice, defined look.
Q2: How many rounds should I make for the Triple Puff Granny Square?
A: The number of rounds depends on the desired size of your square. Typically, 3-4 rounds are enough, but you can add more if you need a larger square.
Q3: Can I use different colors for each round?
A: Absolutely! Using different colors for each round can add more visual interest and create a beautiful, vibrant design.
Q4: How do I join multiple Triple Puff Granny Squares?
A: You can join the squares using a whip stitch, slip stitch, or join-as-you-go method. Whip stitching is the most common technique for joining granny squares.
Q5: Can I use this pattern for projects other than blankets?
A: Yes! The Triple Puff Granny Square can be used for a wide range of projects, including bags, pillow covers, and table runners.
Q6: How do I make sure my puff stitches are even?
A: Make sure to yarn over three times for each puff stitch, and keep your tension consistent to achieve even puff stitches throughout the project.
Join our VIP broadcast list and gain access to exclusive patterns, all for free. As a VIP member, you’ll receive the best patterns daily, delivered directly to your device. ✨📱 It’s a unique opportunity to stay up-to-date with the latest trends and designs, curated just for you. Don’t miss out on enhancing your projects and discovering new inspirations with the best patterns every day! 🎨🔝
The Triple Puff Granny Square – Free Pattern is a delightful and textured crochet design that will enhance any project. By following this step-by-step guide, you can create beautiful squares that add dimension and interest to blankets, cushions, and more. Remember to experiment with colors and yarn types to make your design unique.
We hope this tutorial has inspired you to try out the Triple Puff Granny Square and incorporate it into your crochet creations. Don’t forget to share your thoughts and projects in the comments below—we’d love to hear your feedback and see what you’ve made! Happy crocheting!


